|
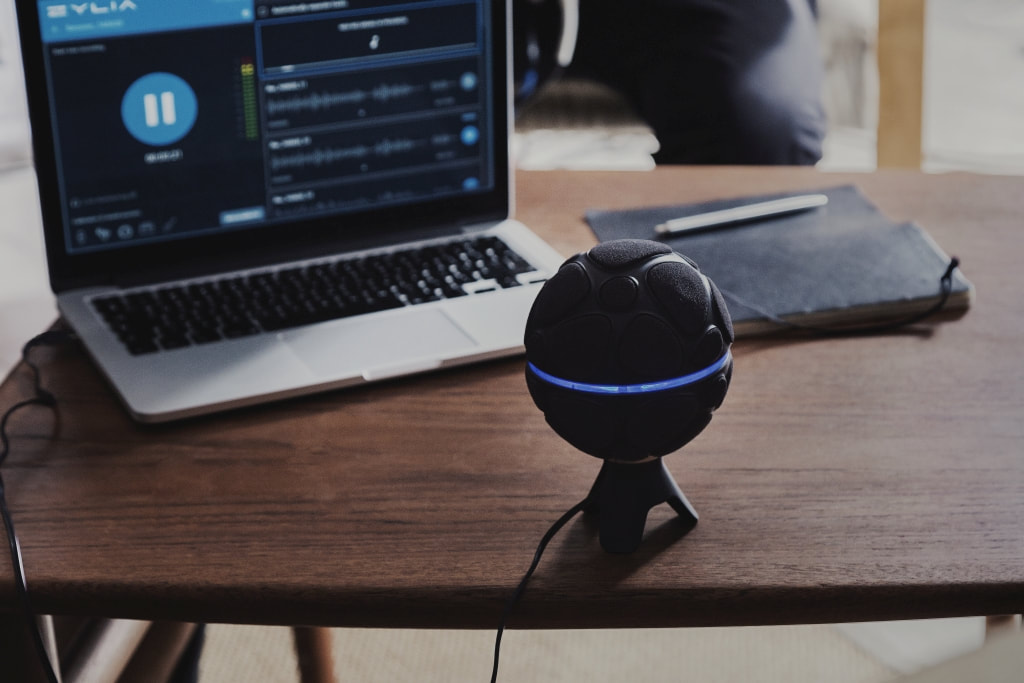
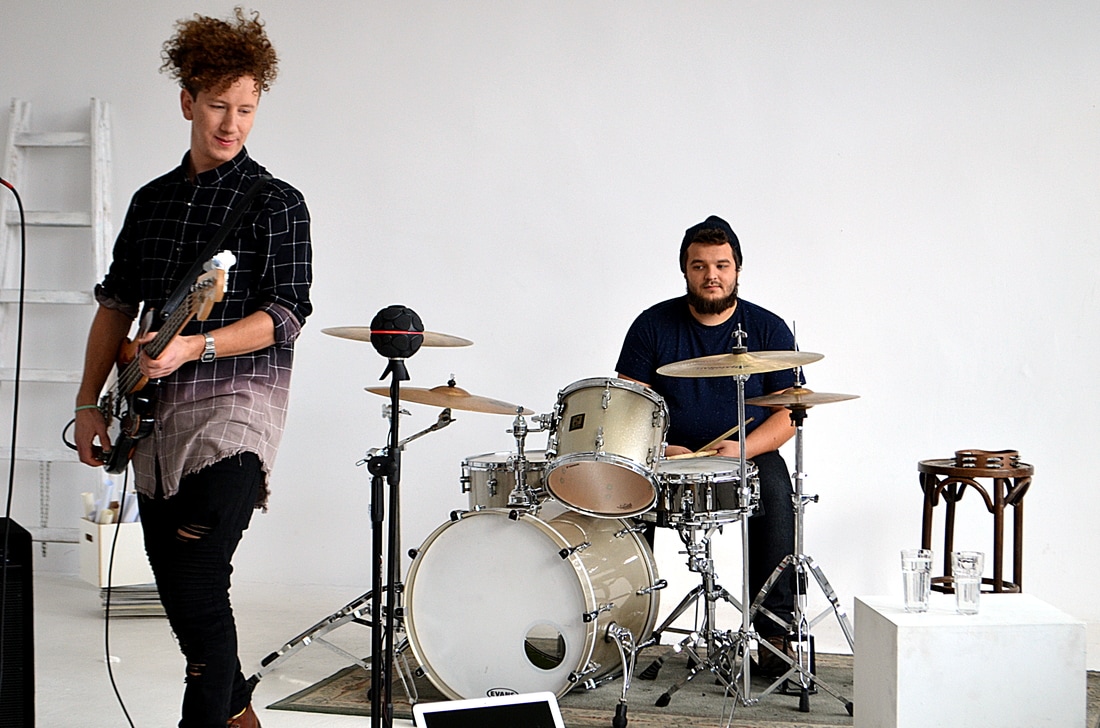
In these crazy times, we musicians face many new challenges. We spend more time creating at home – we play in here, write new songs, record and mix. It is, however, a good time to learn new audio techniques and polish the old ones. There is a tool that will allow you to take your first easy steps in sound post-processing, so you could bring yourself closer to the world of professional musicians. 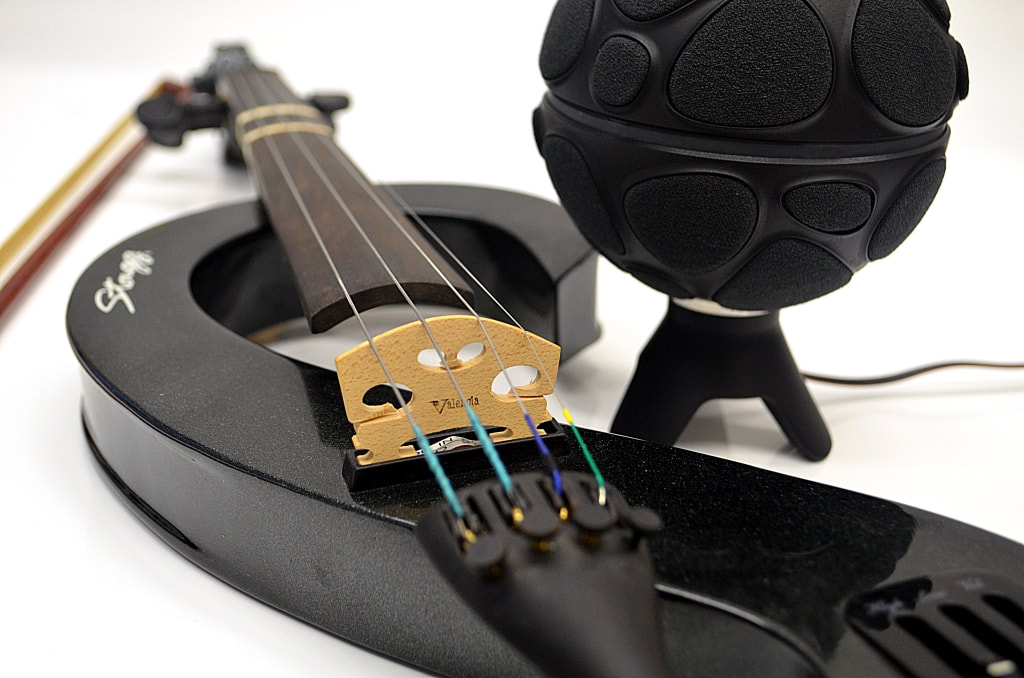 Record and mix with ZYLIA Music! ZYLIA Music set consists of one spherical microphone array (with 19 microphones hidden inside!) and easy in use ZYLIA Studio software. That’s it! This is all you need to make your home recordings in studio quality.
How does it work?
Everything is simple and intuitive. The software will guide you step by step through the recording process. You don't need to be familiar with all the cables, as well as, with recording interfaces and techniques. You don't need to know how to properly position the microphones to record the sound correctly. This recording studio will do everything for you. You just have to play well ;-) ZYLIA Studio workflow. Want more? If you want to set free in full your music creativity and explore the sound design topic, we have a PRO plugin for you. This will take you to the next level of sound post-processing. You will be able to experiment with Ambisonics sound and mix the 360-degree scene using virtual microphone technology. You also have a wide range of spatial presets at your disposal. Invaluable, especially nowadays, is the possibility to stream 3D audio in binaural format, so the one which mirrors the way our ears hear. Don't waste your time scrolling through boring videos on the Internet. Get started making beautiful music! Good luck! 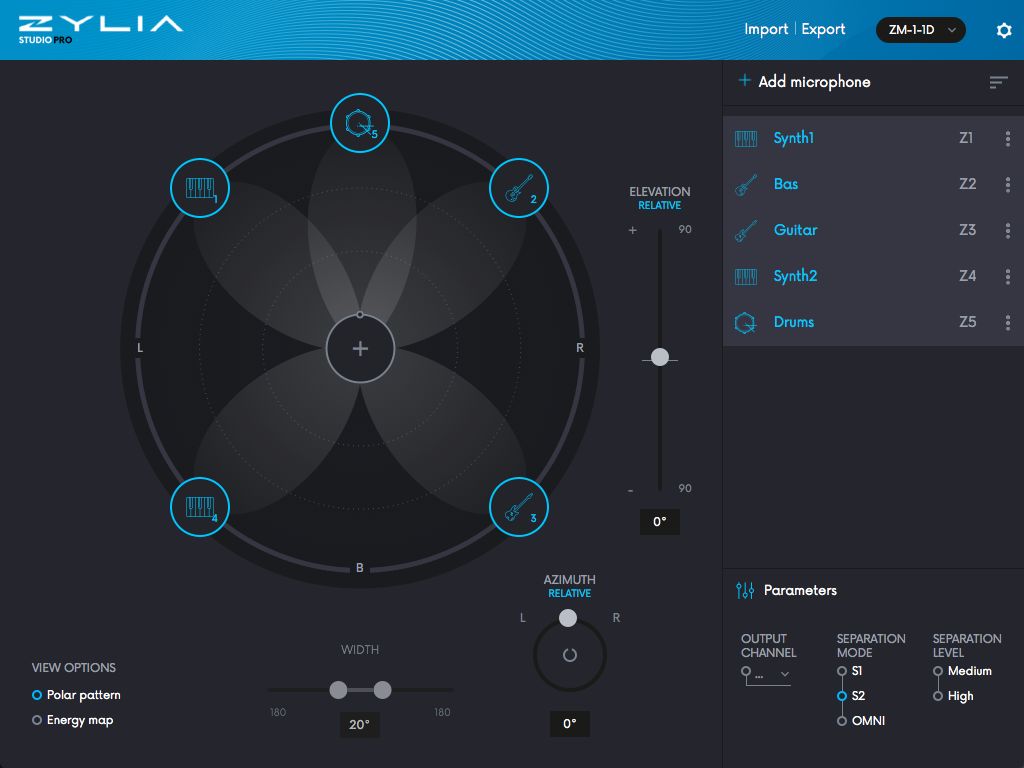
0 Comments
by Eduardo Patricio
Let’s talk about recording music!
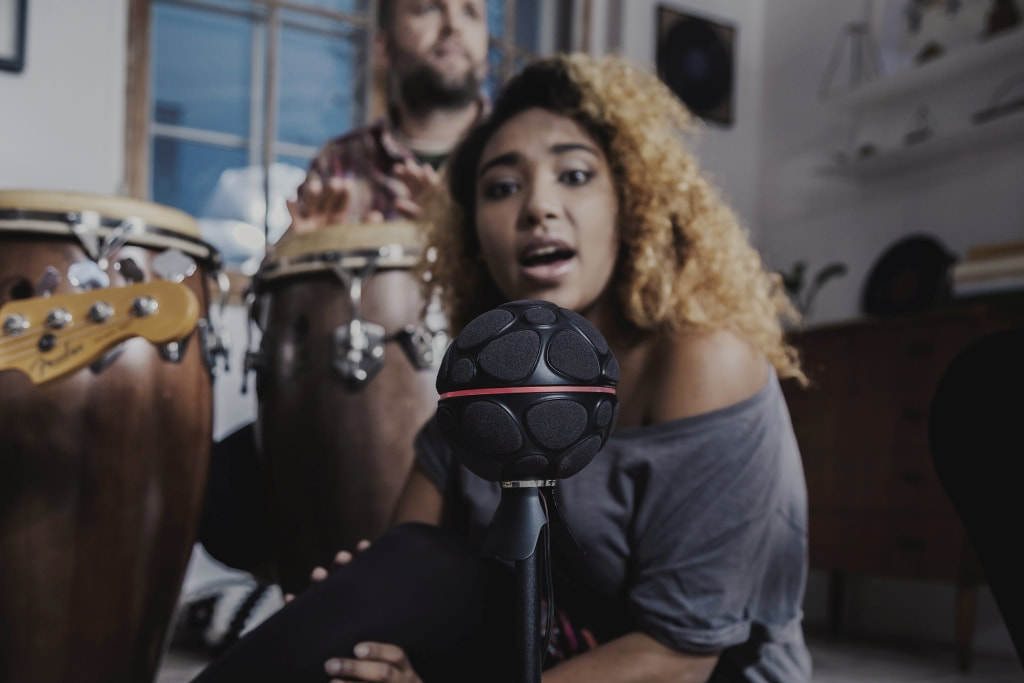
This tutorial will address key points to help you improve your sound and get to a great demo with your ZYLIA MUSIC set. All you need is the ZM-1 mic, ZYLIA Studio application and your music.
Before going any further, the general tips / rules apply:
Ok, have said that, as usual, let’s break it down into steps: 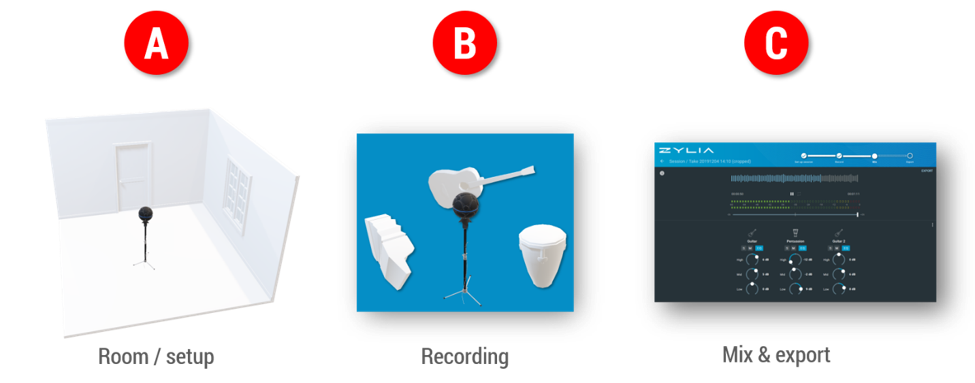
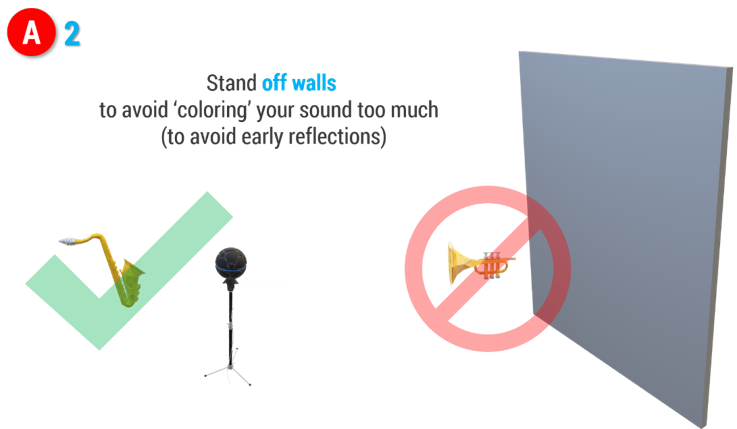
A - Rehearsal room / Setup
You can record in rooms with great or not-so-great acoustics.
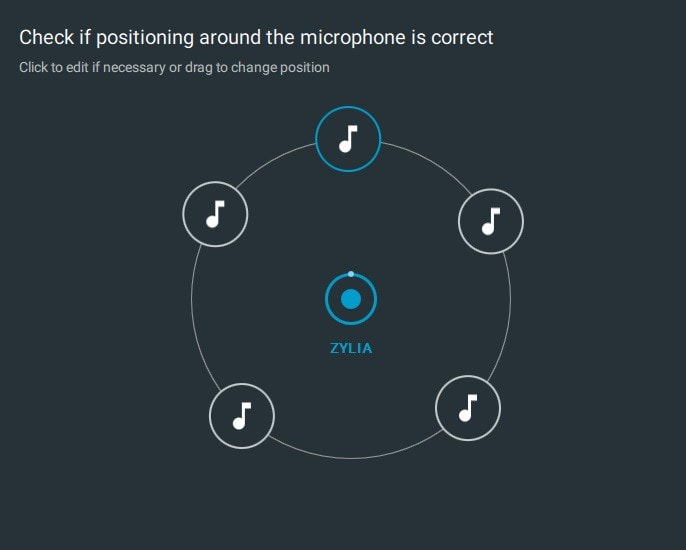
Key things are: A1 - Place the ZM-1 mic in a central position in the room; A2 - Avoid standing near walls. This will help specially if your room doesn’t have great acoustics. 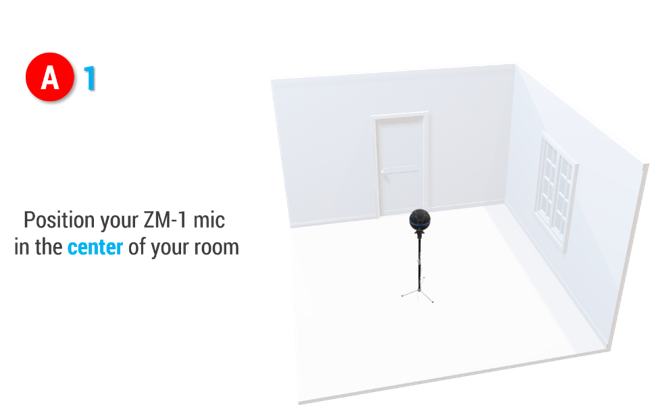
B - Recording

C – Mix and export
Once you have your recording you can adjust the volume of each instrument to get a better balance. You can also apply equalization to enhance desired or hide unwanted characteristics of each instrument.
EQ example
If you record 2 guitars, say, with different functions (one focused on doing chords and the other more high-pitched patterns or solos), you can enhance the low end of the 1st and the high end of the 2nd one.
When you’re done with your mix, just export your demo and that’s it! 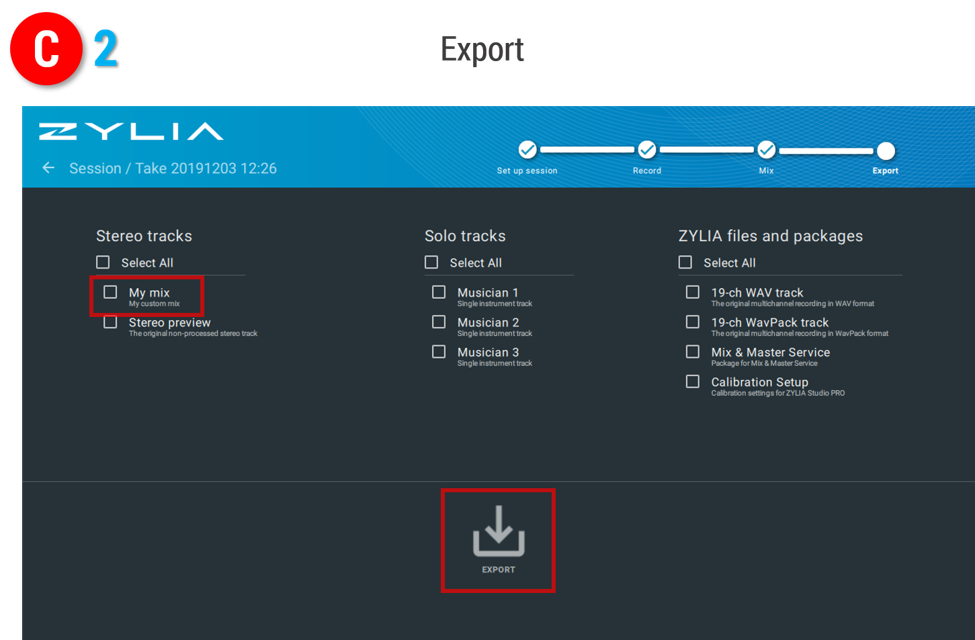
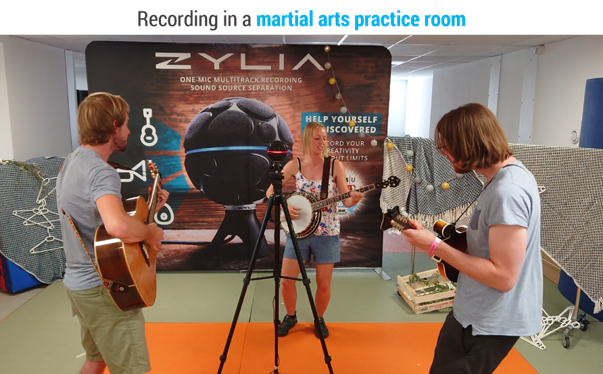
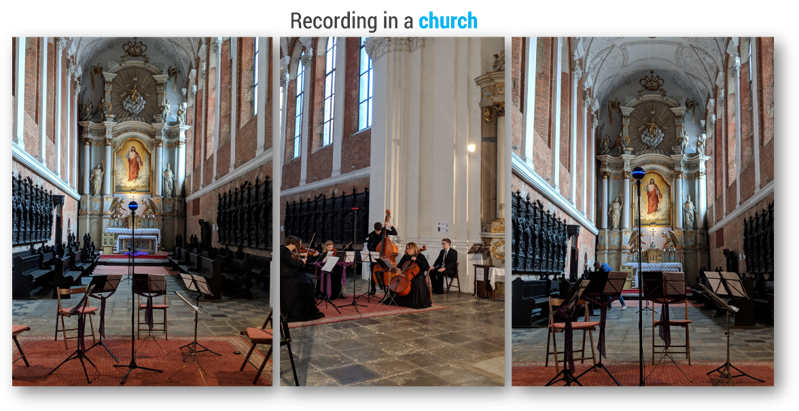
To illustrate, here are 2 ZM-1 examples of ZM-1 recordings in completely different spaces, a martial arts practice room and in a church. Have a listen!
Recording done in a room with, err…, not-so-great acoustics
Recording done in a room with beautiful and style-matching acoustics
If you’d like to go further with mixing, you can either:
Here are some related useful resources for you:
Tutorial: Recording an acoustic guitar with the ZM-1 mic Tutorial: How to record classical music To support our customers and their workflow we have prepared several presets of ZYLIA Studio PRO for Dolby Atmos. Simply download the zip package, extract files and import the appropriate surround preset into your Reaper session.  What is Dolby Atmos?Wikipedia - "Dolby Atmos is a surround sound technology developed by Dolby Laboratories. It expands on existing surround sound systems by adding height channels, allowing sounds to be interpreted as three-dimensional objects."
Read more at Wikipedia>
Let’s have a look at an easy way to get a music track done, from recording to mastering. It’s quick tutorial time!
Alright, the main steps to take are: (A) recording, (B) mixing and (C) mastering.
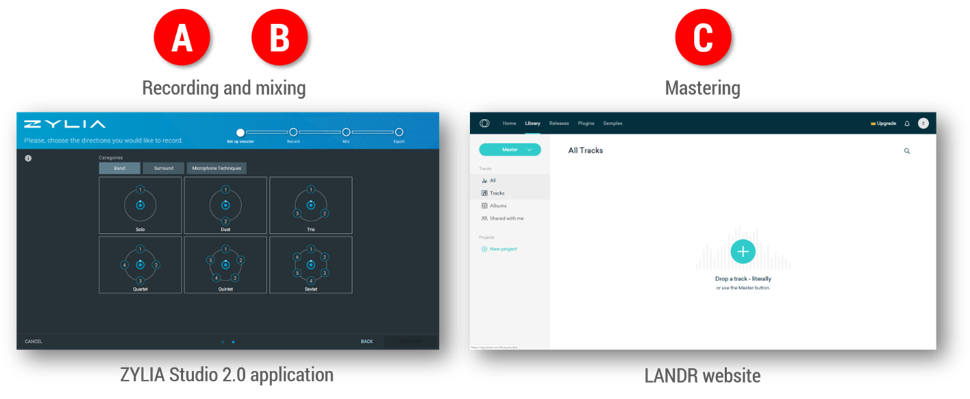
Let’s breakdown main steps A and B in ZYLIA Studio (5 sub-steps):
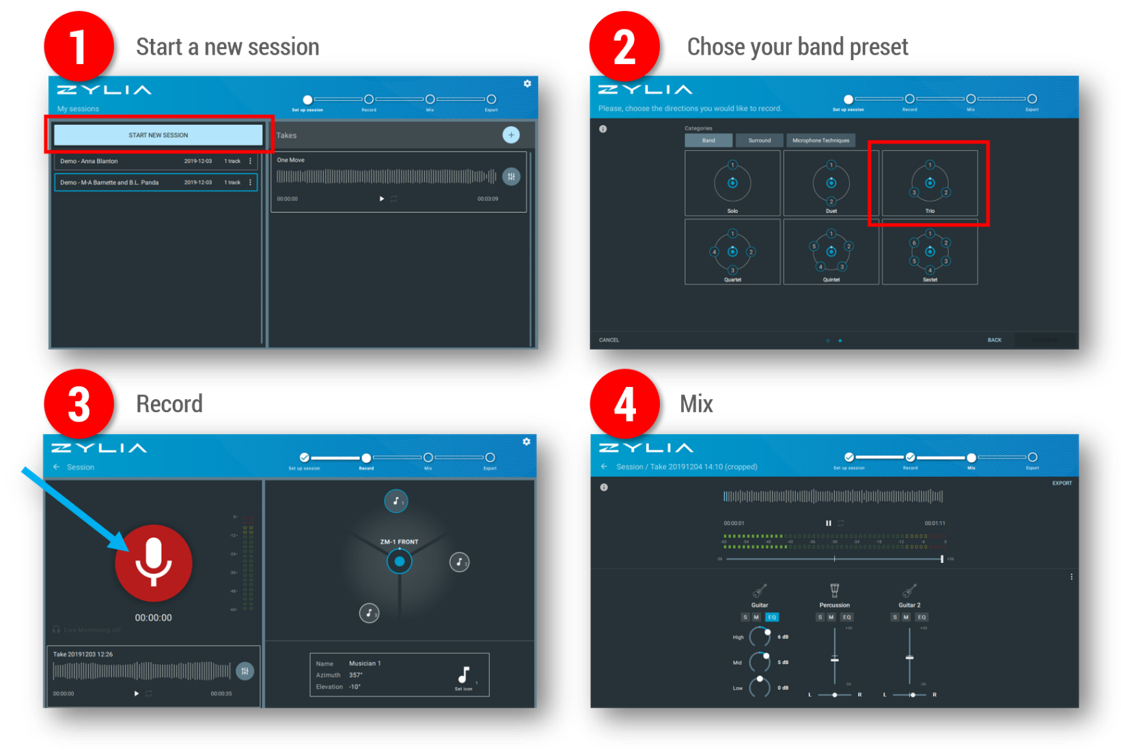
Note
In step 4 (Mix), for each instrument, you can define:
Once you’re happy with you mix, it’s time to export the resulting stereo file: 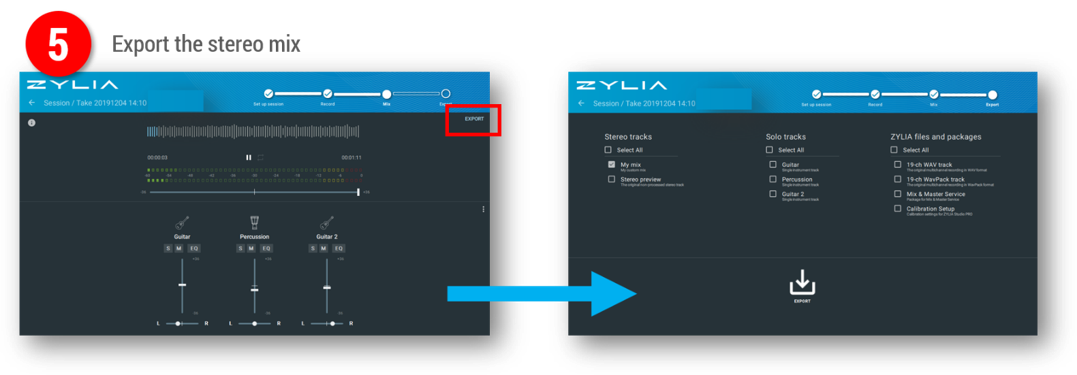
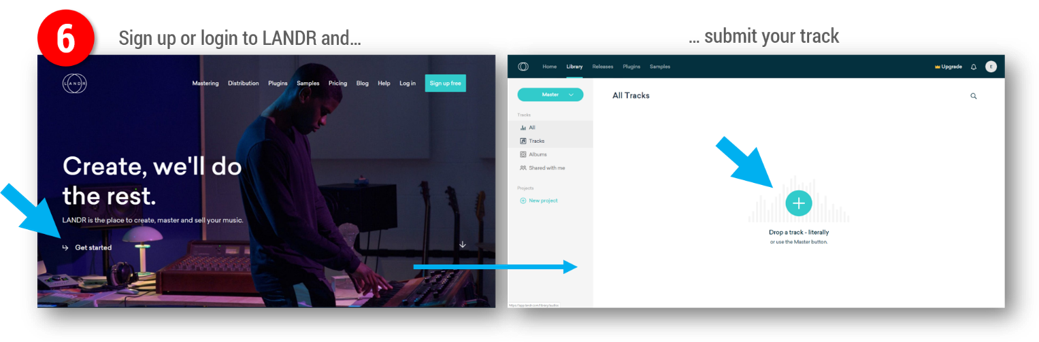
The 6th sub-step (the last one!) is submitting your track to be mastered by the folks at LANDR.com
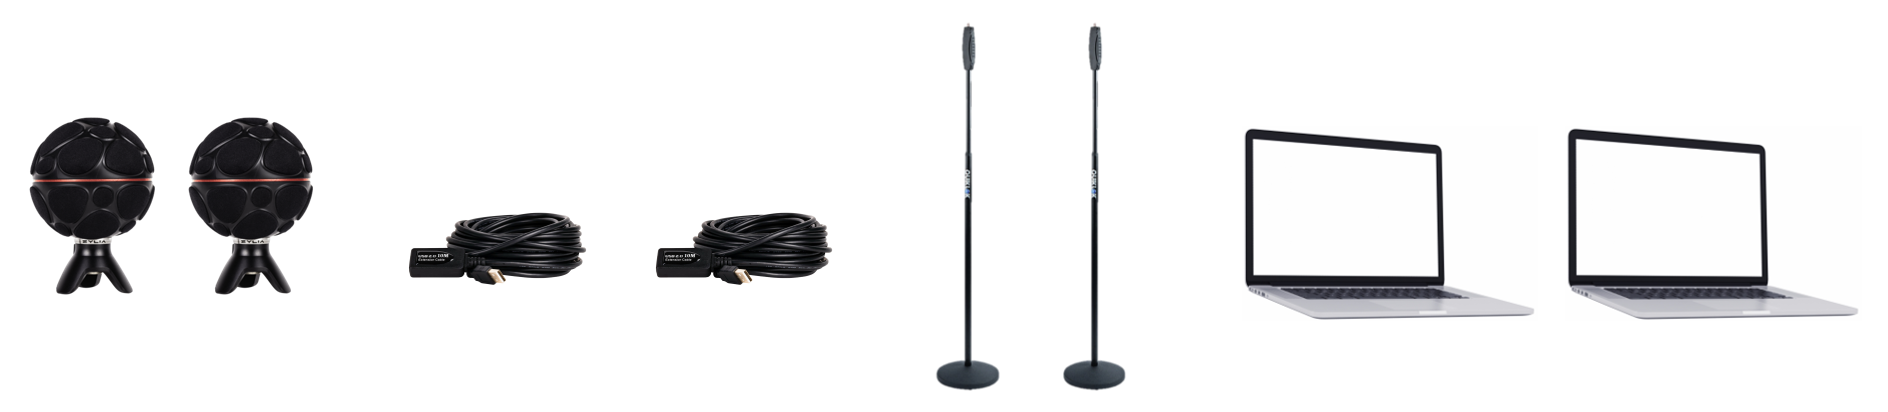
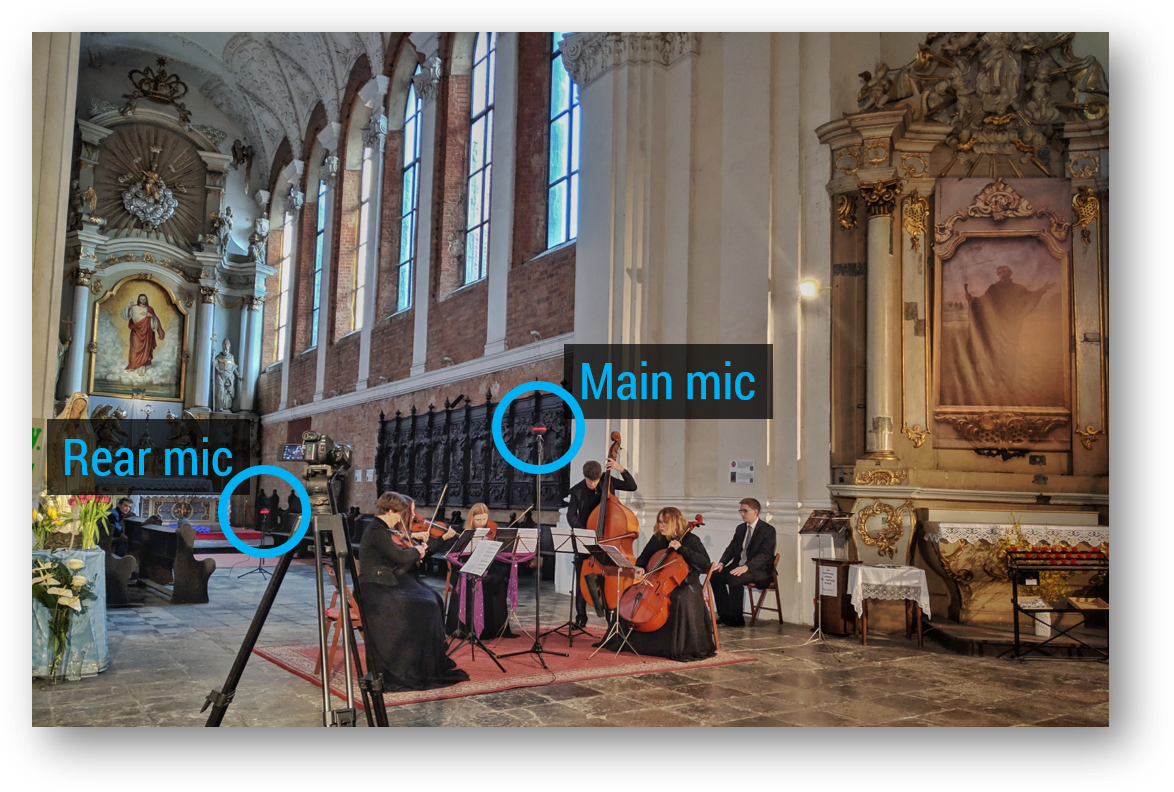
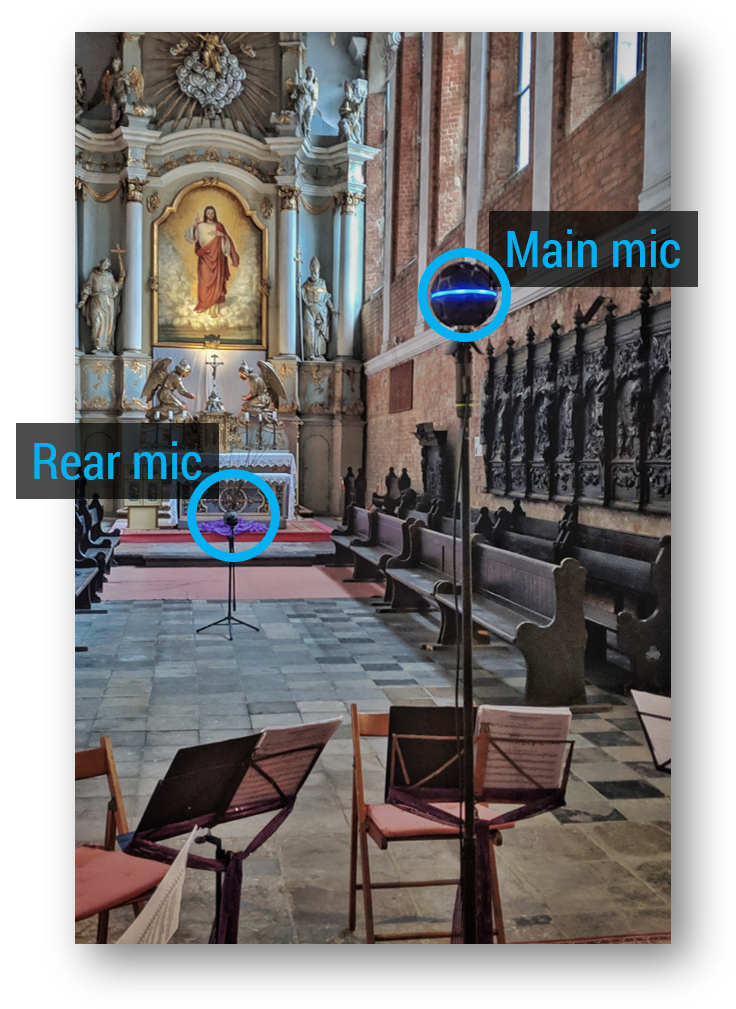
by Eduardo Patricio Earlier this year (2019), during Easter, we recorded a string quintet concert* with 2 ZM-1 microphones. One in front of the ensemble and 1 behind it. Very simple and portable setup with powerful postproduction possibilities!
Here’s a quick example of the multi-track possibilities we have from the recordings: Equipment used
 How we did it Using ZM-1 microphones basically allows you to have multi-track recordings from single mics. Here’s what we did for this project in 5 steps. 1. We recorded the 19 channels from each ZM-1 directly onto DAW tracks on each laptop. The result was 2 uncompressed, 24-bit, 48KHz wave files. 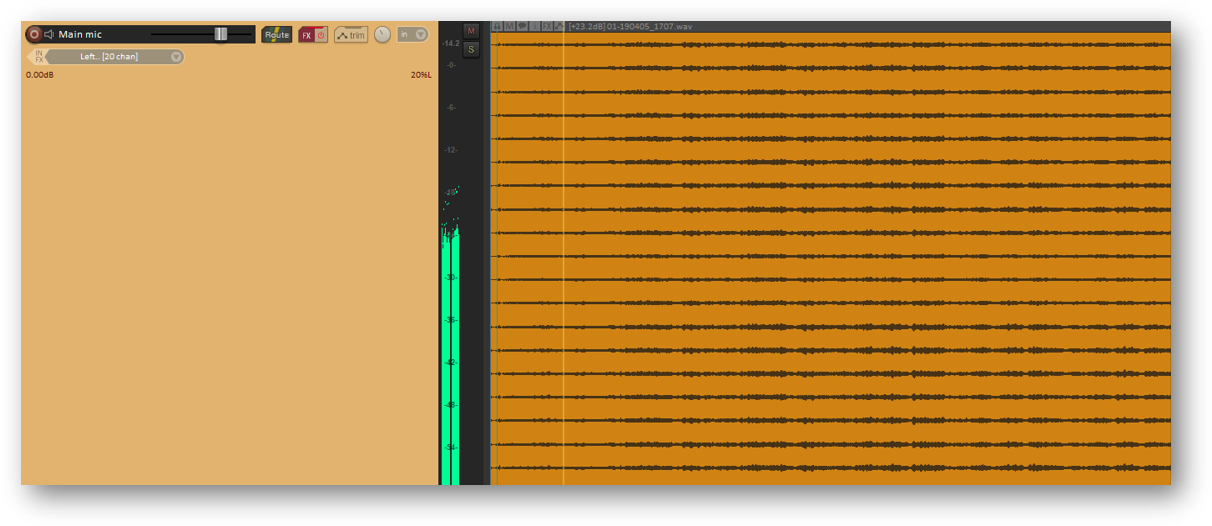 Resulting multi-channel audio file being played back in Reaper. 2. After the recording, we loaded both multi-channel files onto a single DAW session, onto separate tracks. We synchronized the files manually using a clear transient sound (the classic "clap to sync"). 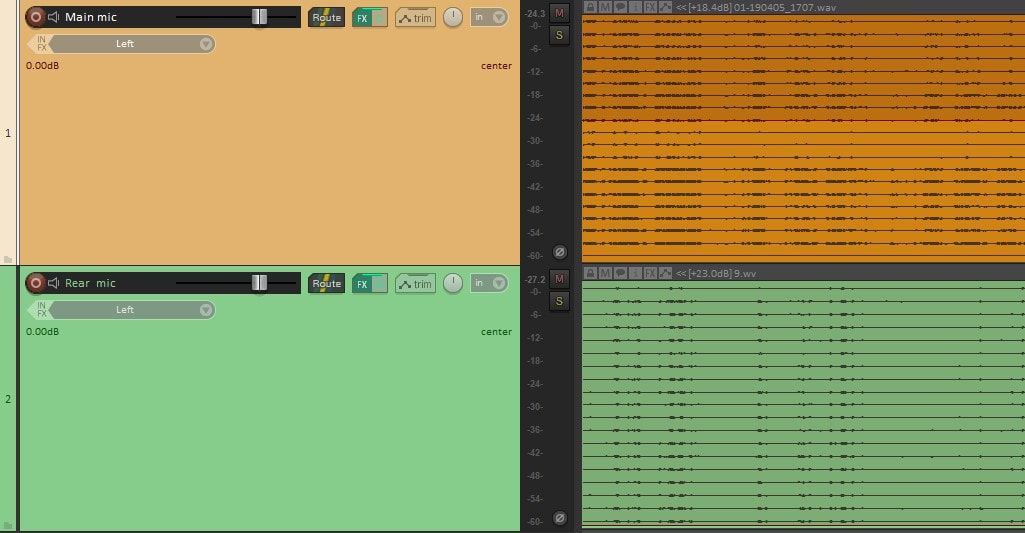 Two 19-channel audio files on 2 DAW tracks. 3. We added ZYLIA Studio PRO plugin to the tracks containing the multi-channel files (one instance of the plugin for each). The plugin converts the recorded information into perfect sound spheres, from which you can extract sounds from any direction. 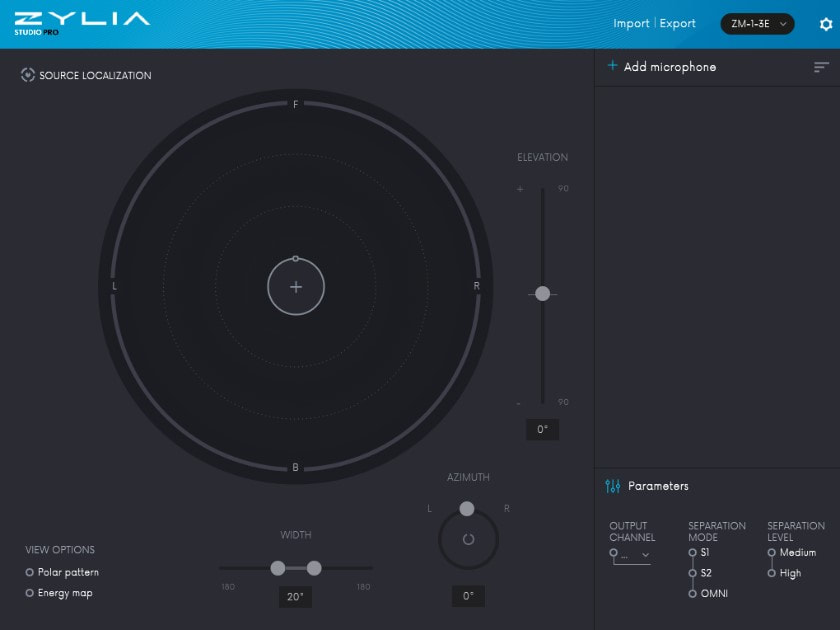 ZYLIA Studio PRO plugin interface before adding any virtual microphones. 4. We added virtual microphones, by clicking on the plus sign in the middle of the circle and defined their direction (in the horizontal and vertical planes) and polar patterns (width). Obs.: That means we basically set up a complex microphone arrangement after the recording, and one that can be tweaked or changed at any moment (!). NOTE: If you don’t know yet how to work with virtual microphones and ZYLIA Studio PRO, you can check the following additional resources: 4A. From the main microphone recordings, 7 virtual microphones were used as seen in the following screen capture: 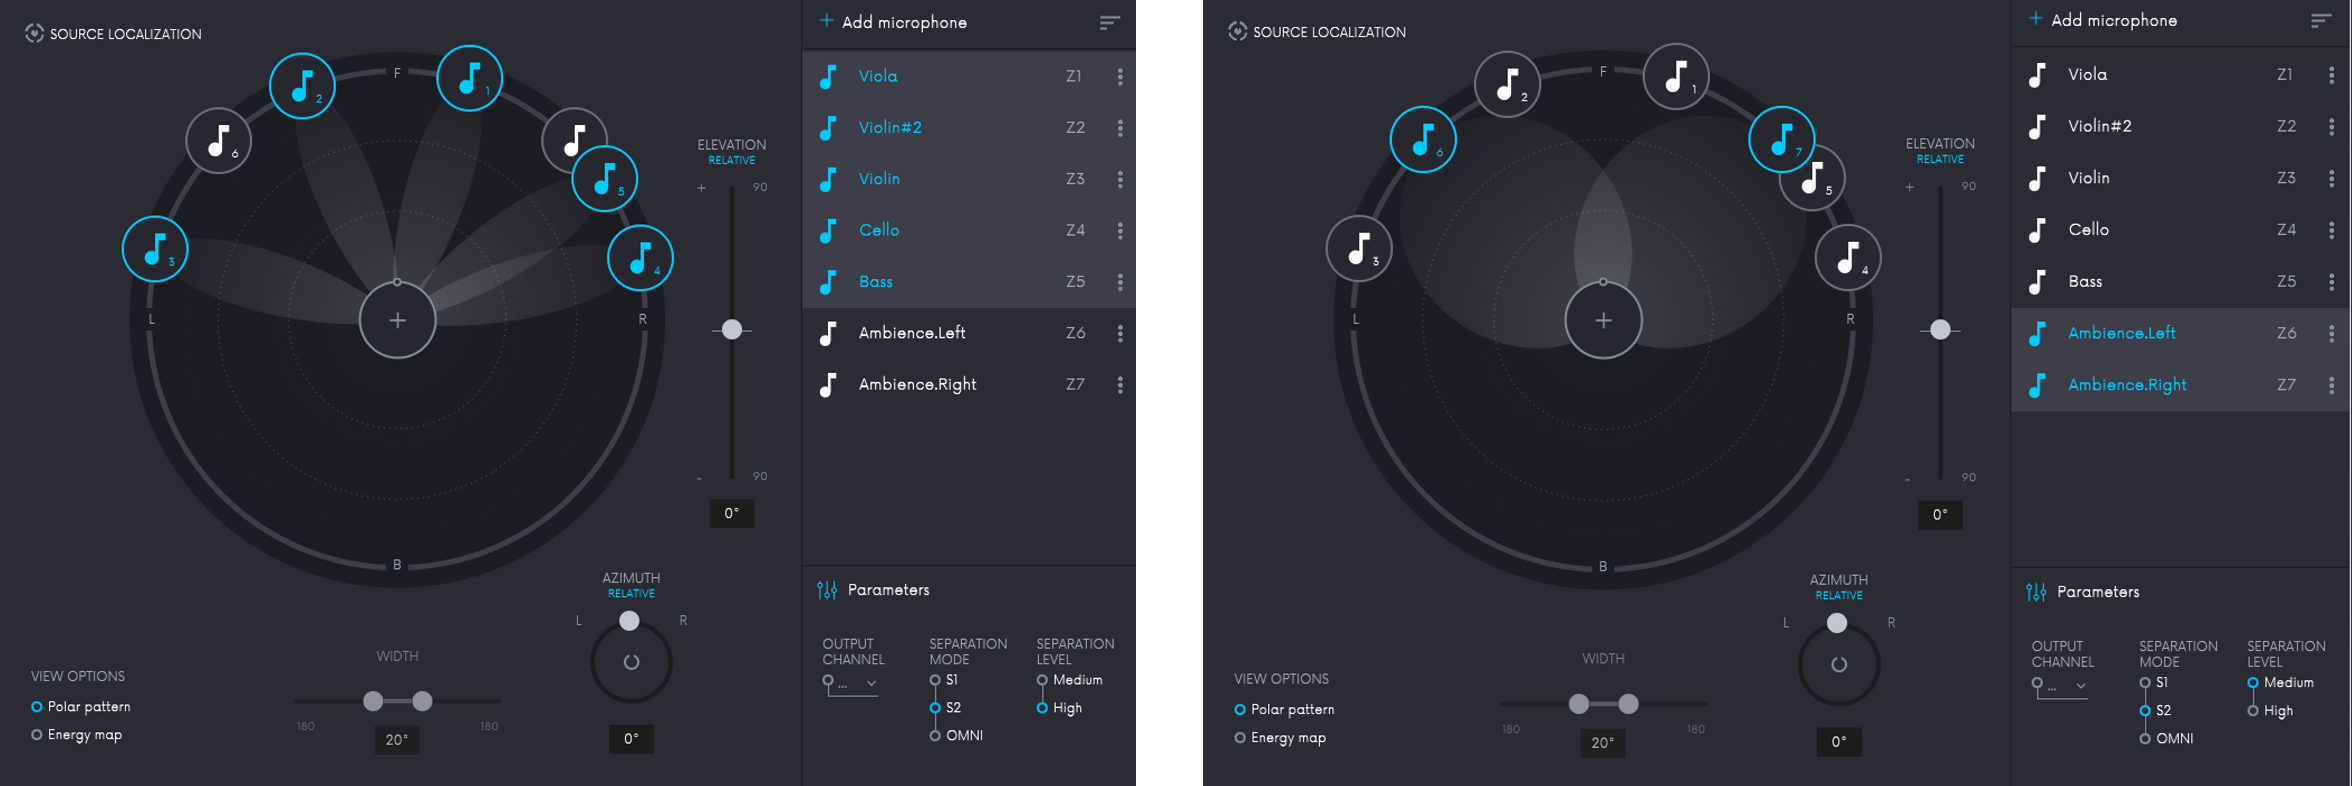 ZYLIA Studio PRO with 7 virtual microphones in place. The virtual microphones Z1 – Z5 were narrow (shotgun-like) ones, pointing at each instrument and using S2 separation mode. Z6 and Z7 form a wide stereo pair, pointing 45˚ up, to capture some of the overall sound and a great deal of reverberant sound. 4B. From the rear microphone recordings, 5 virtual microphones were used as seen in the following screen capture: 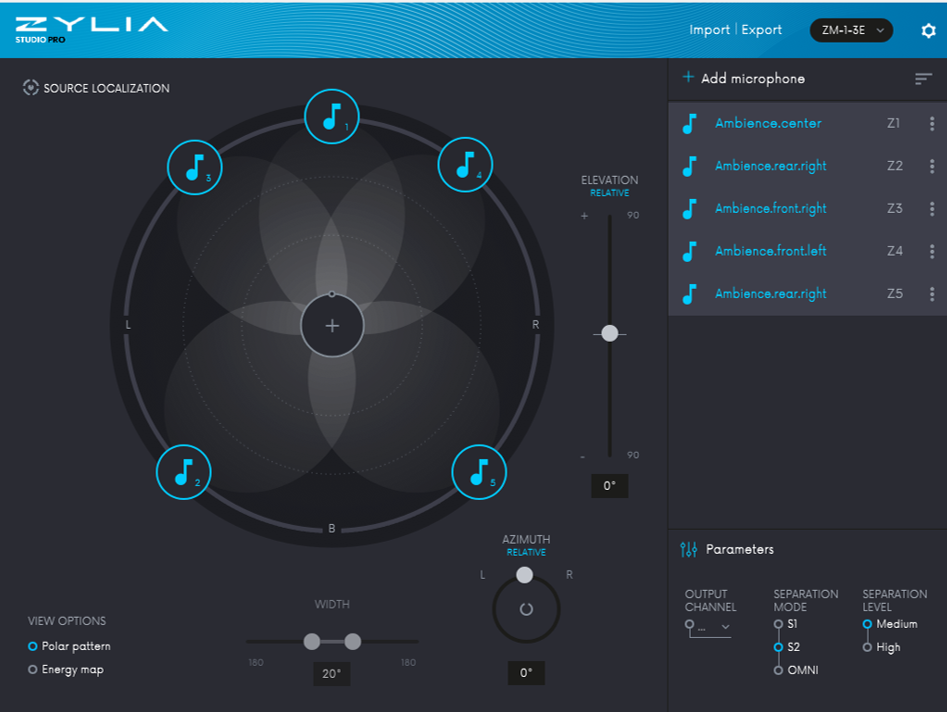 ZYLIA Studio PRO with 5 virtual microphones in place. Detailed configuration of each virtual microphone: Z1: 0˚ azimuth, 33˚ elevation, 60˚ width; Z2 and Z5 form a stereo pair with a sum of 90˚ azimuth, pointing up (-45˚ elevation), and with 60˚ width; Z3 and Z4 form a stereo pair with a sum of 80˚ azimuth, pointing down (-51˚ elevation), and with 60˚ width. 5. We directed each virtual microphone to individual tracks in our DAW and carried on with a regular basic mixing strategy (leveling, panning and EQing). 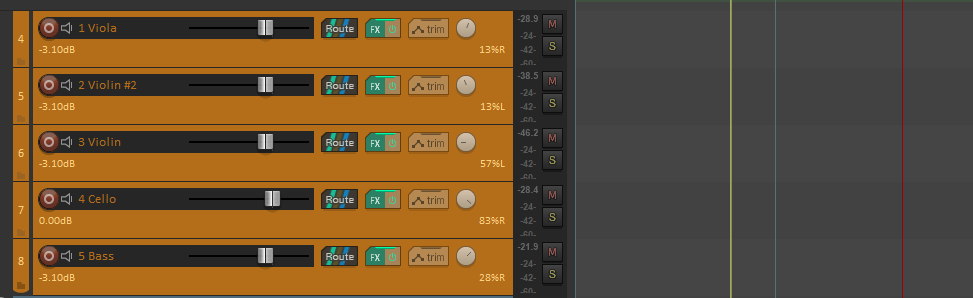 Section of DAW showing the tracks receiving signals from virtual microphones Z1-Z5 (Main ZM-1 microphone). To sum up
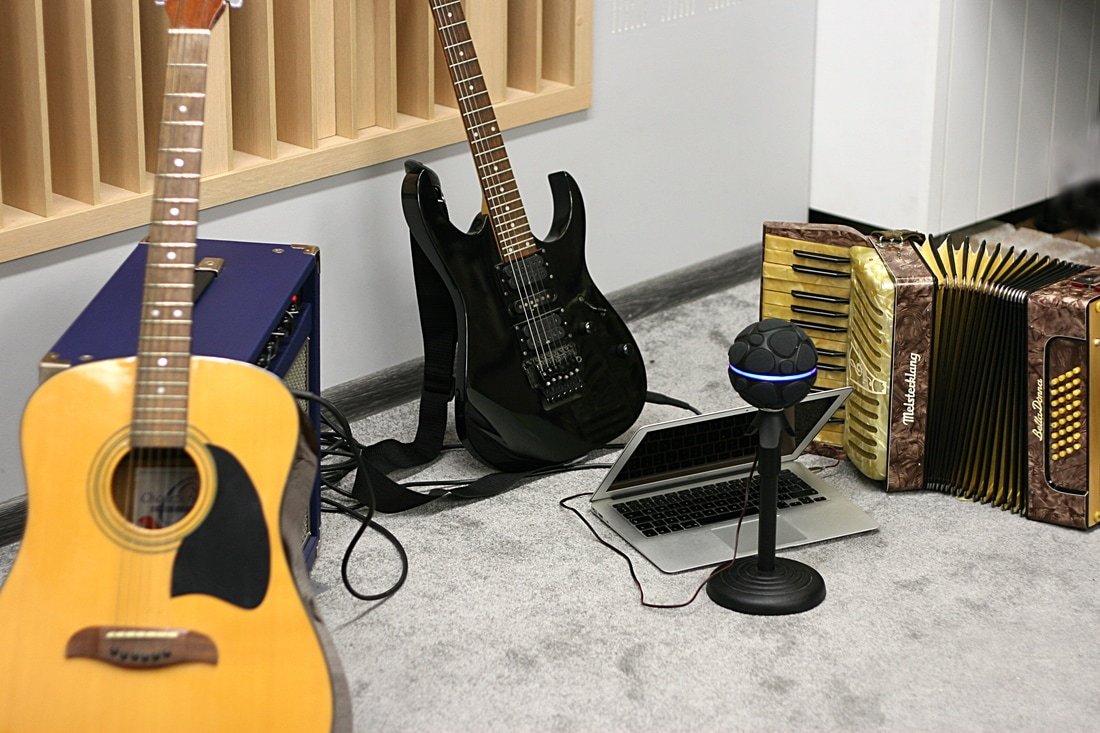
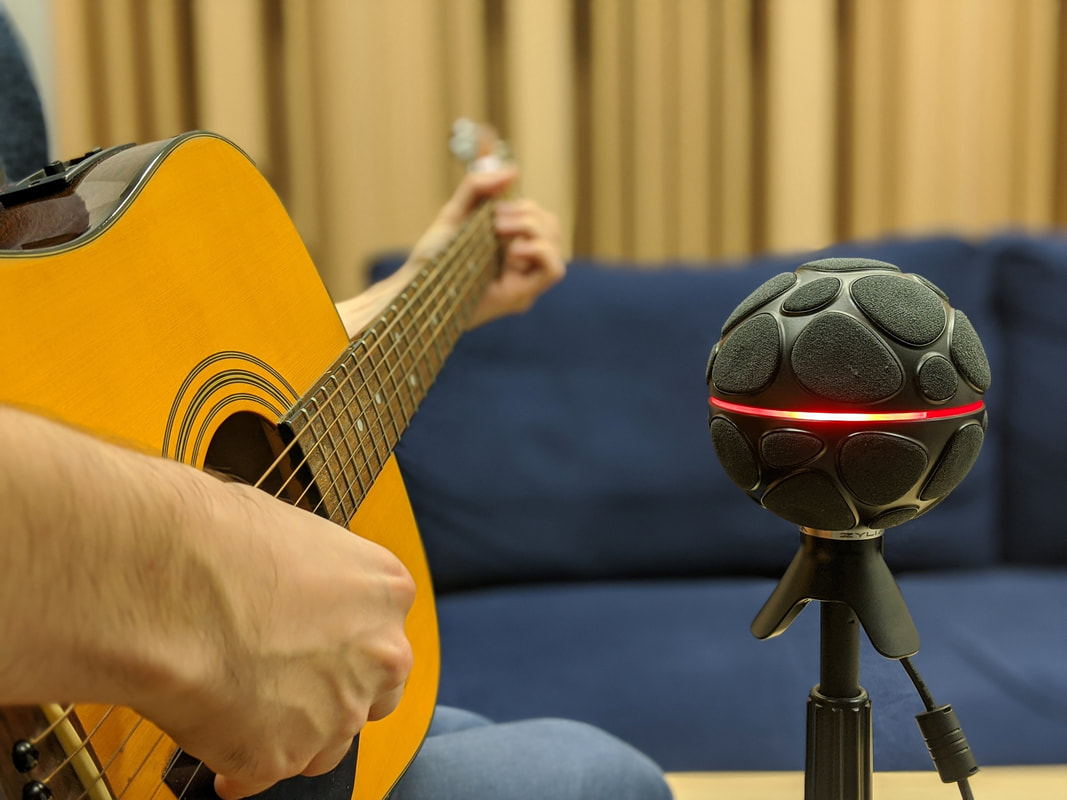
by Pedro Firmino In this article, we will give you an alternative way of recording and coloring your guitar tone using the ZYLIA ZM-1 microphone by taking advantage of multiple channel recording. 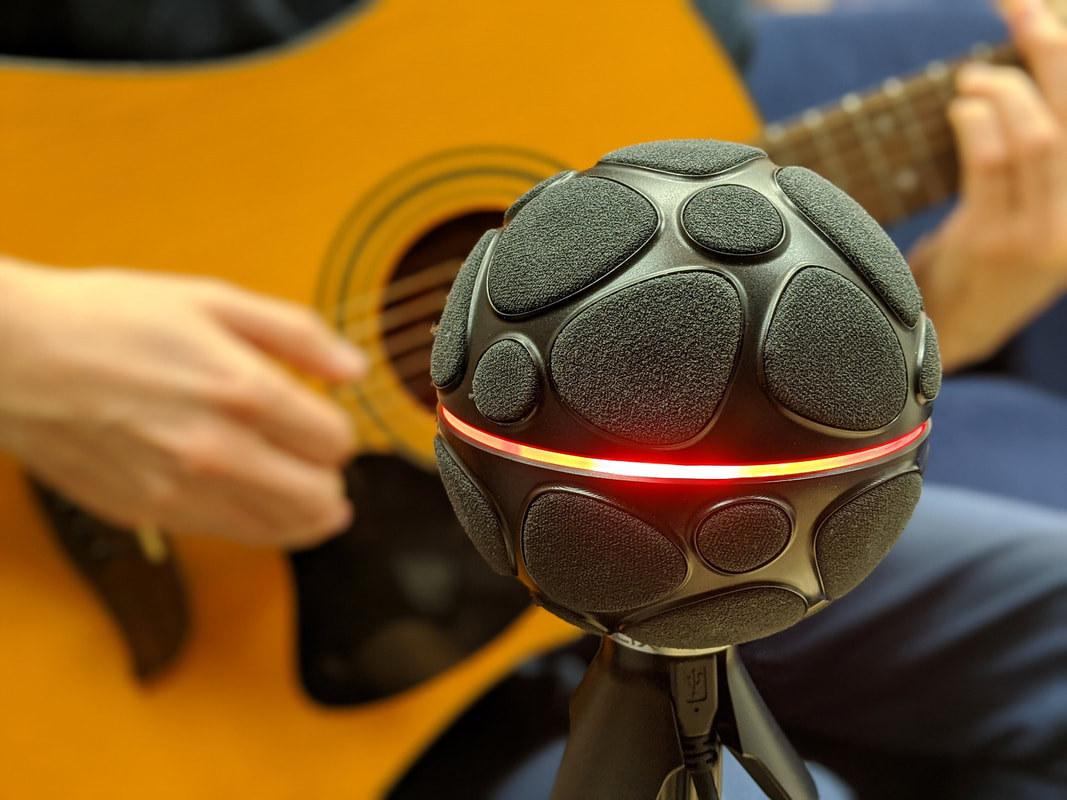 Please, remember that these are suggestions based on our own experience and might not be suitable for your specific situation. While trying our methods, make sure to listen and adapt to your instrument, environment, and musician. When miking a guitar it’s important to understand that this instrument is not designed to be experienced at close distances making it more challenging to find a balanced positioning for recording, especially if you plan to use the ZM-1 to obtain several channels for posterior mixing. After all, it’s one of the ZM-1 strengths. Here we will guide you to make the most out of the ZM-1 recording abilities. Step 1 Position the ZM-1 between the neck and the sound-hole.
At 25 cm distance, the results were quite flexible to work with, however, if you see clipping happening on the VU meter of ZYLIA Studio, reduce the gain on ZYLIA Control Panel or move the ZM-1 further from the sound source.
Record your take and take some time to listen to the results. If you’re happy with the tone of the guitar you may proceed to mixing stage, if not here are some options for you: - increasing distance of the ZM-1 and the guitar for more room tone and less presence. - positioning ZM-1 closer to neck, giving you more treble and percussive sounds. - positioning the ZM-1 closer to the soundhole, provides more lower end and less treble. - using another channel of the ZM-1 recordings to add brighter tone to the mix. This last option shows one of the great advantages of recording with the ZM-1, which it will be mentioned next. Step 3 Separate the take and Mix your tone. Using ZYLIA Studio or ZYLIA Studio PRO, you are able to get different tones from your instrument with a single recording due to the multiple channels. It can also be useful if you want to add some reflections from the environment. After Separating the take, try using the Auto-mix feature. The tone resulting of this feature might surprise you, but if that’s not the case you are always able to mix the tone by controlling the different channel parameters in the MIXER window. 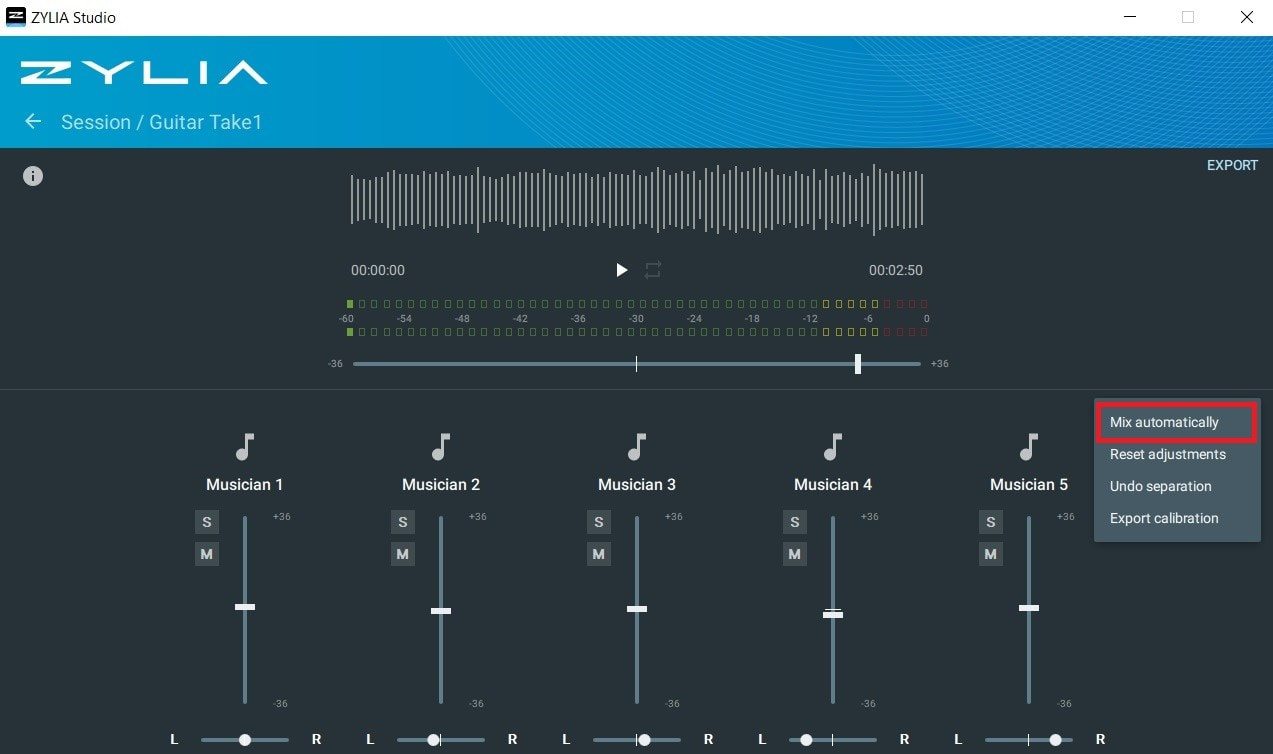 Are you looking for more low end in your tone? Simply adjust the level of the channel correspondent to the microphone closer to the sound-hole of the guitar (In this example Musician 2). Or perhaps you want more room tone and a wider stereo image of your recording? Increase the levels of the back microphones and apply panning (Musician 4 and 5).
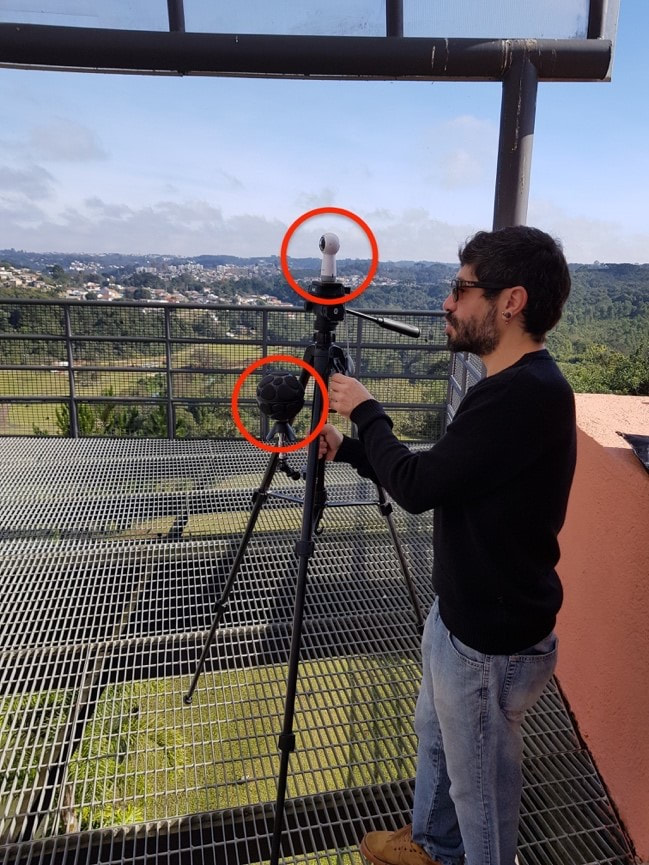
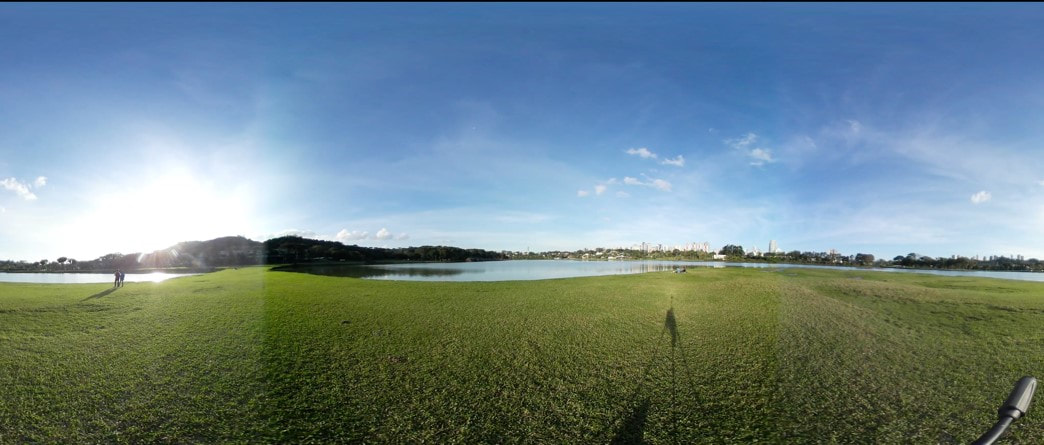
By Eduardo Patricio In this post we present two videos in different formats, but edited from the same source material captured on the 20th of June 2018, at Barigui park (Curitiba, Brazil). The audio was recorded with the ZYLIA ZM-1 3rd order Ambisonics spherical microphone array while the video was captured by a 360-degree camera (Gear 360). Below, you can watch both videos and find some information on how to achieve the two different results, with focus on preparing the audio recorded with the ZM-1 microphone for each scenario. Scenario AInteractive, immersive video with full 3D sound (media components: 360-degree video + Ambisonics audio) Scenario BNon-interactive video with fixed perspective 3D sound (media components: Tiny planet” video + binaural audio)
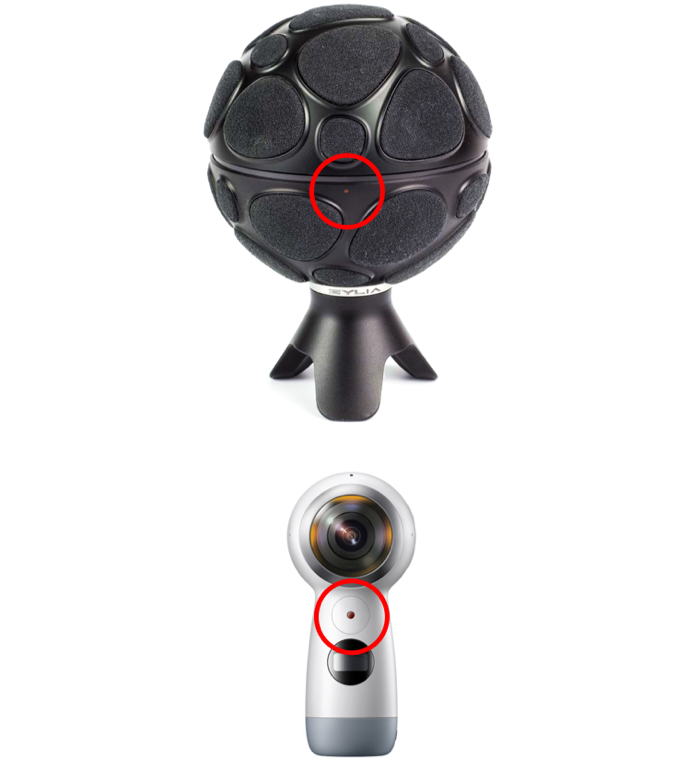
The microphone and the camera were placed on a single camera stand with a small clamped extension arm (see picture below). Both devices were aligned vertically with a small horizontal offset. We made sure the microphone and the camera always had the same relative facing direction (front of the microphone aligned with the camera side where the recording button is found).
For scenario B, we used the video from Gear 360 in ‘tiny planet’ format and a binaural audio track. Since, the source material is the same as the one from scenario A, we’ll list here only the steps that differ. Scenario B steps:
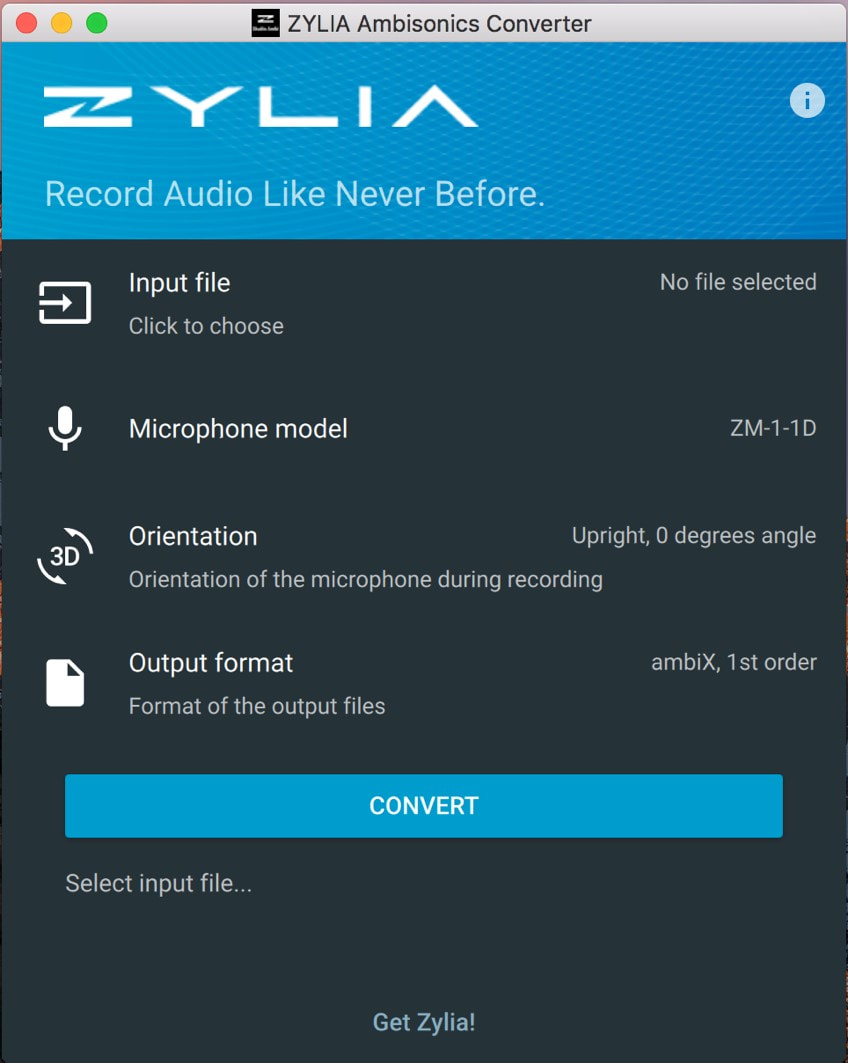
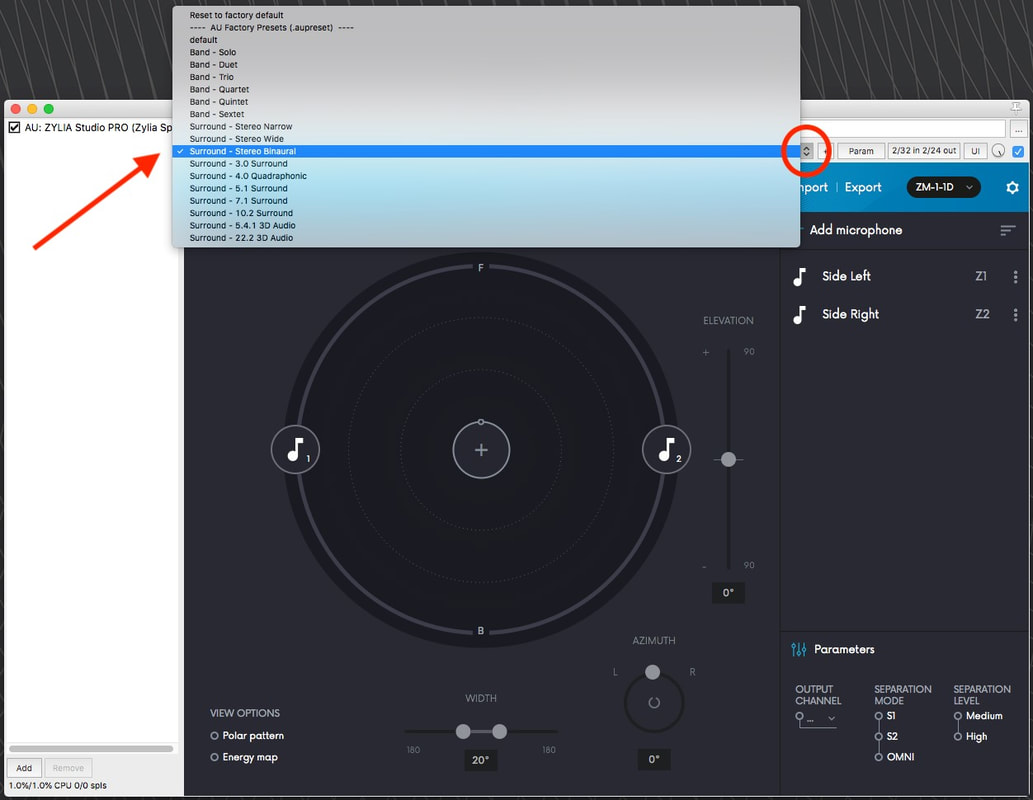 Choosing binaural preset on ZYLIA Studio PRO in REAPER #ambiencerecording #ambisonics #binaural #soundscapes #immersiveaudio #360recording
Organizing rehearsals is much easier nowadays than it was in the past. Songwriters and musicians can easily rent a rehearsal room, join together and take part in the jam session. But how to achieve a great rehearsal recording without spending too much time on technical issues? First, you need to know is what happens with the audio signal that goes to the recording device. The terms 'conversion' and 'converter' are crucial here. 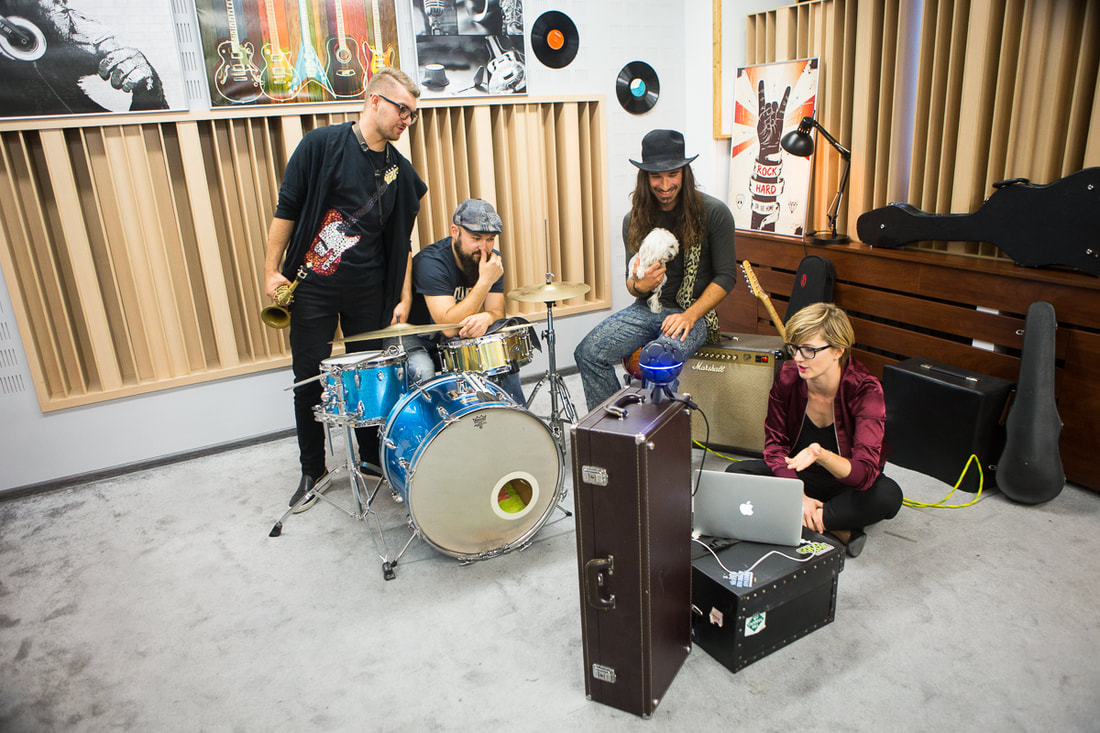 Band rehearsal recorded with ZYLIA ZM-1. Conversion of the audio into a digital formThe audio which comes from a microphone or directly from an instrument to the interface is actually a series of electric signals of varying voltage, which represent acoustic sounds. These signals are converted into a series of numbers (by the analogue-to-digital converter), which correspond to the specific values of the voltage. This process is called conversion, digitalization or sampling. 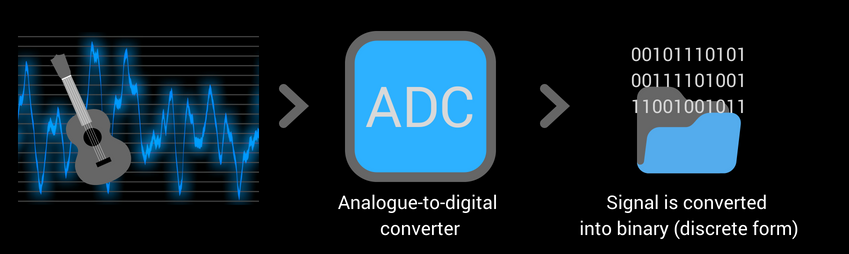 To be more detailed, digitalization is collecting a great number of snapshots (samples) of changing voltage values in equal time intervals. You can visualize this by comparing this process with a film stock which consists of many still photographs taken with the camera at the specific time frame. Depending on the sampling frequency set, these snapshots are taken at different time intervals. For example, at 44.1kHz the analog-to-digital converter takes one sample every 1 / 44,100th of a second. It mins that it takes 44,100 samples representing the voltage every one second and converts them into appropriate numbers which can be stored in the digital form. The audio signal recorded in this form, in order to be reproduced, must go ‘way back’ – so it needs to be converted into the analog signal, which will again be a variable electrical voltage. This process takes place in the digital-to-analog converter. Audio bit depthIn digital audio ‘bit depth’ is the number of bits of information in each sample, and it directly corresponds to the resolution of each sample. To simplify, we can assume that the sampling frequency are values assigned in time and the bit depth are values assigned to the strength of the signal. As it was already mentioned, in the 44.1kHz system, the audio-to-digital converter takes 44,100 samples per second. So, in the 48kHz system it is going to be 48,000, and so on. Increasing this value allows capturing more information about the sound which equals higher sound frequencies. This simply means that high-frequency instrument components can be better reproduced. On mastering process, it is significant to operate on full band samples where low and high-frequency components are well heard. It is easier to mask some instruments by others in the same acoustic scene. Taking care of high sample frequency, you can guarantee your listeners’ natural timbre and feelings. High sample frequency and bit resolution recordings are strongly recommended in compression, equalization and many additional audio effects. Standard configurations are 16 bits depth and 44,1k Hz sample frequency called CD standard. More advanced audio processing may require higher parameters. Important!If you neglect to configure high bit resolution a quantization noise will appear in your recording. It is an understandable effect since sound samples will be represented by an insufficient number of bits.
In audio mastering process, the quantization noise prevents engineer to operate on well-recorded sound frequencies. Low bit depth frequency components are much distorted than the high bit. When mastering operator mix rehearsals with noise, the final record contains strengthened noise, which may be onerous for the listener and difficult to accept in professional audio production. Probably you wonder if it is possible to record a live concert with ZYLIA microphone. Of course, it is possible. This time we present recording made only with one ZYLIA mic situated in front of the stage. On stage, we had around 20 acoustic musicians - piano, double bass, saxophones, flutes, trumpets, etc. No additional mixing or mastering was made.
Big Band from Poznan Music Academy. A mysterious and inspiring piece of music. Conductor - Patryk Piłasiewicz.
By Maciej Lenartowicz
Over the past decades, musicians experienced an unprecedented increase in availability of home recording equipment. Recording studios of the 1980s based on cassette tapes redefined the way how music is created, spawning such masterpieces as Bruce Springsteen’s “Nebraska” - intimate, dark, emotional and most important – created mostly outside of professional recording studio. In the digital age, there’s no need to rewind and erase – there’s plenty of recording space for hours of high-quality audio on your hard disk. Thanks to this pivotal change the difference between studio and rehearsal space becomes more and more insignificant.
There are very different ways of rehearsing – from a tightly organized practice of previously composed pieces to “chaotic” jam sessions. It doesn’t really matter how your rehearsal looks like – every single one of them is worth recording.

If you’re passionate about something that you do, it is very likely that you will want to do it better. Recording rehearsals let you (and other band/project members) review your progress on a certain piece of music. Some errors may go unnoticed while playing, especially when you are focused on your part and less concentrated on the piece as a whole. If your session is recorded everybody has a chance to take their time, re-think and highlight the most troublesome parts of a song. If rehearsals are recorded there’s no worry that somebody will forget their astonishing idea that came spontaneously. You can also record different versions of a song and then chose the best afterward, with a clear mind.
This type of exercise is a good way to introduce a new member of your band/project to already existing songs. She/he can learn all the songs prior to rehearsals without involving other band members and thus save their precious time.
To conclude, I think that in this case, it’s acceptable to answer a question with a question. Why shouldn't we record our rehearsals? Due to aforementioned advantages. enormous storage space for recordings and simplicity of making them I strongly believe that there’s no reason not to.
|
Categories
All
Archives
August 2023
|
 RSS Feed
|
|
Connect with us |
|
© Zylia Sp. z o.o., copyright 2018. ALL RIGHTS RESERVED.
|