|
by Florian Grond, PhD
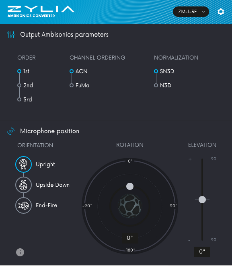
Content of the articleIn this blog entry, I will first give a brief overview of HOA, followed by an explanation of some relevant features of Dolby Atmos. Then, I will describe the general workflow connecting both approaches to create immersive audio experiences. I will conclude with some comments regarding the possibilities and limitations of some specific DAWs for the proposed workflow. Higher-order Ambisonics (HOA) overviewHigher-order Ambisonics (HOA) plays a key role in all situations that require isotropic sound scenes, i.e. scenes that uniformly cover each direction. These scenes comprise VR, AR, XR, video games and generally speaking 360° audiovisual content, for instance when streaming over YouTube or Facebook. The key advantage of HOA is the ability to transform and conveniently manipulate the sound scene in a uniform and mathematically rigorous way. Ambisonics started in the 70ies through Michael Gerzon’s work with what today is referred to as first-order Ambisonics (FOA) [1]. Higher-order Ambisonics was developed in the 90ies by various researchers [2]; the spatial resolution and the sense of depth in the sound scene improved significantly. Without explaining Ambisonics in detail here I will cover some aspects that are relevant to the workflow; if you want to know more, I have compiled more about HOA below [3]. The A- and the B-format It is important to know that the raw output of an Ambisonics microphone array, the A-format, needs to be converted into what is known as the B-format before using it in an Ambisonics production workflow. This is sometimes a bit of an obstacle for the novice. Unlike in a channel-based approach, the audio channels of the B-format are not associated in a direct way with spatial directions or positions, like the positions of speakers in the playback system, for instance. However, the more abstract representation of the sound scene in the B-format makes sound field operations like rotations fairly straightforward. Although multichannel audio is at its base, the B-format is only an intermediary step and requires decoding before you can listen to a meaningful output. This decoding process can either yield speaker feeds ranging from classic stereo to multichannel surround sound setups for a conventional channel-based output, or it can result in a binaural experience over headphones. This is just one of the reasons why one would like to deliver immersive audio recorded through Ambisonics over playback solutions that support Dolby Atmos. For delivering a mobile and immersive listener experience with comparably small hardware requirements, the capabilities of headphones with integrated head-tracking are particularly attractive. Ambisonic orders For FOA recordings, the A- and the B-format have both 4 channels. The spatial resolution is limited, and sound sources usually appear as if they are all at the same remote distance. For full-sphere HOA solutions the A-format has typically more channels than the B-format. As an example, the ZYLIA ZM-1 has 19 channels as raw A-format output and 16 channels after converting it to 3rd order Ambisonics. It is important to remember these channel counts when planning your workflow with respect to the capacities of the DAW in question. Dolby Atmos overviewDolby Atmos is a surround sound technology developed by Dolby Laboratories. On the level of channel counts and positions, it expands on existing surround sound systems by adding height channels. While Dolby Atmos as a format is agnostic with respect to the speaker layout of the playback system, the inner workings are in part inspired by a channel-based approach. Dolby Atmos is not isotropic as Ambisonics is, however, it does aim in a similar way to envelop the listener from many directions, hence the desire to explore links with the immersive quality of HOA recordings. In order to represent rich 360° audio content, Dolby Atmos can handle internally up to 128 channels of audio. The Audio Definition Model (ADM) ensures a proper representation of all the metadata related to these channels. Dolby Atmos files are distributed through the Broadcast Wave Format (BWF) [4]. From a mixing point of view, and also for combining it with Ambisonics, it is important to be aware of two main concepts in Dolby Atmos: beds and audio objects. Beds You can think of beds in two ways:
If you think for instance of a nature soundscape, this could be trees with rustling leaves and a creek with running water, all sound sources with more or less distinct positions. Take an urban soundscape as another example and think of traffic with various moving cars, these are sound sources that change their positions, but you would want to use the scene as is and not touch the sources individually in your mix. These are all examples of immersive audio content that you would send to beds. Audio objects Dolby Atmos also allows for sounds to be interpreted as objects with positions in three dimensions. In a mix, these are objects that allow for control of their position in x, y, and z independently of the position of designated speaker channels. See below [5], for reading up more on beds and objects. HOA recordings in Dolby AtmosThere are many ways how HOA sound material can be used in Dolby Atmos, involving both, beds and objects and the mixer is free to select or switch between those possibilities. For the scope of this article, let’s focus on mapping HOA to beds, in order to make a first step towards leveraging the immersive properties of Ambisonics with the end user format of Dolby Atmos. Mapping HOA to beds While beds are channel-based in their conception, they may be rendered differently, depending on the speaker count and layout of your system. Think of beds as your main mix bus and let’s think of input for beds as surround configurations (2.0, 3.0, 5.0, 5.1, 7.0, 7.1, 7.0.2, or 7.1.2). In order to take advantage of the high resolution of 3rd order recordings made with the ZYLIA ZM-1, we will pick the 7.0.2 configuration with 7 horizontal and two elevated frontal speakers and we will decode the Ambisonic B-format to a virtual 7.0.2 speaker configuration. This results in a proper input for a Dolby Atmos bed. The signal chain Starting with a raw recording made with the ZYLIA ZM-1 we will then have the following signal chain: 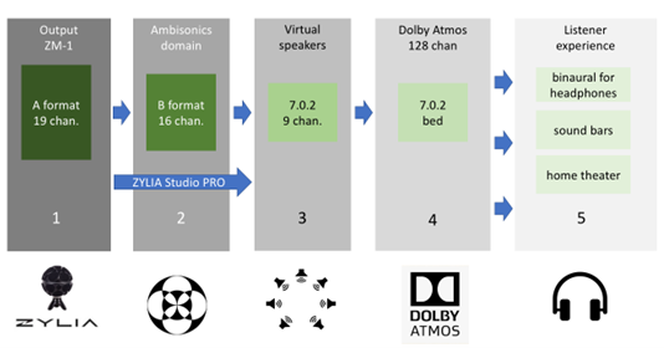 STEP 1 Step one is the raw output of the microphone array, the A-format. For the ZYLIA ZM-1 this is an audio file with 19 channels. From a post-production and mixing perspective, all that matters here is where you placed your microphone with respect to the sound sources. If you want your work environment to include this step of the signal chain, the tracks of your DAW need to be able to accommodate 19 channels. But this is not absolutely necessary, you can start with step 2. STEP 2 The 3rd order Ambisonic B-format contains 16 channels. For the conversion from step one to step two, you can use the Ambisonic Converter plugin from Zylia [6]. If your DAW cannot accommodate the necessary 19 channels for step one you can also convert offline with the ZYLIA Ambisonics Converter application, which also offers you batch conversion for multiple assets [7]. In many situations, it is advisable to start the signal chain with step 2, in order to save the CPU resources used by the A to B conversion for other effects. From a mixing perspective, operations that you apply here are mostly rotations, and global filtering, limiting or compression of the immersive sound scene that you want to send to Atmos beds. You will apply these operations based on how the immersive bed interacts with the objects that you may want to add to your scene later. There are various recognized free tools available to manipulate HOA B-format, for instance, the IEM [8] or SPARTA [9] plugin suites. 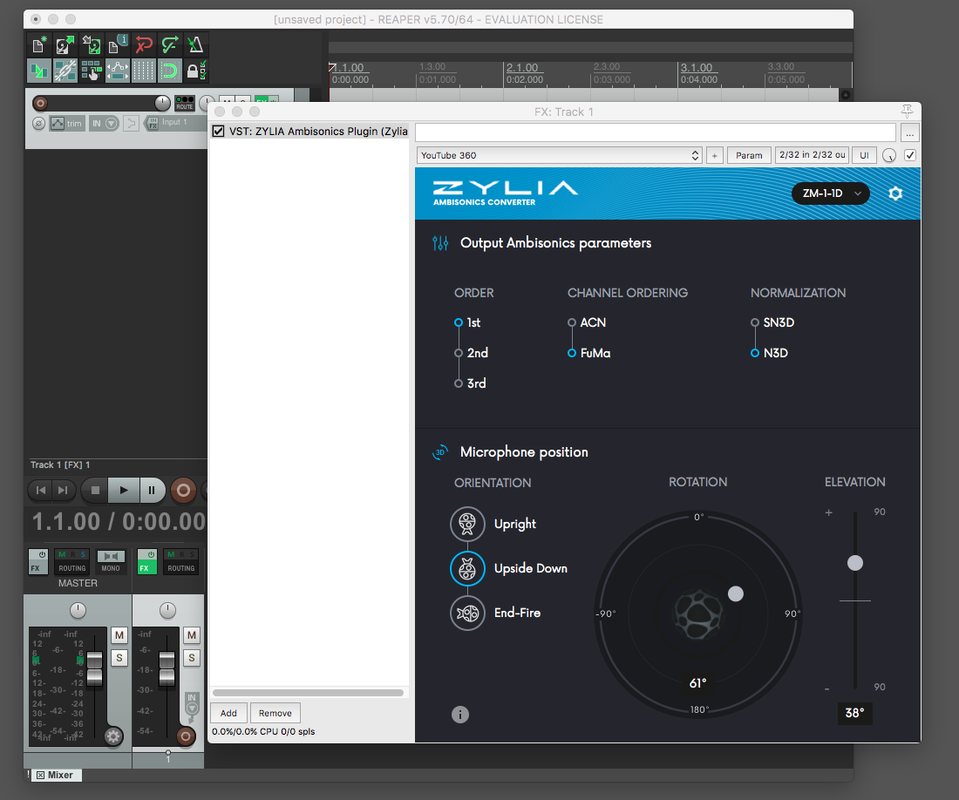 Zylia Ambisonics Converter plugin opened in Reaper STEP 3 Then, The Ambisonic B-Format needs to be decoded to a virtual surround speaker configuration. For this conversion from the B-format, you can use various decoders that are again available from multiple plugin suites like IEM and SPARTA. ZYLIA Studio Pro [10] allows you to decode to a virtual surround layout directly from step one, the raw A-format recordings, which means that you can bypass step 2. For some background audio content, this maybe a perfectly suitable choice. Part of the roadmap for ZYLIA Studio Pro is to also offer A-format input, making it a versatile high-quality decoder. From a mixing perspective and depending on the content of your bed input, you may want to choose different virtual surround configurations to decode to. Some content might be good on a smaller, more frontal bed e.g. 3.1, and other content will need to be more enveloping. If your DAW has a channel count per track that is limited to surround sound setups, you will need to premix these beds as stems.  Zylia Studio PRO plugin with 7.1.4 surround pre-set uploaded STEP 4 This bed then needs to be routed to Dolby Atmos. The details are beyond the scope of this article, and there are many excellent tutorials available that describe this process in detail. Here I want to mention that some DAWs have Dolby Atmos renderers built in, and you can study everything you practically need to know within these DAWs. With other DAWs, you will need to use the external Dolby Bridge [11]. This has a steeper learning curve to it but there are also many excellent tutorials out there that cover these topics [12]. There are also hardware solutions for Dolby Atmos renderings which interface with your speaker setup, but we will not cover them here. In Dolby Atmos, you will likely also integrate additional sources as objects, and you will control their 3D pan position with the Dolby Atmos Music Panner plug-in in your DAW. From a mixing perspective: the sonic interaction between the bed and the objects will probably make you revisit steps 2 and step 3 in order to rebalance, compress or limit your bed to optimise your mix. STEP 5 You will need to monitor your mix to make sure that the end user experience is perfect. Only very few of us will have access to a Dolby Atmos studio for their work. For bedroom studio owners, you can listen to your mix always over headphones as a binaural rendering, on some recent OSX platforms over the inbuilt Atmos speakers, and with AirPods even over headphones with built-in headtracking. These solutions might be options depending on what you are producing for. Regarding this highly debated question, on whether you can mix and master over headphones, I found the following article very insightful [13], elaborating on all pros and cons and also pointing out that the overwhelming majority of end users will listen to music over headphones. With regards to an Ambisonic mix, using headphones means that the listener will be always in the sweet spot of the spatial reproduction. The workflow in selected DAWsI will finish by discussing the steps of the signal chain on a couple of selected DAWs focusing on Ambisonics and beds only. In general, when planning your HOA to Dolby Atmos workflow, you need to understand how Dolby Atmos is supported in the DAW of your choice [14]. Either a Dolby Atmos renderer is integrated, or you need to get acquainted with the Dolby Bridge. On the side of HOA, you need to understand how many channels per track your DAW supports, and whether you can start working with the A-format, the B-format or premixed beds as stems. REAPER Reaper is amongst the first choices when it comes to higher-order Ambisonics, due to its 64-channel count per track. Hence for the HOA aspect of the workflow sketched above, there are no limitations. However, you will need to familiarize yourself with the Dolby Bridge and the Dolby Atmos Music Panner plug-in. PRO TOOLS In regular Pro Tools, you will also use the Dolby Atmos Music Panner plug-in and the Dolby Bridge. Since Pro Tools has a limitation of 16 channels per track, you will need to convert all your Ambisonic assets to B-format before you can start mixing. Upgrading to Pro Tools Studio or Flex [15] adds Dolby Atmos ADM BWF import/export, native immersive panning, I/O set-up integration with the Dolby Atmos Renderer, and a number of other Dolby Atmos workflow features as well as Ambisonics tracks. LOGIC In the most recent versions of Logic, Dolby Atmos is completely integrated, so no need to use the Dolby Bridge. For the monitoring of your mix, Logic will play nicely with all Atmos-ready features from Apple hardware. However, the channel count per track is limited to beds with 7.1.4. In theory, this means that you would have to premix all the beds as multichannel stems. While you can import ADM BWF files, as the Dolby Atmos project is ready for mixing, it is less obvious how to import a bed input as discussed above. In any case, once you have a premixed bed, the only modifications available to you in the mixing process are multi-mono plugins (e.g., filters), so you cannot rotate the Ambisonic sound field anymore at this point. To summarize for Logic, while Dolby Atmos is very well integrated, the HOA part of the signal chain is more difficult to realize. NUENDO Nuendo also has Dolby Atmos integrated and it also features dedicated Ambisonic tracks up to 3rd order which can be decoded to surround tracks. This means you have a complete environment for the steps of the workflow described above. DAVINCI RESOLVE While being mostly known as a video editing environment, DaVinci Resolve features a native Dolby Atmos renderer that can import and export master files. This allows for a self-contained Dolby Atmos workflow in Resolve without the need for the Dolby Atmos Production or Mastering Suite. DaVinci Resolve also has the Dolby Atmos renderer integrated and the tracks can host multichannel audio assets and effects. SummaryI hope this gives a general overview of how to connect HOA with Dolby Atmos. The proposed workflow is making use of beds in an orthodox way, but this is not the only way how HOA recordings can be mapped to Dolby Atmos. The 128 channels of Dolby Atmos including the object channels offer plenty of opportunities to explore. If you like this article, then please let us know in the comments what we should describe in more detail in future articles? References:[1] The publication by Michael Gerzon introducing FOA:
[6] The Zylia Ambisonics Converter plugin: LINK [7] The Zylia Ambisonics Converter: LINK [8] The IEM plugin suite: LINK [9] The SPARTA plugin suite: LINK [10] Zylia Studio Pro plugin: LINK [11] A video tutorial for using the Dolby Bridge with Pro Tools: LINK [12] A video tutorial for using the Dolby Bridge with Reaper: LINK [13] An blog post about the limits and possibilities of mixing Dolby Atmos via headphones by Edgar Rothermich: LINK [14] Information about Dolby support for various DAWs: LINK [15] Here you can compare Protools versions and their Dolby and HOA support: LINK #zylia #dolbyatmos #ambisonics
1 Comment
ZYLIA ZM-1 is a 3rd order Ambisonics microphone. That is excellent information if you want to capture and use 3D audio Impulse Responses (IR). In this case, you get a recorded 3rd order Ambisonics IR (3AIR). Below is a short introduction to the recording and using 3AIR with your podcast, film, or game production.  Recording of Ambisonics (spatial audio) Impulse Responses What do you need?
The process: 1. Start recording in the ZYLIA Studio application or your favorite DAW. 2. Pop the balloon where you want to have a source. We did this about 1 meter in front of ZM-1. 3. Stop the recording and export the raw 19-channel file. 4. Convert 19 channels A-format to Ambisonics B-format (3AIR) with the ZYLIA Ambisonics Converter plugin. The next step is a convolution of your 3AIR with your mono or multichannel signal to which you would like to add a reverberation effect. Requirments:
nThe process: 1. Create folder named "mcfx" in C://Users/your-name/AppData/Roaming/ (~/Library/ on macOS). 2. Create folder named "convolver_presets" in C://Users/your-name/AppData/Roaming/mcfx (~/Library/mcfx on macOS). 3. Start recording in the ZYLIA Studio application. 4. Pop the balloon in a place where you want to have a source. We did this about 1 meter in front of ZM-1. 5. Stop the recording and export the raw 19-channel file. 6. Open the file in DAW (e.g., Audacity) and process the IR recording in the following way:
8. Export the file from DAW as 19 channel. 9. Open ZYLIA Ambisonics Converter and convert the 19 channel file to 3-rd order Ambisonics with SN3D normalization and ACN channel ordering. 10. Save the file to C://Users/your-name/AppData/Roaming/mcfx/convolver_presets (~/Library/mcfx/colvolver_presets on macOS). In case you want to apply 3AIR to a mono file:
# in out gain delay offset length chan file # --------------------------------------------------------------------- # /impulse/read 1 1 0.1 0 0 IR_length 1 16_channel_IR.wav /impulse/read 1 2 0.1 0 0 IR_length 2 16_channel_IR.wav /impulse/read 1 3 0.1 0 0 IR_length 3 16_channel_IR.wav /impulse/read 1 4 0.1 0 0 IR_length 4 16_channel_IR.wav /impulse/read 1 5 0.1 0 0 IR_length 5 16_channel_IR.wav /impulse/read 1 6 0.1 0 0 IR_length 6 16_channel_IR.wav /impulse/read 1 7 0.1 0 0 IR_length 7 16_channel_IR.wav /impulse/read 1 8 0.1 0 0 IR_length 8 16_channel_IR.wav /impulse/read 1 9 0.1 0 0 IR_length 9 16_channel_IR.wav /impulse/read 1 10 0.1 0 0 IR_length 10 16_channel_IR.wav /impulse/read 1 11 0.1 0 0 IR_length 11 16_channel_IR.wav /impulse/read 1 12 0.1 0 0 IR_length 12 16_channel_IR.wav /impulse/read 1 13 0.1 0 0 IR_length 13 16_channel_IR.wav /impulse/read 1 14 0.1 0 0 IR_length 14 16_channel_IR.wav /impulse/read 1 15 0.1 0 0 IR_length 15 16_channel_IR.wav /impulse/read 1 16 0.1 0 0 IR_length 16 16_channel_IR.wav # -----------------------end of file -----------------------------------
In case you want to apply IR to 19 channel file:
# in out gain delay offset length chan file # --------------------------------------------------------------------- # /impulse/read 1 1 0.1 0 0 IR_length 1 16_channel_IR.wav /impulse/read 2 2 0.1 0 0 IR_length 2 16_channel_IR.wav /impulse/read 3 3 0.1 0 0 IR_length 3 16_channel_IR.wav /impulse/read 4 4 0.1 0 0 IR_length 4 16_channel_IR.wav /impulse/read 5 5 0.1 0 0 IR_length 5 16_channel_IR.wav /impulse/read 6 6 0.1 0 0 IR_length 6 16_channel_IR.wav /impulse/read 7 7 0.1 0 0 IR_length 7 16_channel_IR.wav /impulse/read 8 8 0.1 0 0 IR_length 8 16_channel_IR.wav /impulse/read 9 9 0.1 0 0 IR_length 9 16_channel_IR.wav /impulse/read 10 10 0.1 0 0 IR_length 10 16_channel_IR.wav /impulse/read 11 11 0.1 0 0 IR_length 11 16_channel_IR.wav /impulse/read 12 12 0.1 0 0 IR_length 12 16_channel_IR.wav /impulse/read 13 13 0.1 0 0 IR_length 13 16_channel_IR.wav /impulse/read 14 14 0.1 0 0 IR_length 14 16_channel_IR.wav /impulse/read 15 15 0.1 0 0 IR_length 15 16_channel_IR.wav /impulse/read 16 16 0.1 0 0 IR_length 16 16_channel_IR.wav # -----------------------end of file -----------------------------------
The theory behind Ambisonics Impulse Response measurement A more detailed description you can find in here: These articles go deeper into the technics of recording an impulse response. Raw Impulse Response recorded with ZM-1 can be converted to B-format (Ambisonics) and used to add reverbs in Ambisonics encoding. Please share your work on Record with Zylia Facebook page! Efficient Volumetric Scene-based audio with ZYLIA 6 Degrees of Freedom solutionWhat is the difference between Object-based audio (OBA) and Volumetric Scene-based audio (VSBA)?OBA The most popular method of producing a soundtrack for games is known as Object-based audio. In this technique, the entire audio consists of individual sound assets with metadata describing their relationships and associations. Rendering these sound assets on the user's device means assembling these objects (sound + metadata) to create an overall user experience. The rendering of objects is flexible and responsive to the user, environmental, and platform-specific factors [ref.]. 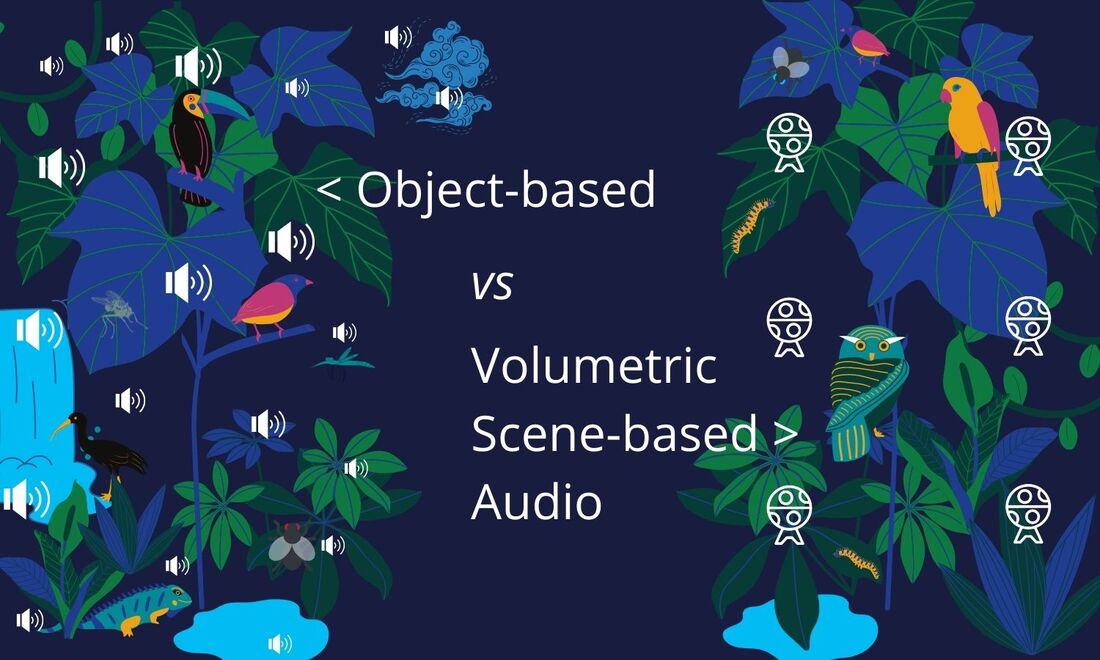 In practice, if an audio designer wants to create an ambient for an adventure in a jungle, he or she needs to use several individual sound objects, for example, the wind rustling through the trees, sounds of wild animals, the sound of a waterfall, the buzzing of mosquitoes, etc. The complexity associated with Object-based renderings increases with the number of sound objects. This means that the more individual objects there are (the more complex the audio scene is) the higher is the usage of the CPU (and hence power consumption) which can be problematic in the case of mobile devices or limitations of the bandwidth during data transmission. VSBA A complementary approach for games is Volumetric Scene-based audio, especially if the goal is to achieve natural behavior of the sound (reflections, diffraction). VSBA is a set of 3D sound technologies based on Higher-Order Ambisonics (HOA), a format for the modeling of 3D audio fields defined on the surface of a sphere. It allows for accurate capturing, efficient delivery, and compelling reproduction of 3D sound fields on any device (headphones, loudspeakers, etc.). VSBA and HOA are deeply interrelated; therefore, these two terms are often used interchangeably. Higher-Order Ambisonics is an ideal format for productions that involve large numbers of audio sources, typically held in many stems. While transmitting all these sources plus meta-information may be prohibitive as OBA, the Volumetric Scene-based approach limits the number of PCM (Pulse-Code Modulation) channels transmitted to the end-user as compact HOA signals [ref.]. 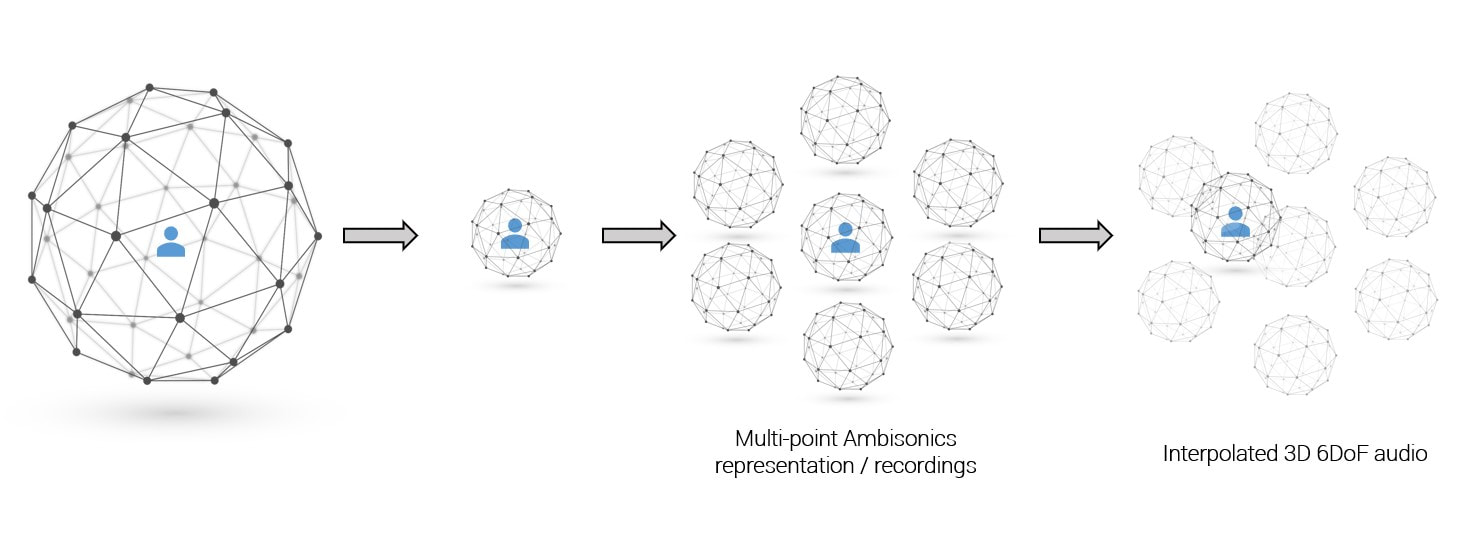 ZYLIAs interpolation algorithm for 6DoF 3D audio Creating a sound ambience for an adventure in a jungle through Volumetric Scene-based audio, can be as simple as taking multiple HOA microphones to the natural environment that produces the desired soundscape and record an entire 360° audio-sphere around devices. The main advantage of this approach is that the complexity of the VSBA rendering will not increase with the number of objects. This is because the source signals are converted to a fixed number of HOA signals, uniquely dependent on the HOA order, and not on the number of objects present in the scene. This is in contrast with OBA, where rendering complexity increases as the number of objects increases. Note that Object-based audio scenes can profit from this advantage by converting them to HOA signals i.e., Volumetric Scene-based audio assets. To summarizing, the advantages of the Volumetric Scene-based audio approach affecting the CPU and power consumption are:
Zylia 6 Degrees of Freedom Navigable Audio One of the most innovative and efficient tools for producing Volumetric Scene-based audio is ZYLIA 6 Degrees of Freedom Navigable Audio solution. It is based on several Higher Order Ambisonics microphones which capture large sound-scenes in high resolution, and a set of software for recording, synchronizing signals, converting audio to B-Format, and rendering HOA files. The Renderer can be also used independently from the 6DoF hardware – to create navigable 3D assets for audio game design. 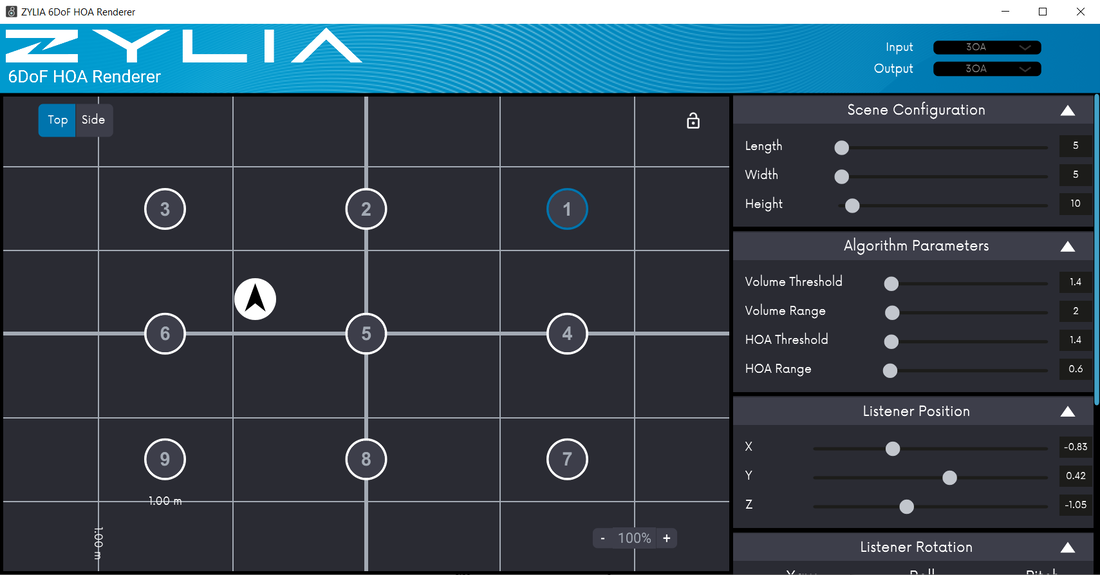 ZYLIA 6 DoF HOA Renderer is a MAX/MSP plugin available for MAC OS and Windows. It allows processing and rendering ZYLIA Navigable 3D Audio content. With this plugin users can playback the synchronized Ambisonics files, change the listener’s position, and interpolate multiple Ambisonics spheres. The plugin is also available for Wwise, allowing developers to use ZYLIA Navigable Audio technology in various game engines. Watch the comparison between Object-based audio and Volumetric Scene-based audio produced with Zylia 6 Degrees of Freedom Navigable Audio solution. Notice how the 6DoF approach reduces the CPU during sound rendering. Volumetric Scene-based audio and Higher Order Ambisonics can be used for many different purposes, not only for creating soundtracks for games. This format is very efficient when producing audio for:
#zylia #gameaudio #6dof #objectbased #scenebased #audio #volumetric #gamedevelopment #GameDevelopersConference #GDC2021 #GDC Want to learn more about multi-point 360 audio and video productions? Contact our Sales team:In this tutorial we describe the process of converting 360 video and 3rd order Ambisonics to 2D video with binaural audio with linked rotation parameters. This allows us to prepare a standard 2D video while keeping the focus on the action from the video and audio perspective. It also allows us to control the video and audio rotation in real time using a single controller. Reaper DAW was used to create automated rotation of 360 audio and video. Audio recorded with ZYLIA ZM-1 microphone array. Below you will find our video and text tutorial which demonstrate the setup process. Thank you Red Bull Media House for providing us with the Ambisonics audio and 360 video for this project. Ambisonics audio and 360 video is Copyrighted by Red Bull Media House Chief Innovation Office and Projekt Spielberg, contact: cino (@) redbull.com Created by Zylia Inc. / sp. z o.o. https://www.zylia.co Requirements for this tutorial:
We will use Reaper as a DAW and video editor, as it supports video and multichannel audio from the ZM-1 microphone. Before recording the 360 video with the ZM-1 microphone make sure to have the front of the camera pointing the same direction as the front of the ZM-1 (red dot on the equator represents the front of the ZM-1 microphone) , this is to prevent future problems and to know in which direction to rotate the audio and video. Step 1 - Add your 360 video to a Reaper session. The video file format may be .mov .mp4 .avi or other. From our experience we recommend to work on a compressed version of the video and replace this media file later for rendering (step 14). To open the Video window click on View – VIDEO or press Control + Shift + V to show the video. 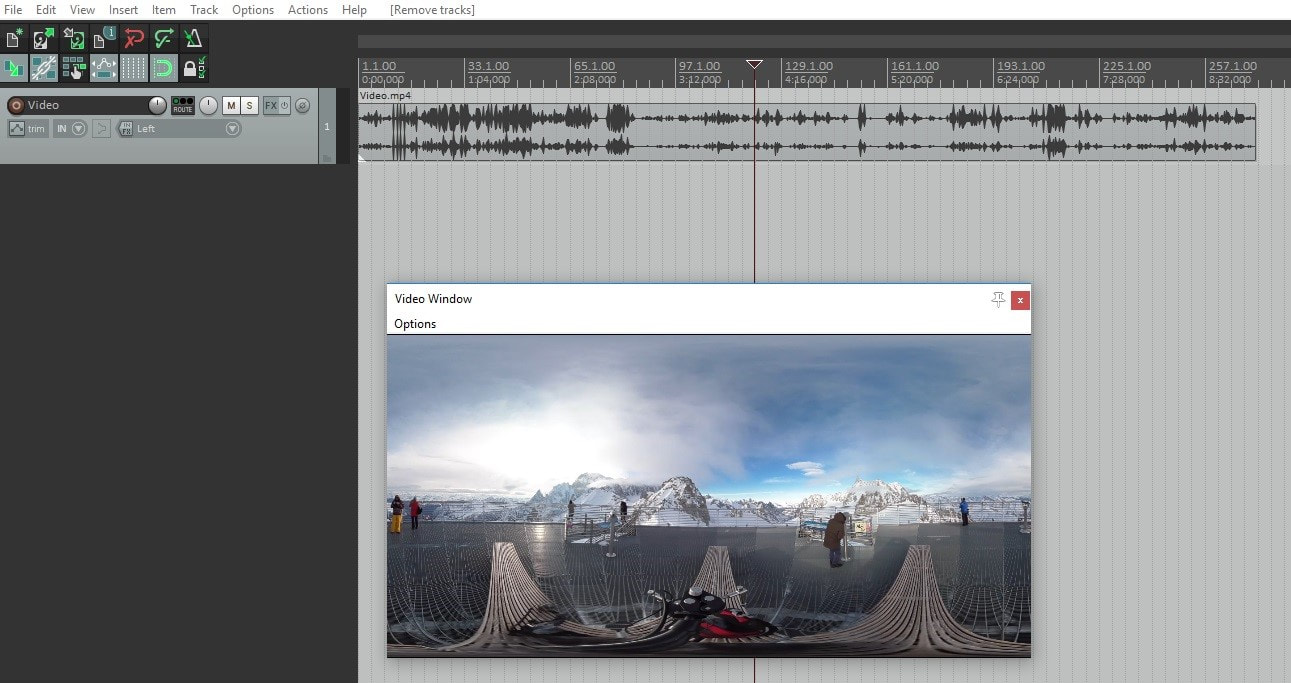 Step 2 - Add the multichannel track recorded with the ZM-1 and sync the Video with the ZM-1 Audio track. Import the 19 channel file from your ZM-1 and sync it with the video file. 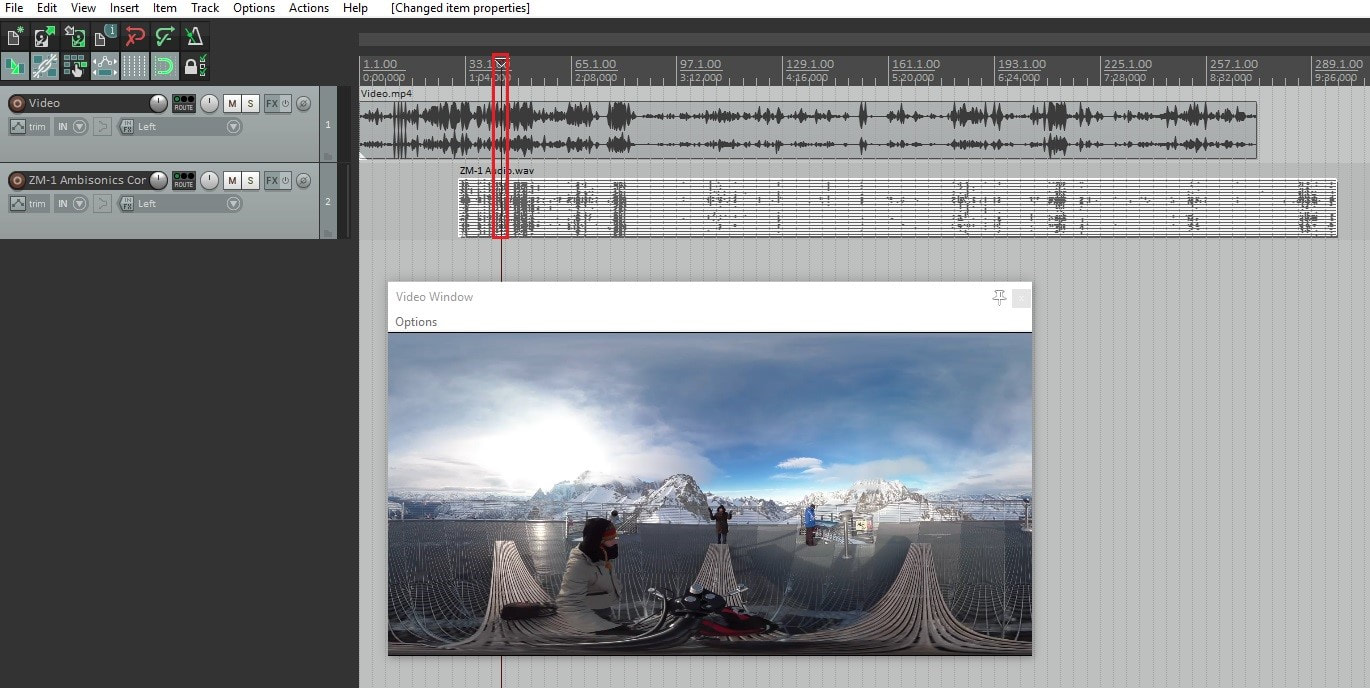 Step 3 – Disable or lower the volume of the Audio track from the video file. Since we will not use the audio from the video track, we require to remove or put the volume from the audio track at minimum value. To do so, right click on the Video track – Item properties – move the volume slider to the minimum. 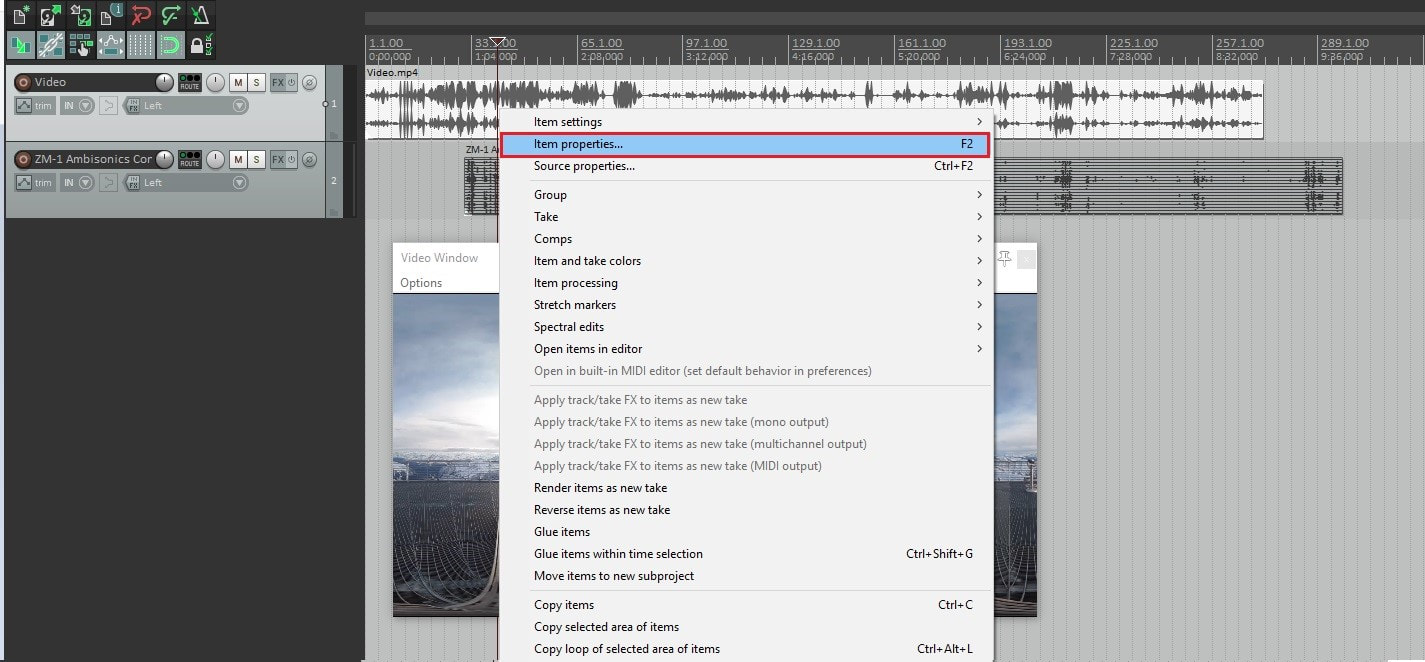  Step 4 – Merge video and audio on the same track. Select both the video and audio track and right click – Take – implode items across tracks into takes This will merge video and audio to the same track but as different takes. 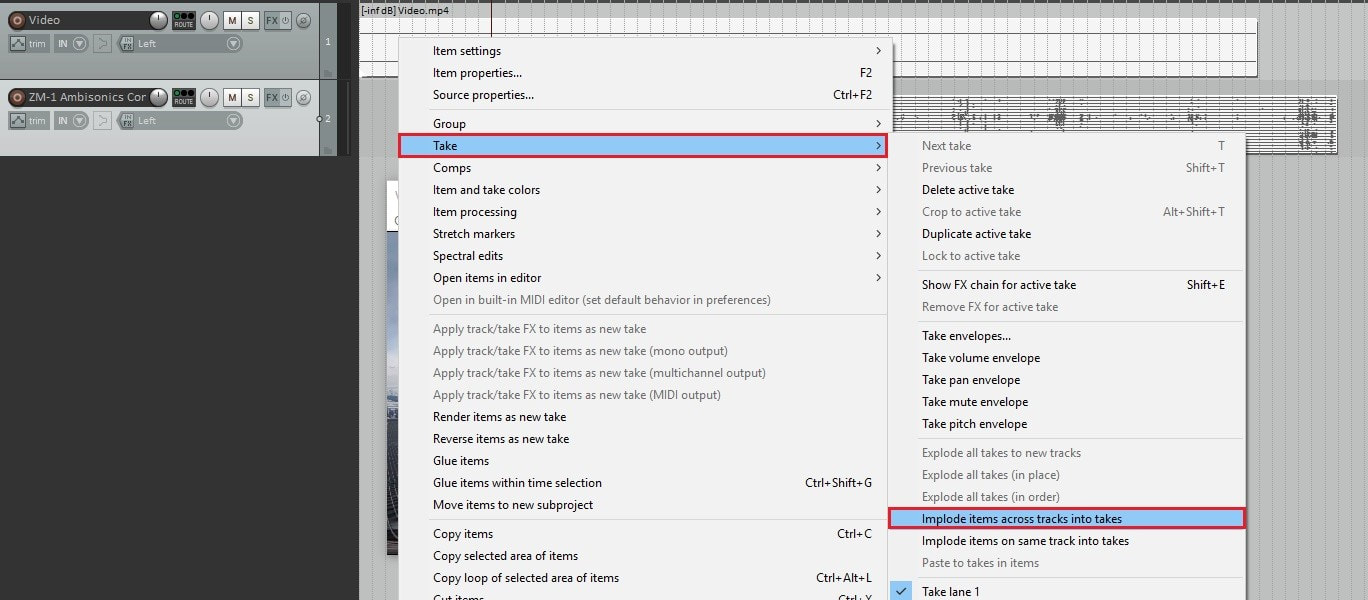 Step 5 – Show both takes. To show both takes, click on Options – Show all takes in lanes (when room) or press Ctrl + L 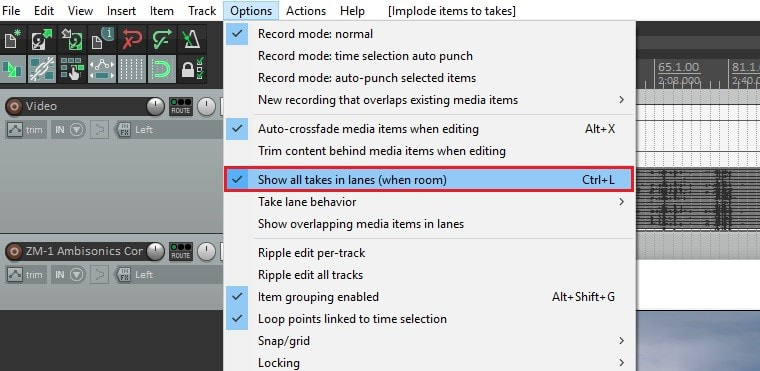 Step 6 – Change the number of channels to 20. Click on the Route button and change the number of track channels from 2 to 20, this is required to utilize the 19 multichannel of the ZM-1. 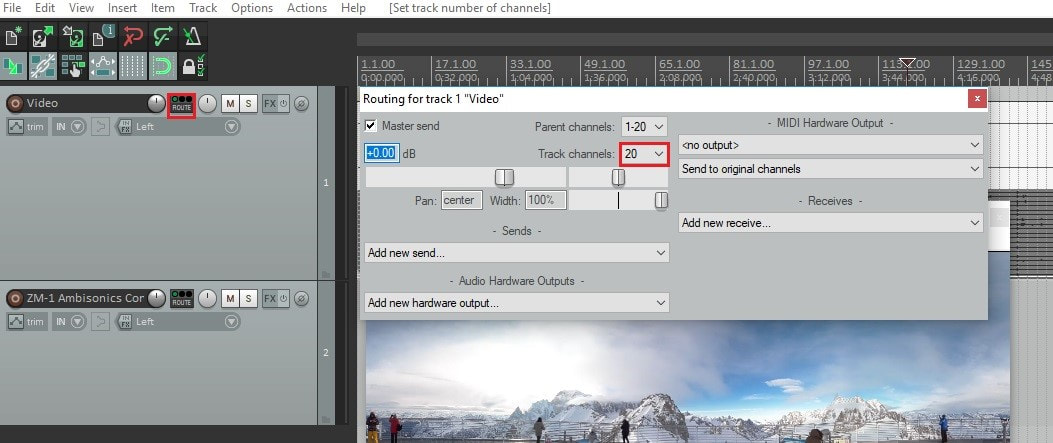 Step 7 - Play both takes simultaneously. If we press play right now, it will only play the selected take, therefore we need to be able to play both takes simultaneously, therefore: Right click on the track – Item settings – Play all takes. 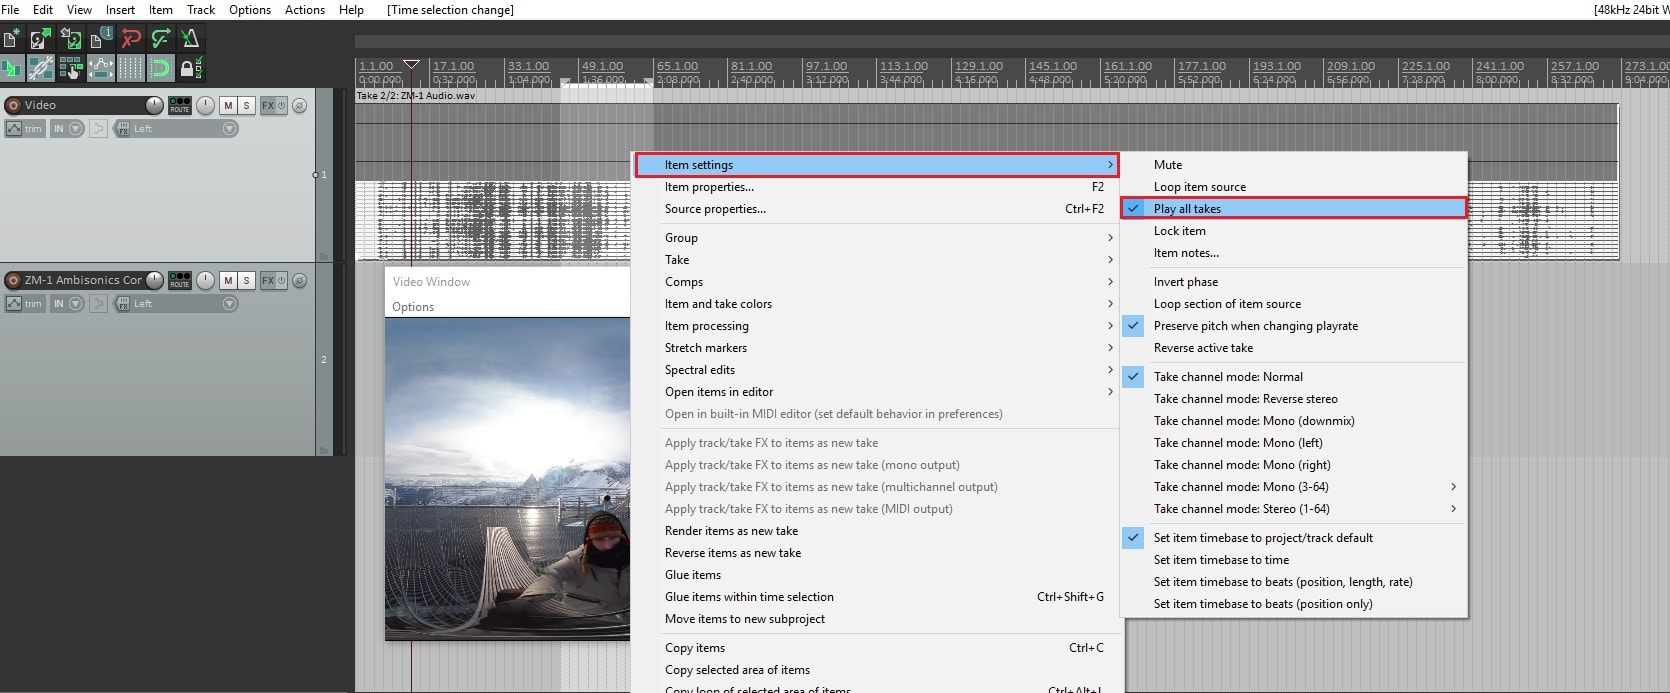 Step 8 – Change 360 video to standard video. Next we will need to convert the 360 video to equirectangular video to visualize and control the rotation of the camera. To do so, open the FX window on our main track and search for Video processor. 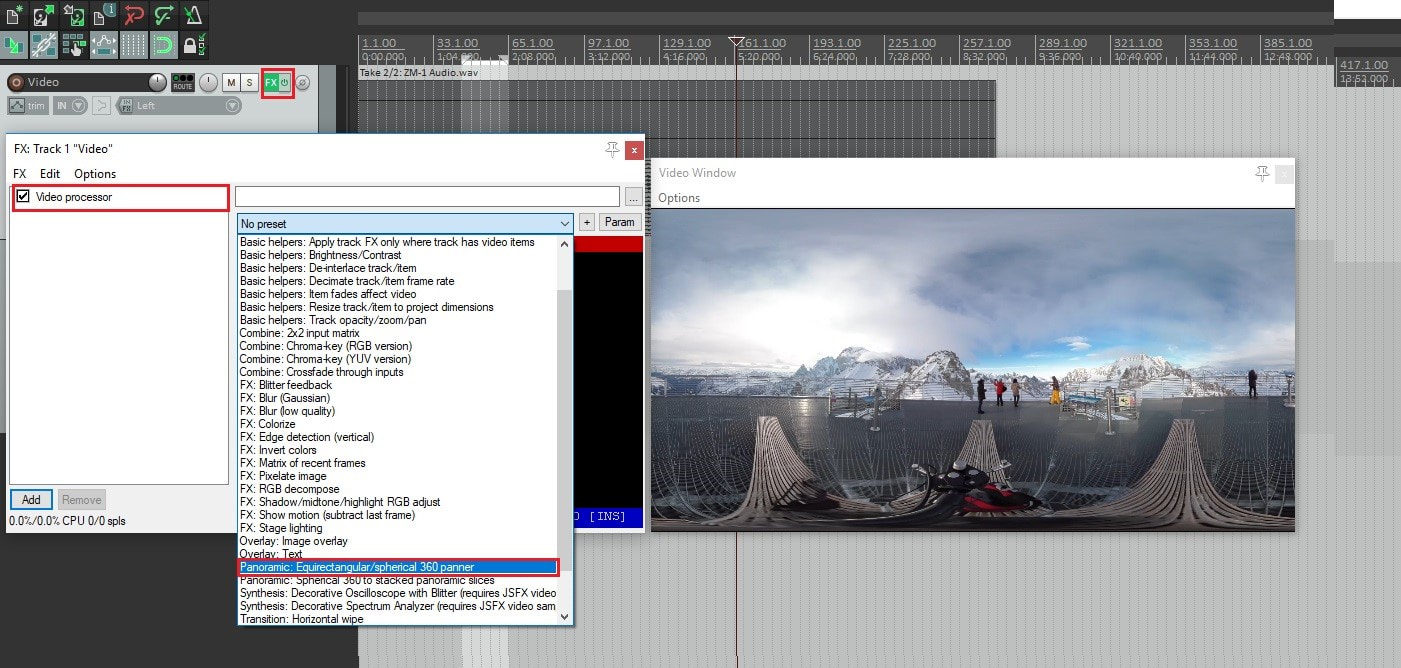 On the preset selection, choose Equirectangular/spherical 360 panner, this will flatten your 360 video allowing you to control the camera parameters such as field of view, yaw, pitch and roll.  Step 9 – As FX, add ZYLIA Ambisonics Converter plugin and IEM binaural Converter. On the FX window add as well:
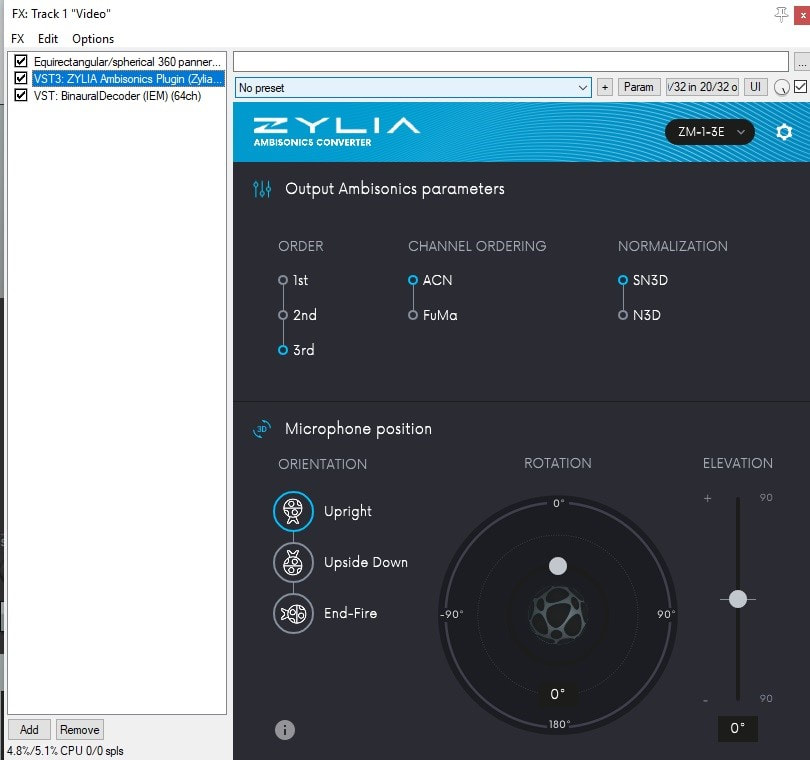 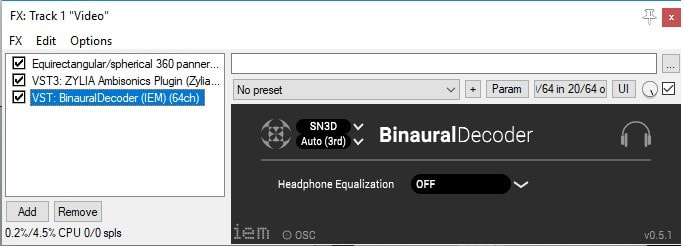 You should now have the binaural audio which you can test by changing the rotation and elevation parameters in ZYLIA Ambisonics Converter plugin. Step 10 – Link the rotation of both audio and video. The next steps will be dedicated to linking the Rotation of the ZYLIA Ambisonics Converter and the YAW parameter from the Video Processor. On the main track, click on the Track Envelopes/Automation button and enable the UI for the YAW (in Equirectangular/spherical 360 panner) and Rotation (in ZYLIA Ambisonics Converter plugin). 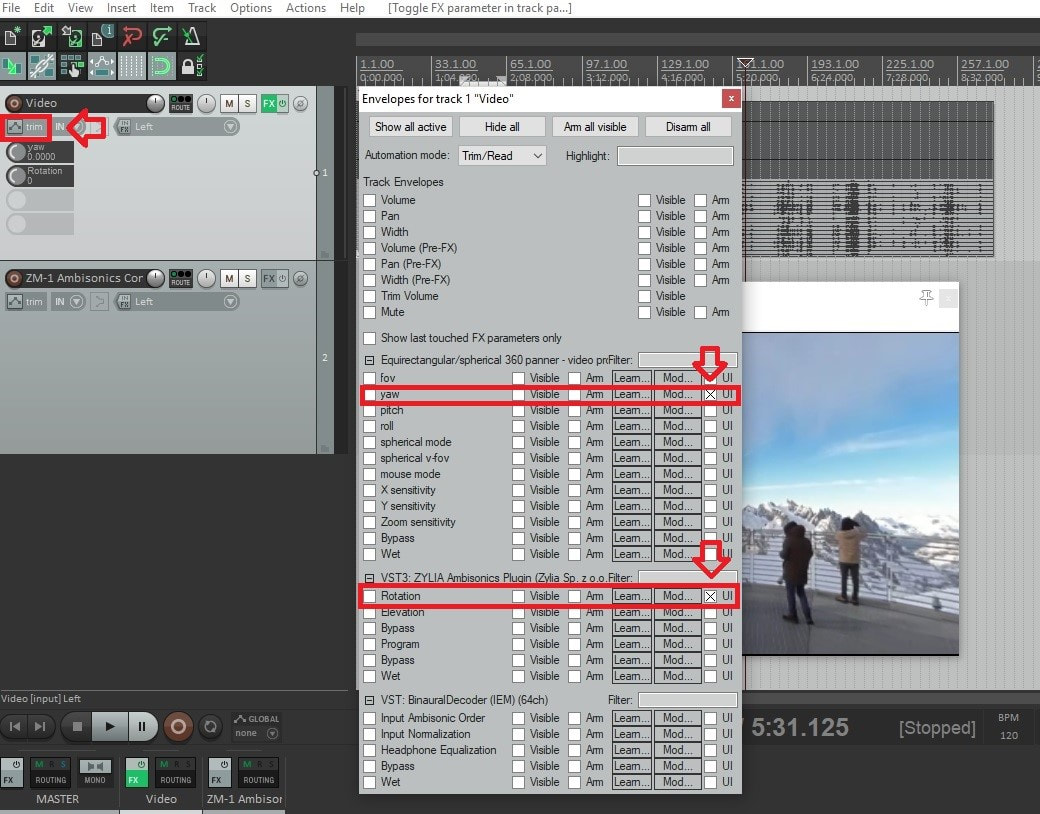 Step 11 – Control Video yaw with the ZYLIA Ambisonics Converter plugin. On the same window, on the YAW parameters click on Mod… (Parameter Modulation/Link for YAW) and check the box Link from MIDI or FX parameter. Select ZYLIA Ambisonics plugin: Rotation 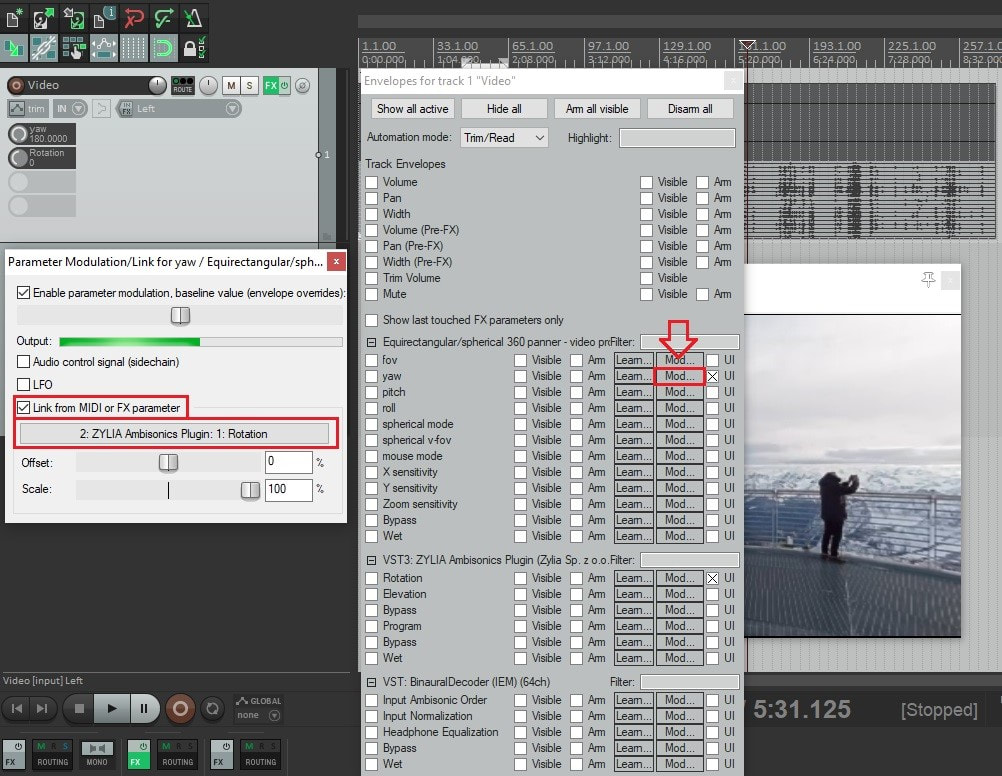 Step 12 – Align the position of the audio and video using the Offset control. On the Parameter Modulation window you are able to fine-tune the rotation of the audio with the video. Here we changed the ZYLIA Ambisonics plugin Rotation Offset to -50 % to allow the front of the video match the front of the ZM-1 microphone. 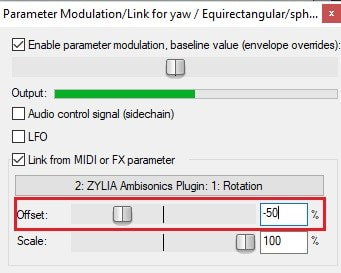 Step 13 – Change the Envelope mode to Write. To record the automation of this rotation effect, right-click on the Rotation parameter and select Envelope to make the envelope visible.  After, on the Rotation Envelope Arm button (green button), right click and change the mode to write. 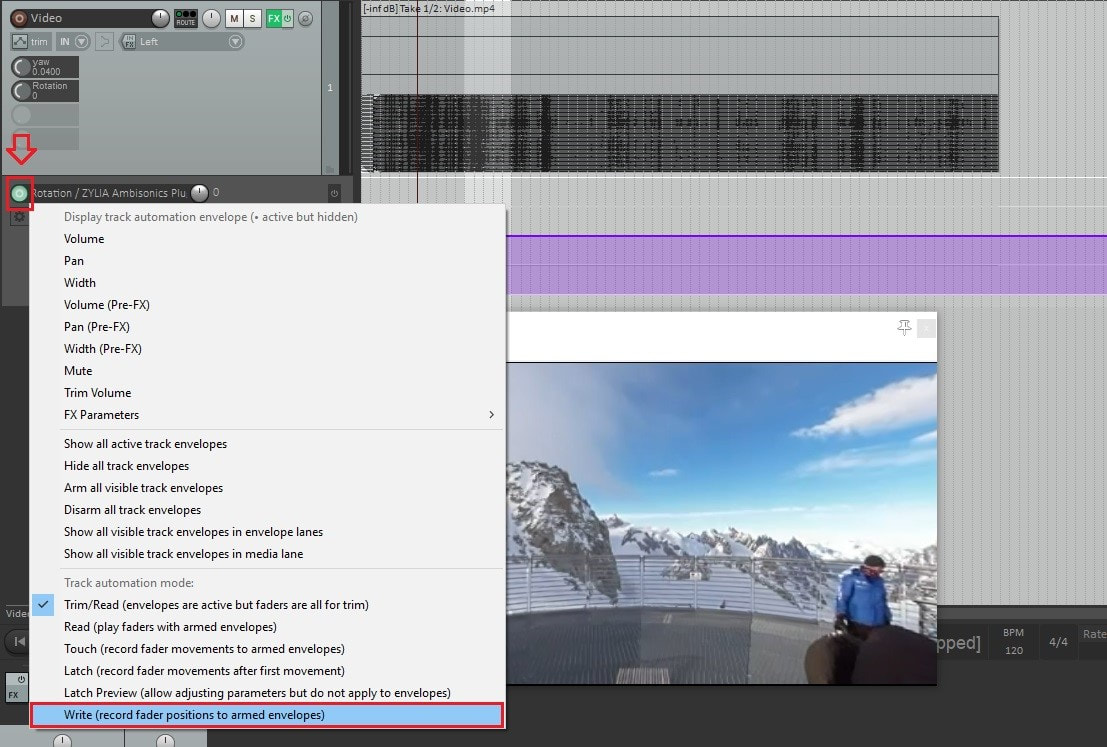 By pressing play you will record the automation of video and audio rotation in real time. Step 14 – Prepare for Rendering After writing the automation, change the envelope to Read mode instead of Write mode. 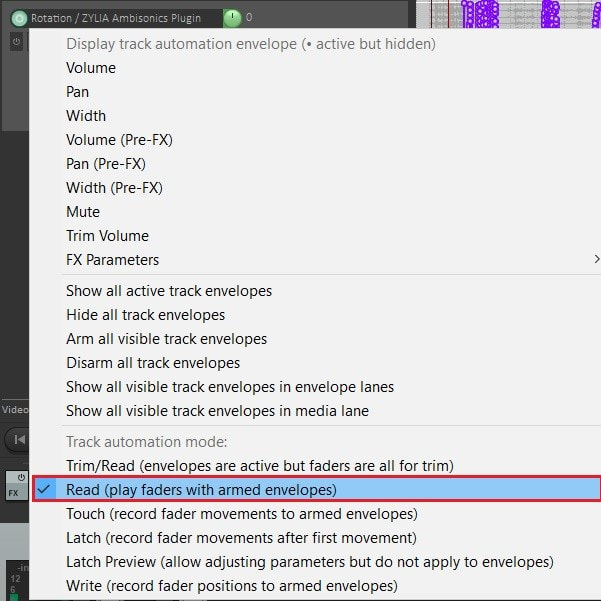 Disable the parameter modulation from the YAW control: Right click on Yaw and uncheck “Link from MIDI or FX parameter” 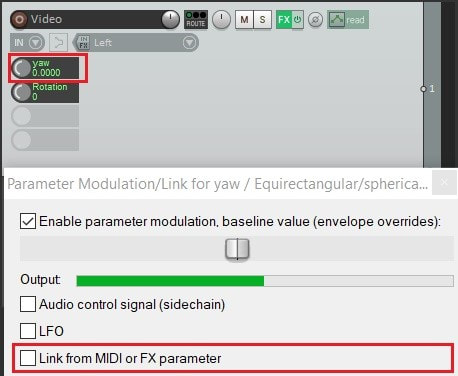 OPTIONAL: Replace your video file with the uncompressed version. If you have been working with a compressed video file, this is the time to replace it with the original media file. To do this, right click on the video track and select item properties. 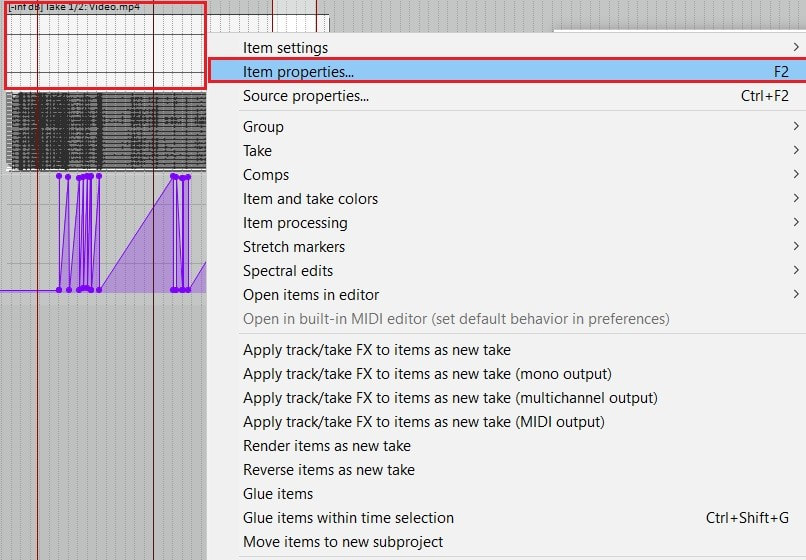 Scroll to the next page and click Choose new file. Then select your original uncompressed video file. 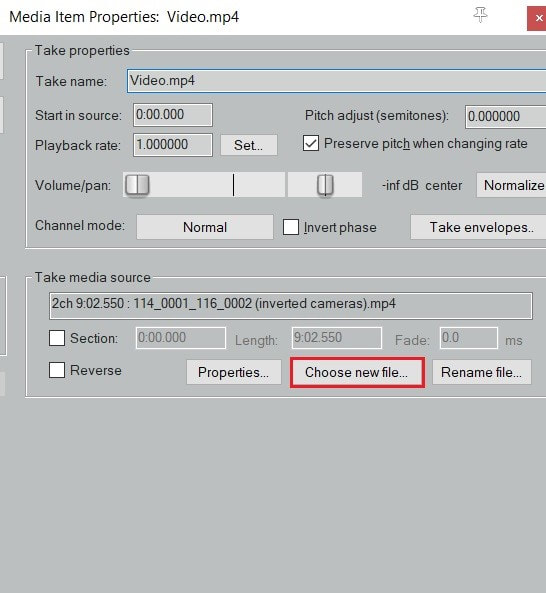 Step 15 – Render! You should now have your project ready for Rendering. Click on File – Render and set Channels to Stereo. On the Output format choose your preferred Video format. We exported our clip in .mov file with video codec H.264 and 24bit PCM for the Audio Codec. 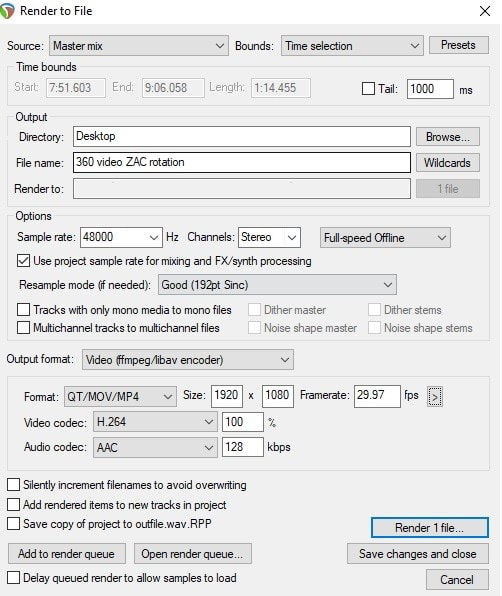 Thank you for reading and don’t hesitate to contact us with any feedback, questions or your results from following this guide.
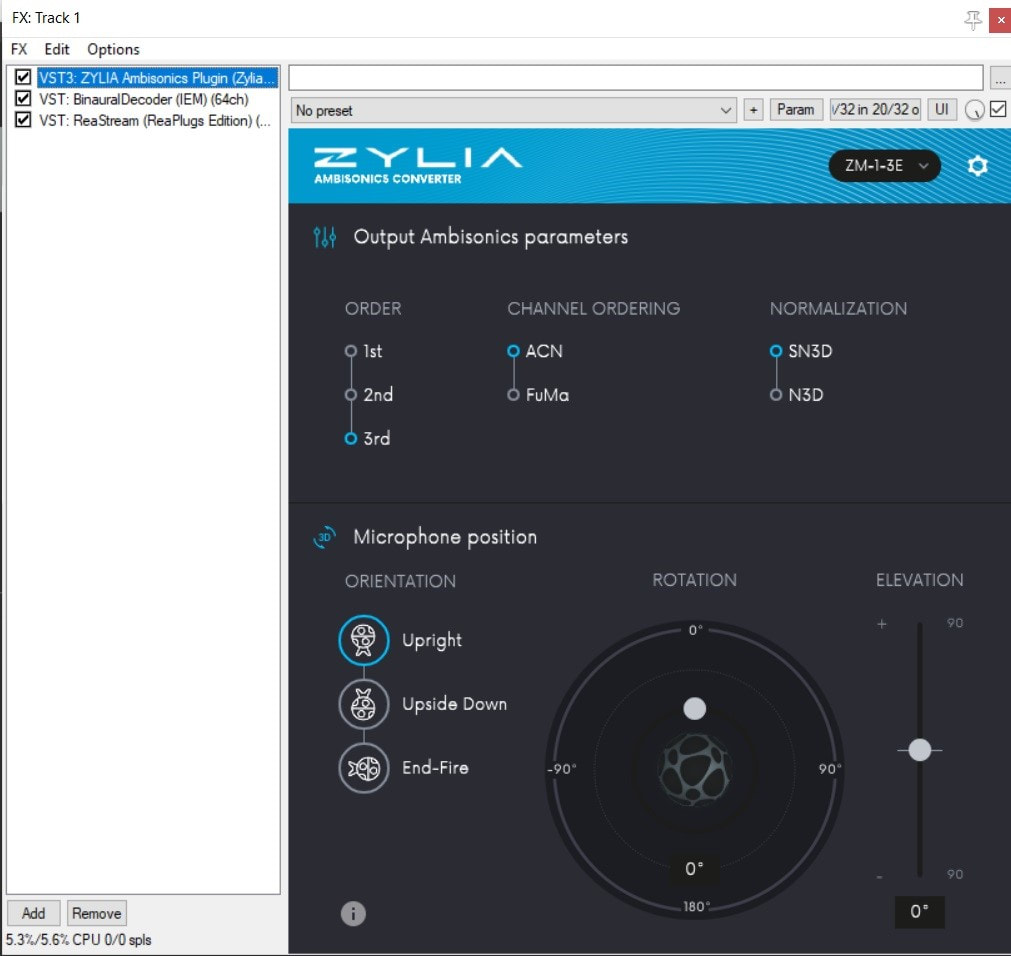
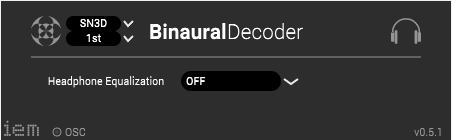
by Pedro Firmino In continuation to our previous blog post “How to stream 3D audio in Binaural format with ZYLIA ZM-1 and ZYLIA Ambisonics Converter plugin” ... Here is how you are able to accomplish the same effect in a Windows system using a DAW with ReaStream and ZYLIA Ambisonics converter plugin. What you require: - ZYLIA ZM-1 microphone array - ZYLIA Ambisonics Converter plugin - BinauralDecoder plugin by IEM ( https://plugins.iem.at/ ) - ReaStream plugin (https://www.reaper.fm/reaplugs/ ) - DAW of your choice. - OBS (as a streaming application) Step 1: Receive input of the ZM1 into your DAW As the first step we need to receive the input from the 19 channels of the ZM-1 to a track in the DAW, therefore connect the ZM-1 microphone, open your DAW and select the ZM-1 as your Audio device. 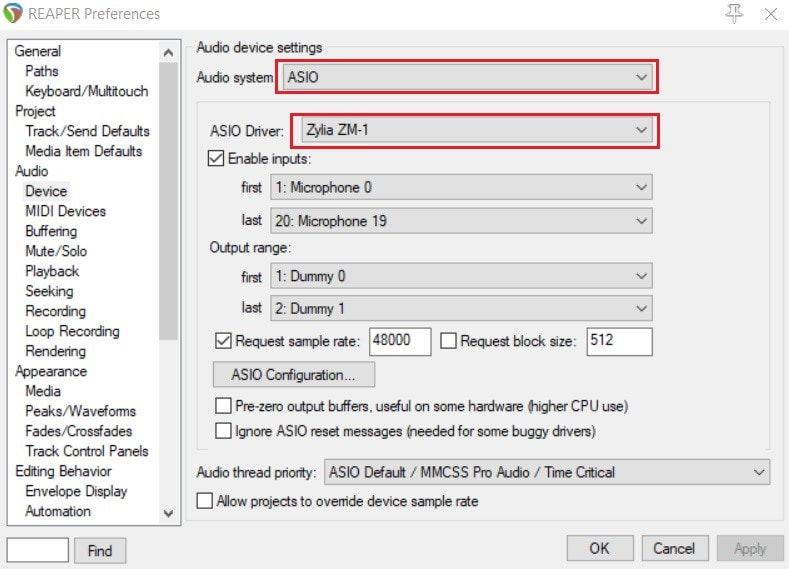 Afterwards, create a track, change the number of channels from 2 to 20 and add the ZM-1 as a 20 channel input source. 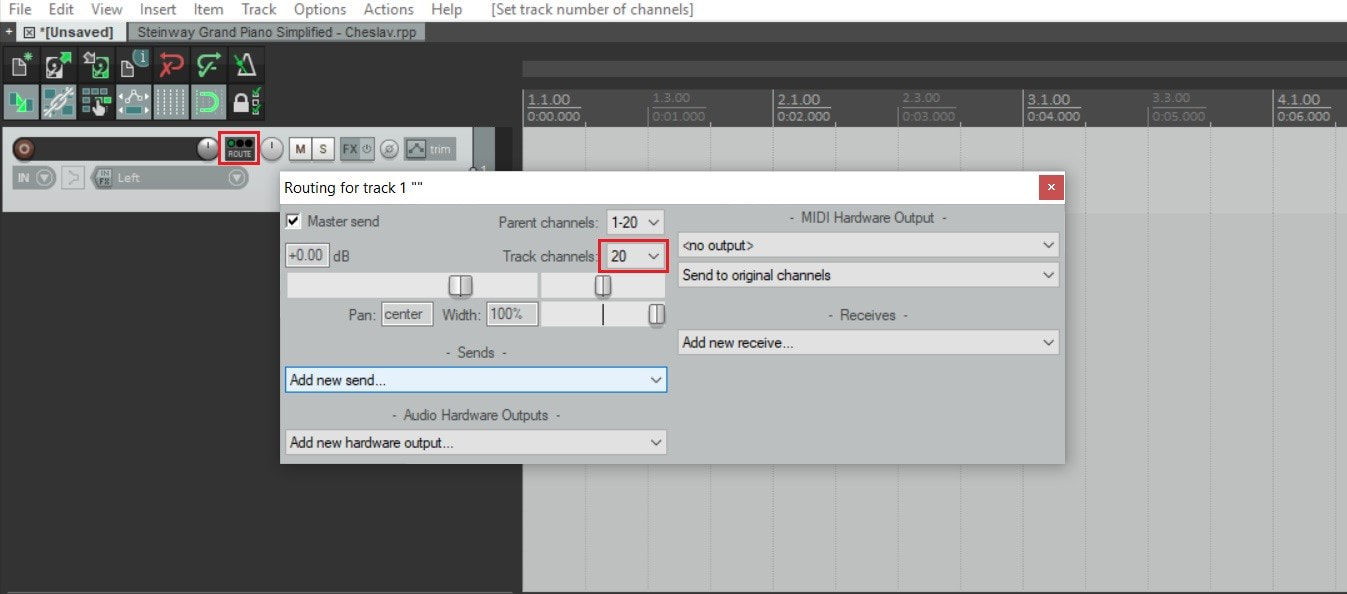 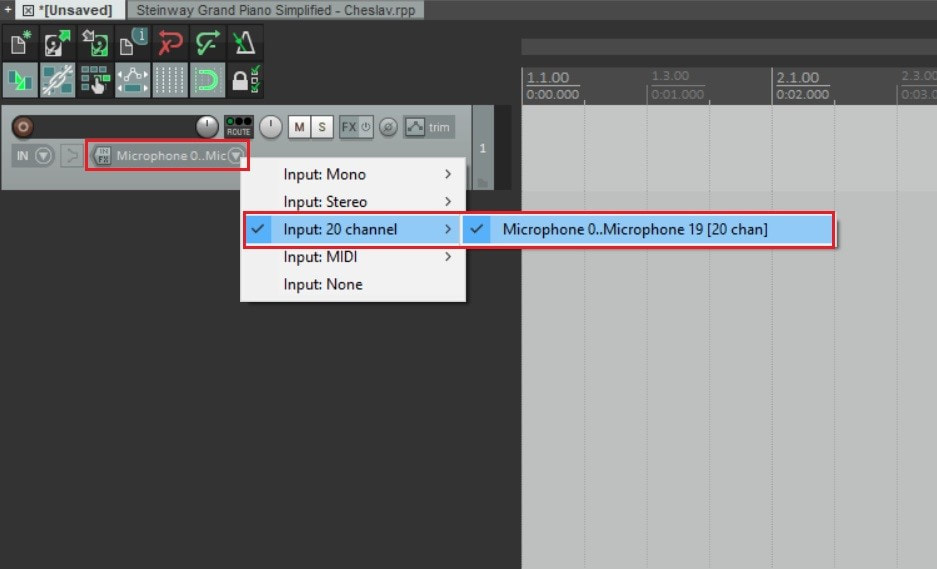 By arming the track to record, you should now be receiving the 19 multichannel signal from the ZM-1 into your DAW. Step 2: Achieving Binaural sound using ZYLIA Ambisonics Converter plugin and IEM Binaural Decoder On the FX chain of the ZM-1 input track you will have to add the following plugins in this specific order:
 On the BinauralDecoder, you may choose to add some headphone equalization if you believe it’s necessary for the streamed audio. 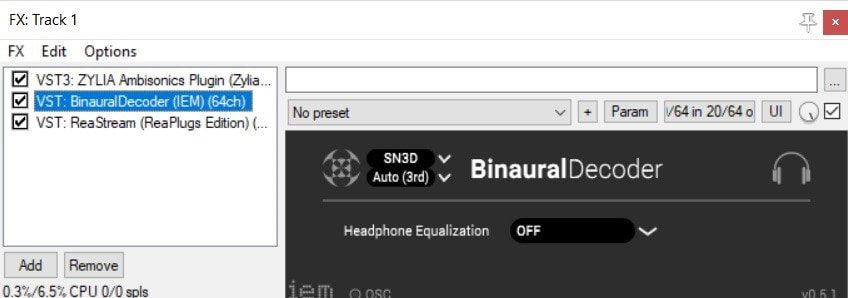 For last, in the ReaStream plugin, remember to have your track armed and enable live monitoring. To send the output for your streaming application, enable “send audio/MIDI” in the ReaStream plugin and select “local broadcast” from the dropdown list. 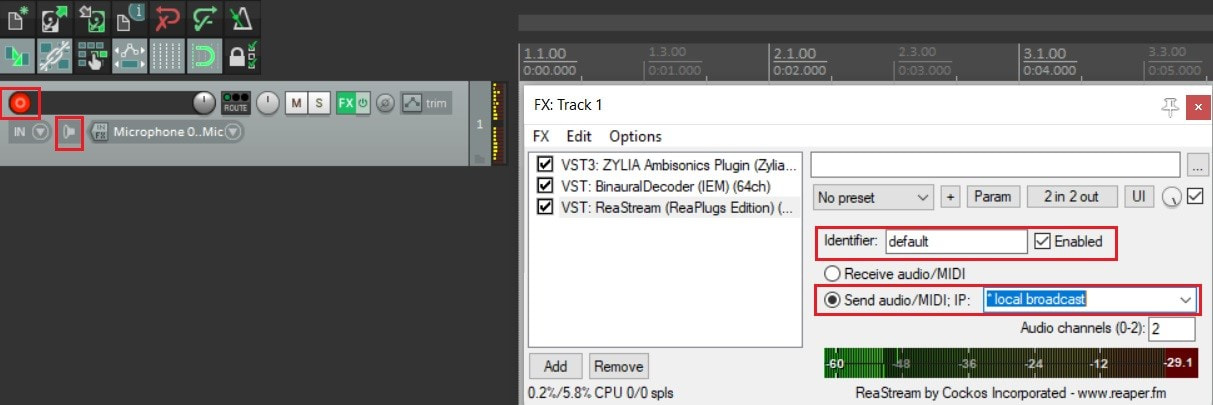 Step 3: Receive the signal in OBS On the right side of OBS, open the Settings and click the Audio settings. In the Desktop Audio choose your output device. In this case Speakers. Confirm with OK. With the Desktop Audio added, click on the cog Icon and select Filters. 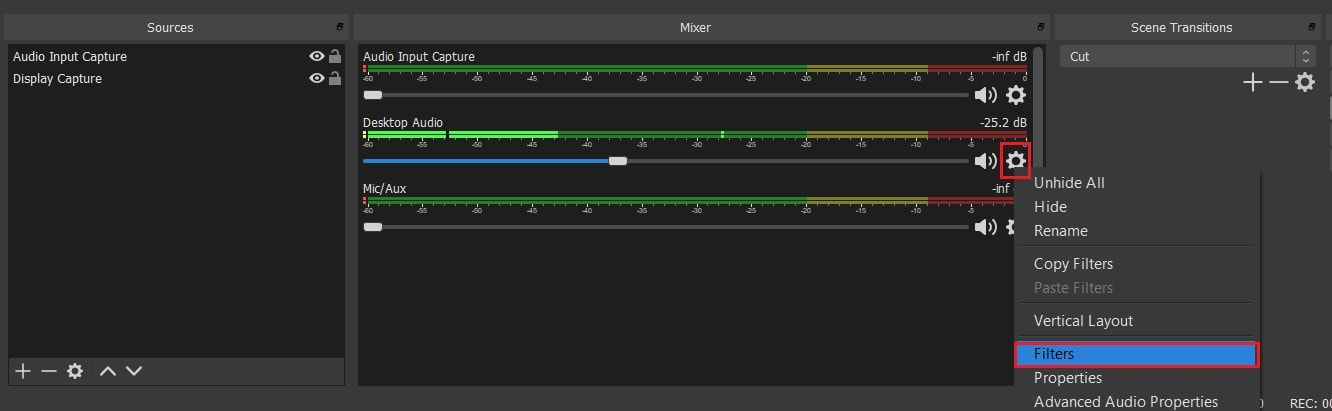 In the + Icon add a new VST 2x Plug-in: Choose ReaJs (it is included in the ReaPlugs vst pack). Click the Open plugin interface, click Load – Utility – Volume. Set the volume to the lowest. 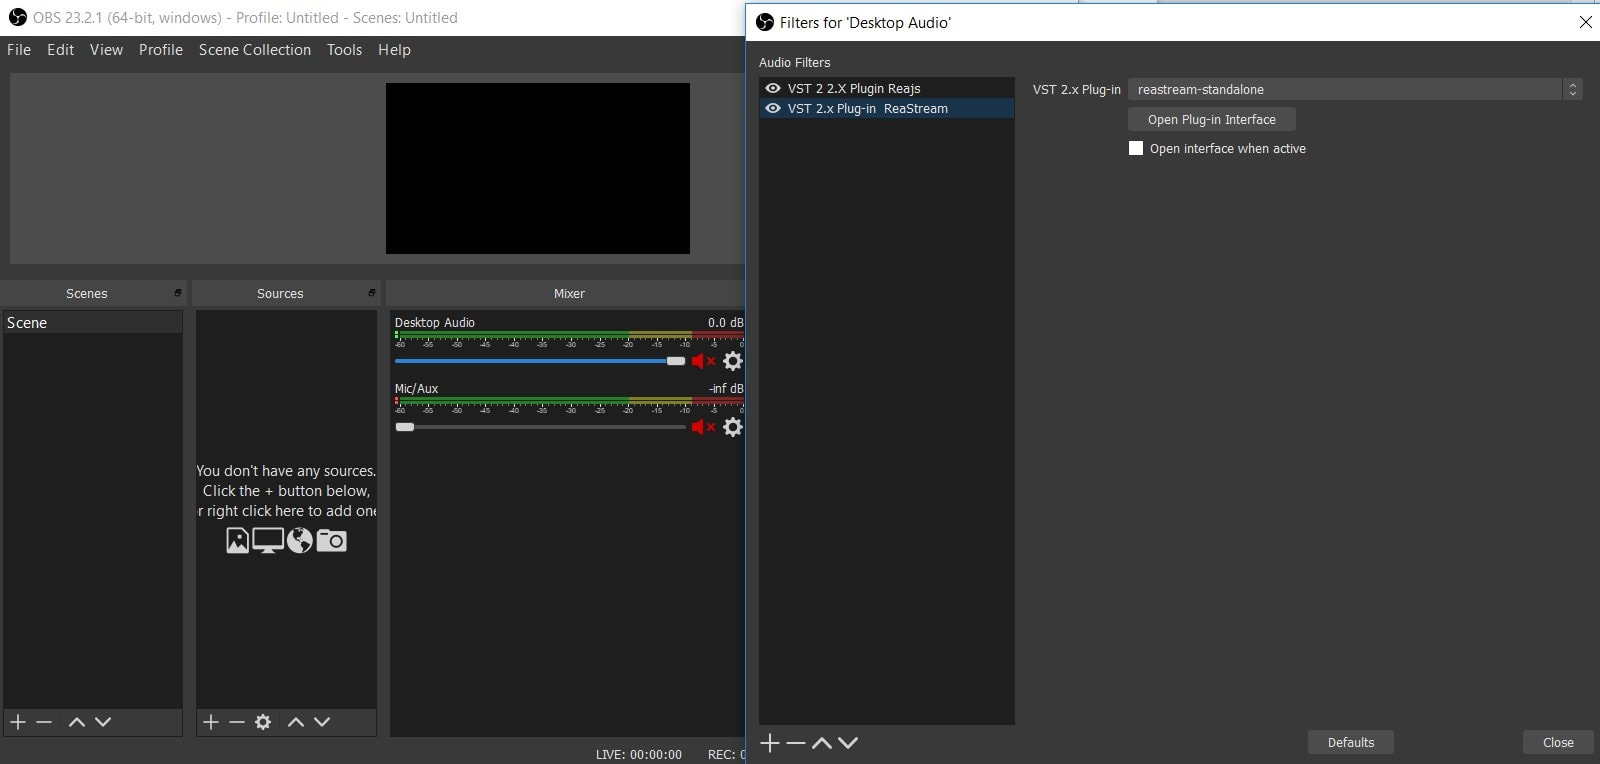 On the Filters window, also add ReaStream-standalone plugin. Open the Plug-in Interface and select to receive. Make sure the identifier is the same as in the Reaper session.
You will now be using the ZM-1 as an input audio device and are ready to start streaming!
by Eduardo Patricio
Let’s talk about recording music!
This tutorial will address key points to help you improve your sound and get to a great demo with your ZYLIA MUSIC set. All you need is the ZM-1 mic, ZYLIA Studio application and your music.
Before going any further, the general tips / rules apply:
Ok, have said that, as usual, let’s break it down into steps: 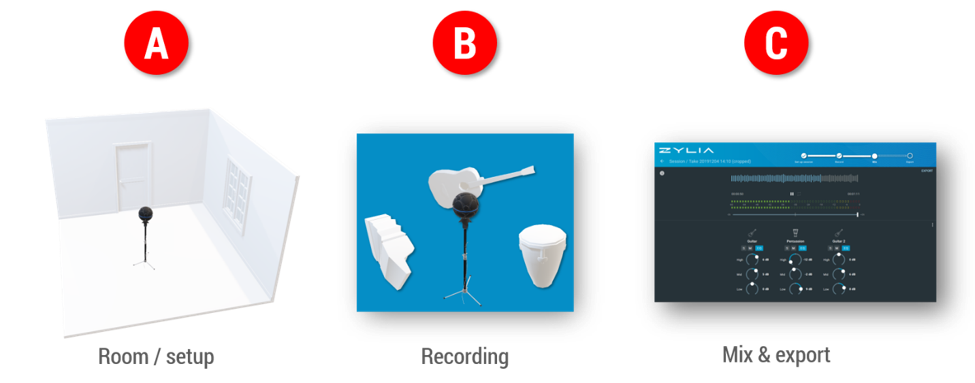
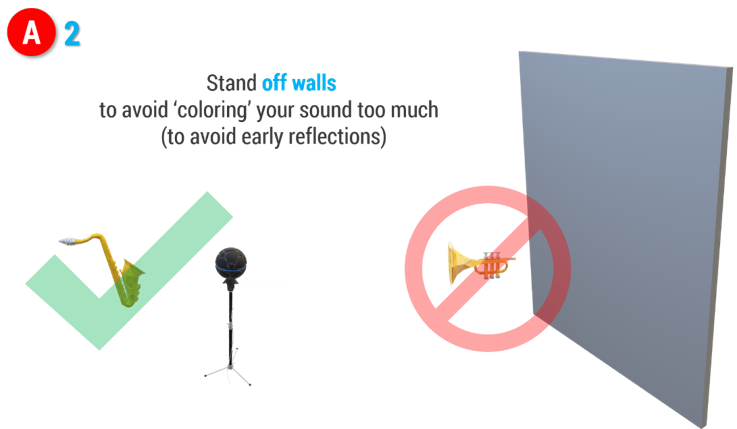
A - Rehearsal room / Setup
You can record in rooms with great or not-so-great acoustics.
Key things are: A1 - Place the ZM-1 mic in a central position in the room; A2 - Avoid standing near walls. This will help specially if your room doesn’t have great acoustics. 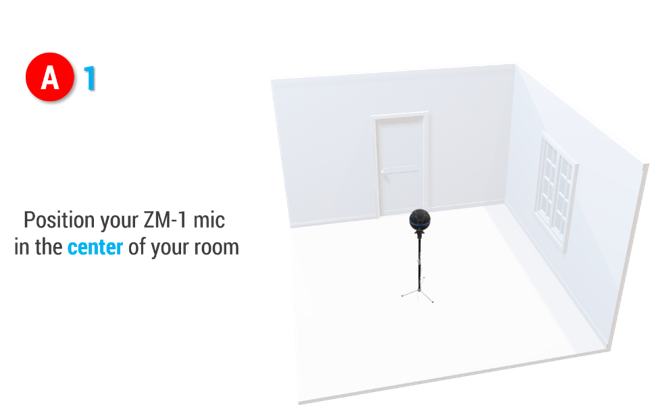
B - Recording

C – Mix and export
Once you have your recording you can adjust the volume of each instrument to get a better balance. You can also apply equalization to enhance desired or hide unwanted characteristics of each instrument.
EQ example
If you record 2 guitars, say, with different functions (one focused on doing chords and the other more high-pitched patterns or solos), you can enhance the low end of the 1st and the high end of the 2nd one.
When you’re done with your mix, just export your demo and that’s it! 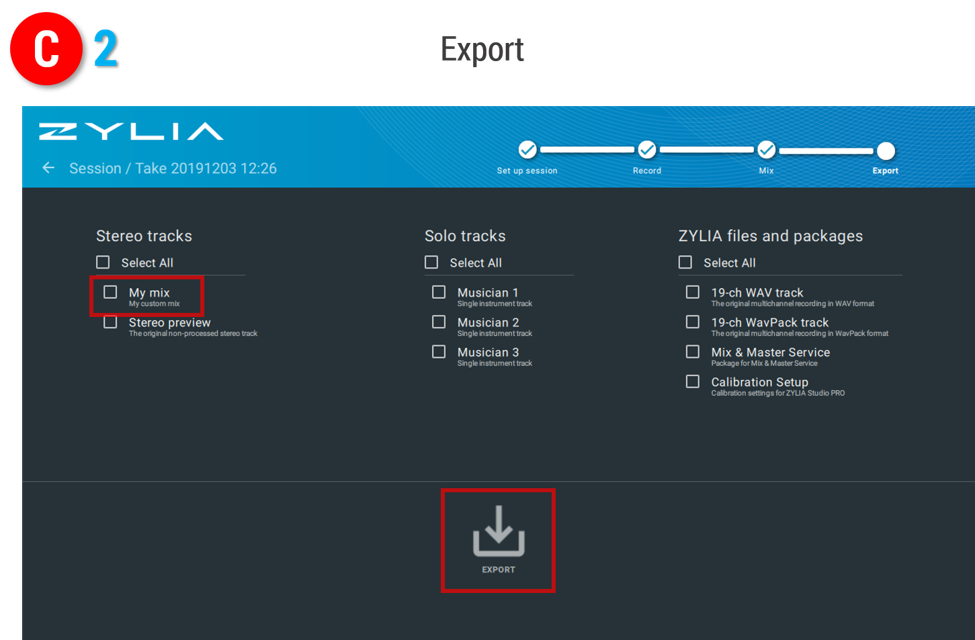
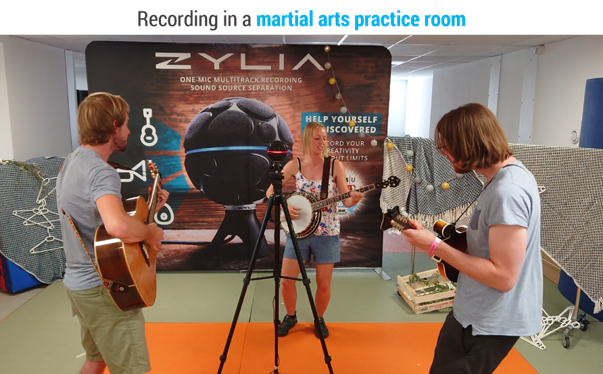
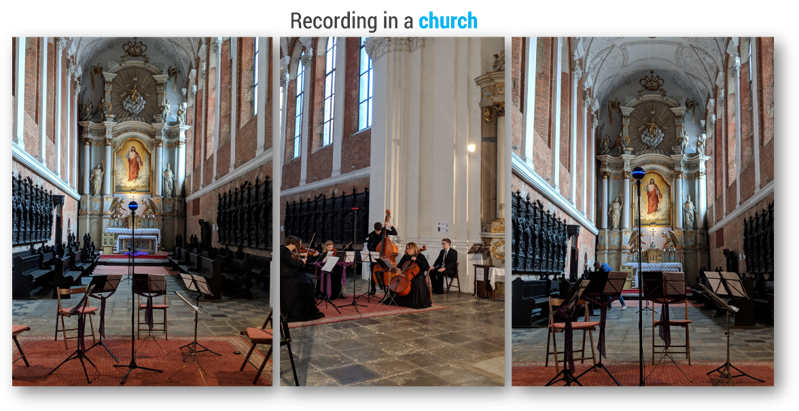
To illustrate, here are 2 ZM-1 examples of ZM-1 recordings in completely different spaces, a martial arts practice room and in a church. Have a listen!
Recording done in a room with, err…, not-so-great acoustics
Recording done in a room with beautiful and style-matching acoustics
If you’d like to go further with mixing, you can either:
Here are some related useful resources for you:
Tutorial: Recording an acoustic guitar with the ZM-1 mic Tutorial: How to record classical music
Let’s have a look at an easy way to get a music track done, from recording to mastering. It’s quick tutorial time!
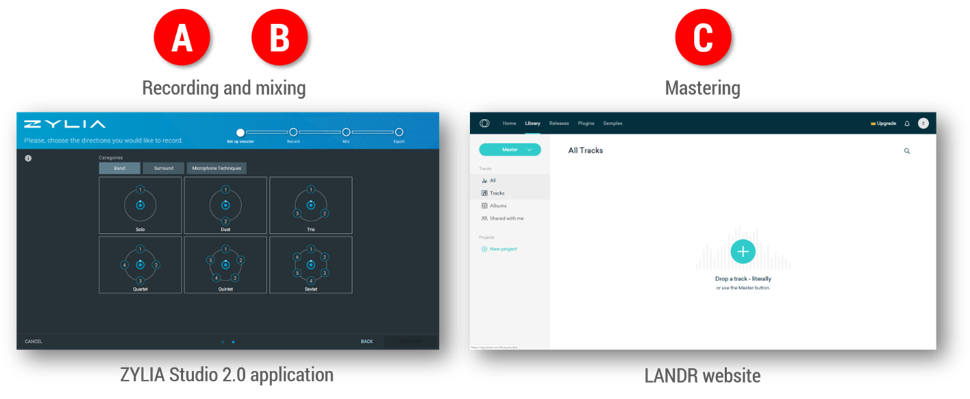
Alright, the main steps to take are: (A) recording, (B) mixing and (C) mastering.
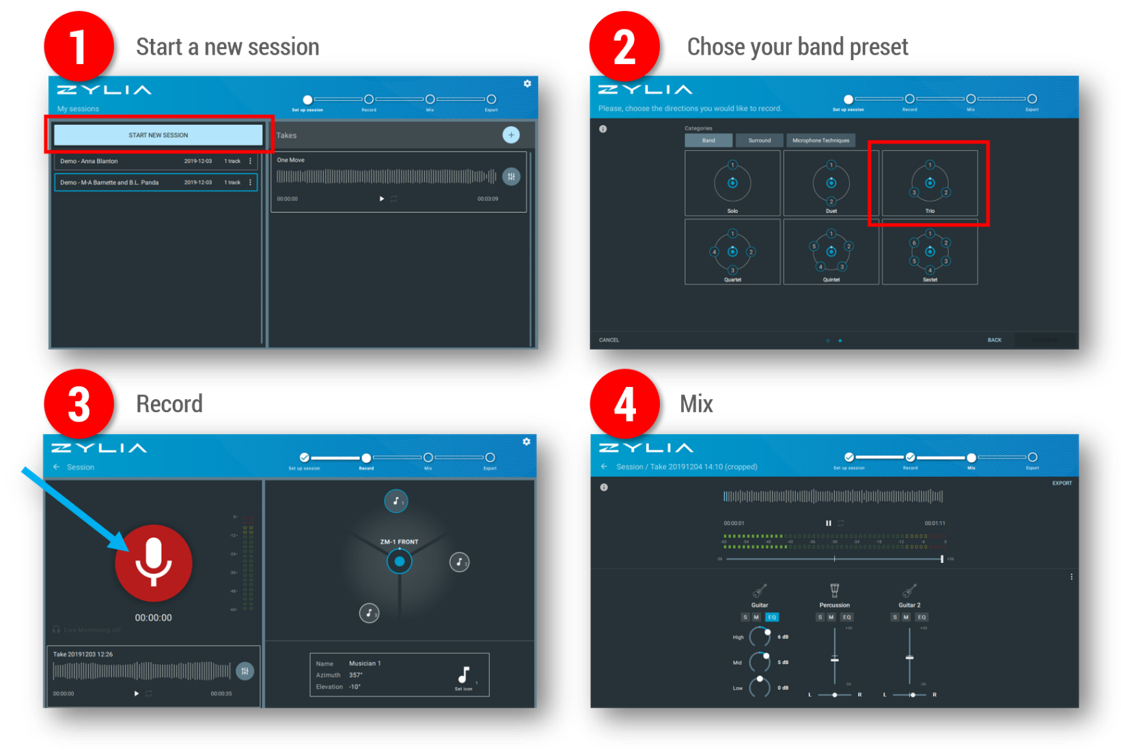
Let’s breakdown main steps A and B in ZYLIA Studio (5 sub-steps):
Note
In step 4 (Mix), for each instrument, you can define:
Once you’re happy with you mix, it’s time to export the resulting stereo file: 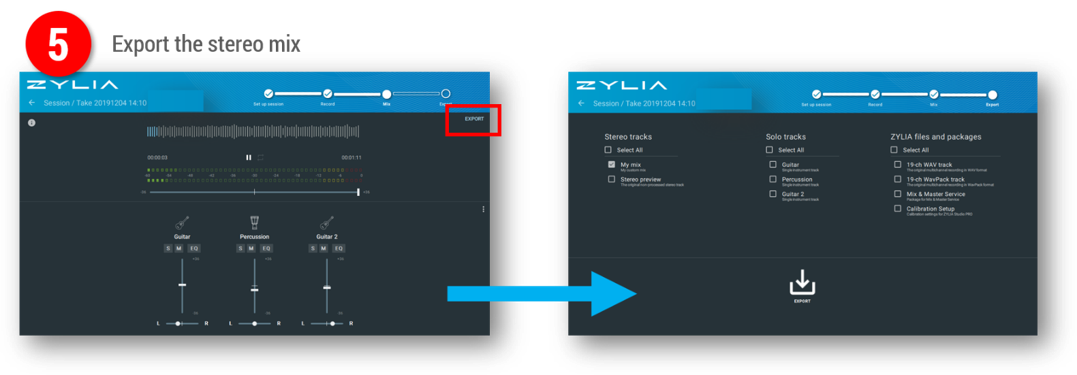
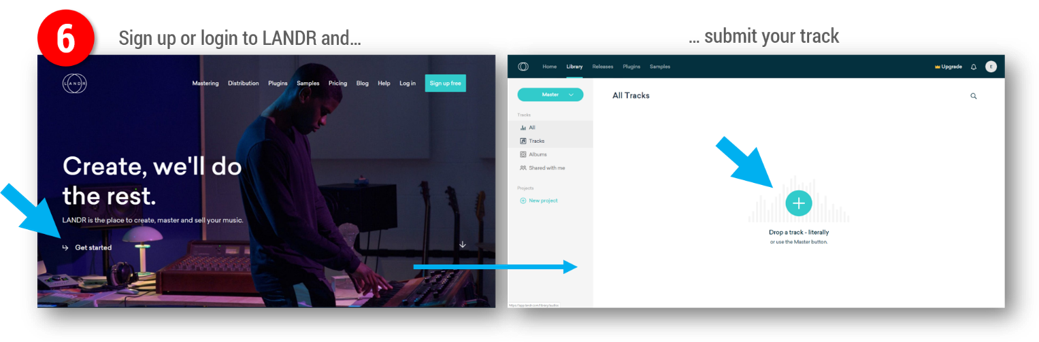
The 6th sub-step (the last one!) is submitting your track to be mastered by the folks at LANDR.com
by Eduardo Patricio In general VR related workflows can be complex and everyone seems to be looking for standard solutions. Here, we will show you, step by step, how to prepare a 360 video with spatial audio in, possibly, the shortest way! Required gear:
After following steps A, B and C, you’ll have a video file with 1st order Ambisonics spatial audio that can be played on your computer with compatible video players (e.g. VLC) or uploaded to YouTube. 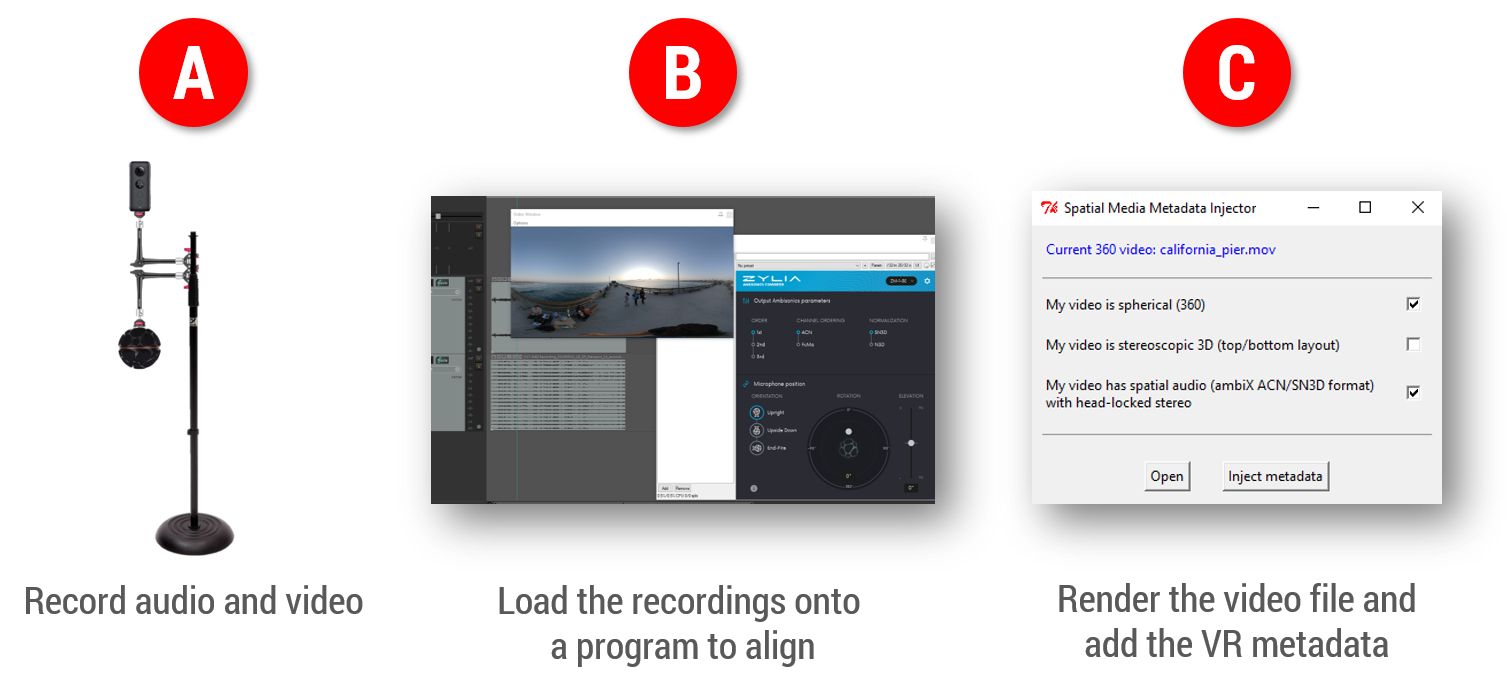 OK, let’s have a close look at each step.
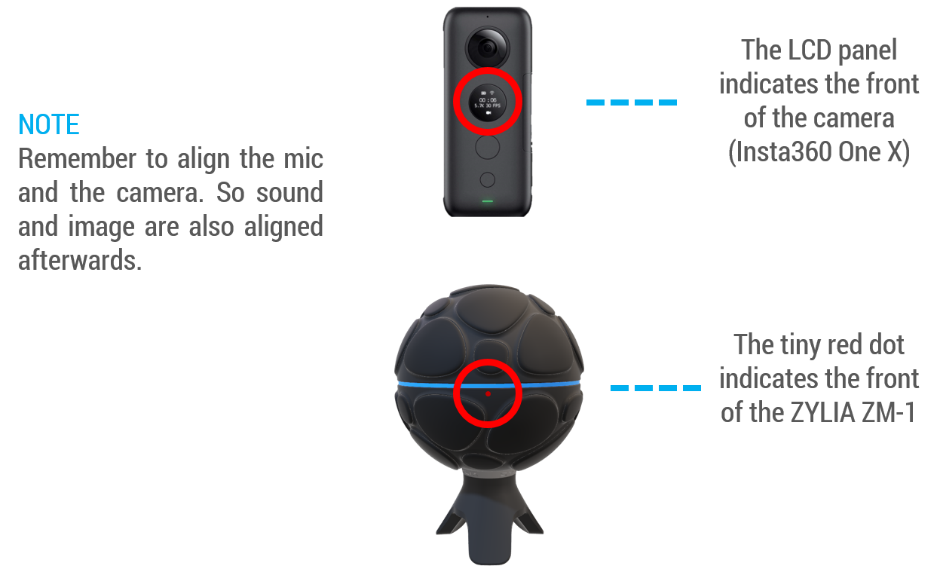 Having said that, a small horizontal offset is not the end of the world
With the gear in place, start recording both audio and video and clap in between the mic and the camera. The clap sound spike can be used to sync the footage later.
Here’s a video showing all the sub-steps in Reaper: Note If you need to check how the recording sounds, add a binaural decoder plugin (e.g. IEM Binaural decoder) to the audio track, after ZYLIA Ambisonics Converter.
That’s it! Now you can enjoy the spatial audio
*Software tools used
Mounting:
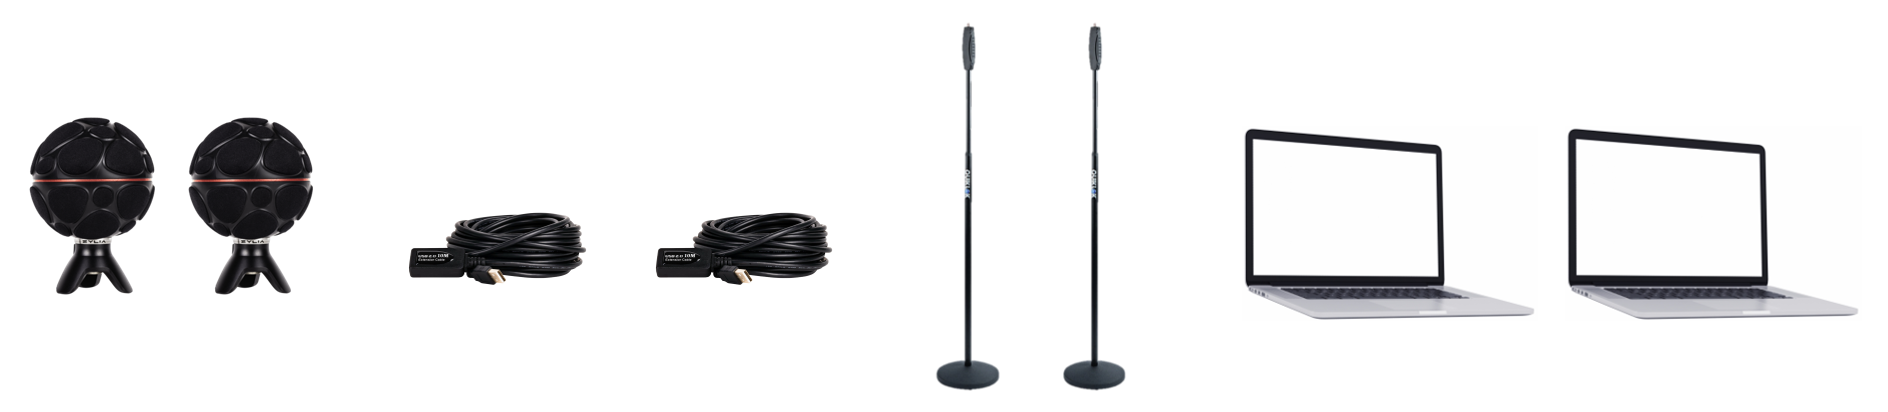
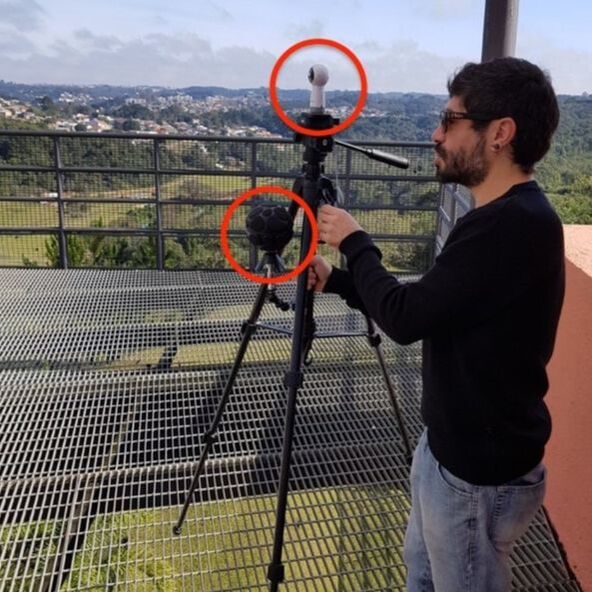
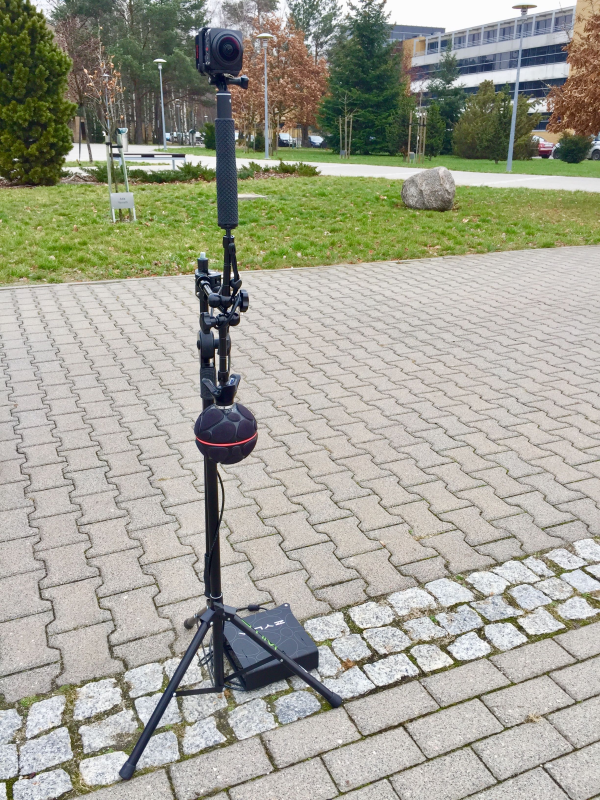
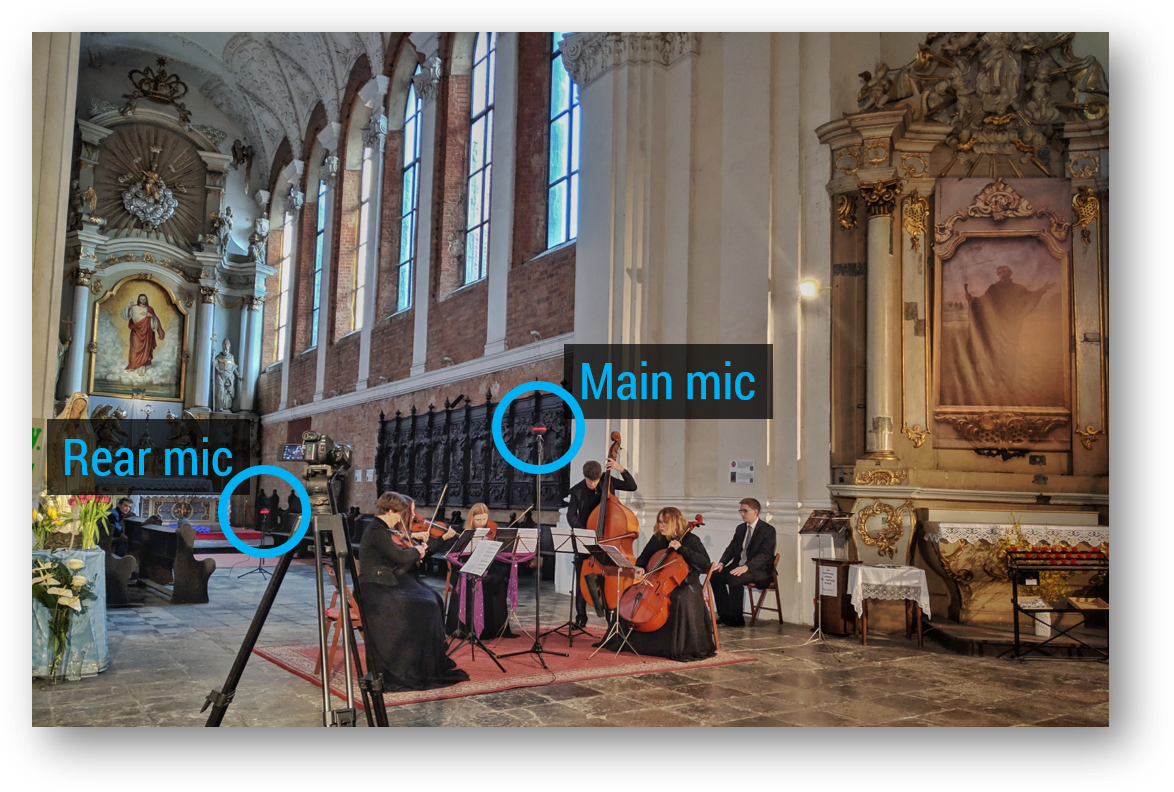
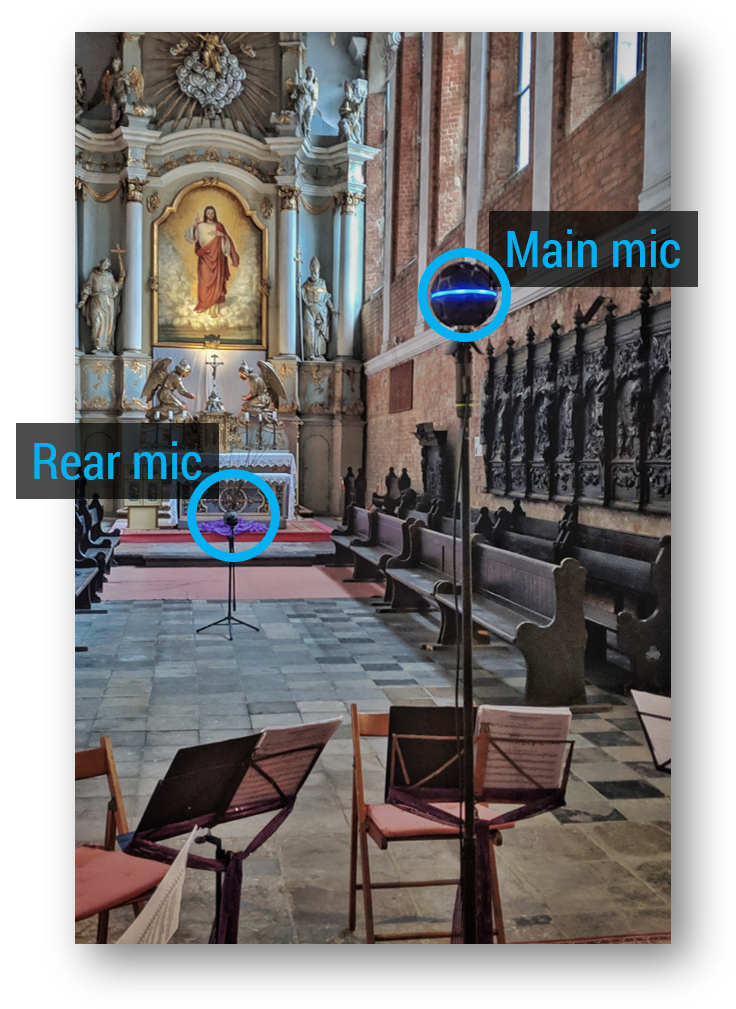
https://www.amazon.com/Stage-MY550-Microphone-Extension-Attachment/dp/B0002ZO3LK/ref=sxbs_sxwds-stvp?keywords=microphone+clamp+arm&pd_rd_i=B0002ZO3LK&pd_rd_r=6860690f-2adc-4b00-a80e-de436939ed2b&pd_rd_w=GlE2J&pd_rd_wg=qrTTx&pf_rd_p=a6d018ad-f20b-46c9-8920-433972c7d9b7&pf_rd_r=GGS60M0DGQ5DQF44594V&qid=1575529629 https://www.amazon.com/Aluminum-Microphone-Swivel-Camera-Monitor/dp/B07Q2V6CBC/ref=sr_1_186?keywords=microphone+boom+clamp&qid=1575529342&sr=8-186 Amazon: https://www.amazon.com/Neewer-Adjustable-Articulating-Mirrorless-Camcorders/dp/B07SV6NVDS/ref=sr_1_205?keywords=microphone+clamp+arm&qid=1575531393&sr=8-205 Allegro generic alternative for us to test: https://allegro.pl/oferta/ramie-przegubowe-11-magic-arm-do-kamery-8505530470 by Eduardo Patricio Earlier this year (2019), during Easter, we recorded a string quintet concert* with 2 ZM-1 microphones. One in front of the ensemble and 1 behind it. Very simple and portable setup with powerful postproduction possibilities!
Here’s a quick example of the multi-track possibilities we have from the recordings: Equipment used
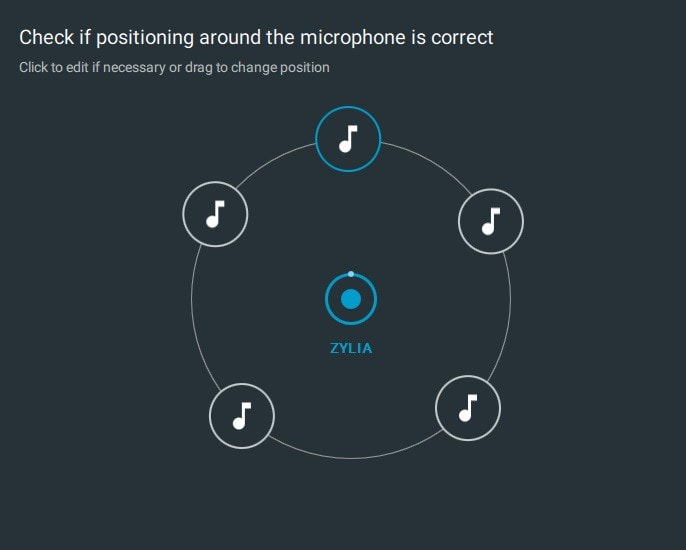
 How we did it Using ZM-1 microphones basically allows you to have multi-track recordings from single mics. Here’s what we did for this project in 5 steps. 1. We recorded the 19 channels from each ZM-1 directly onto DAW tracks on each laptop. The result was 2 uncompressed, 24-bit, 48KHz wave files. 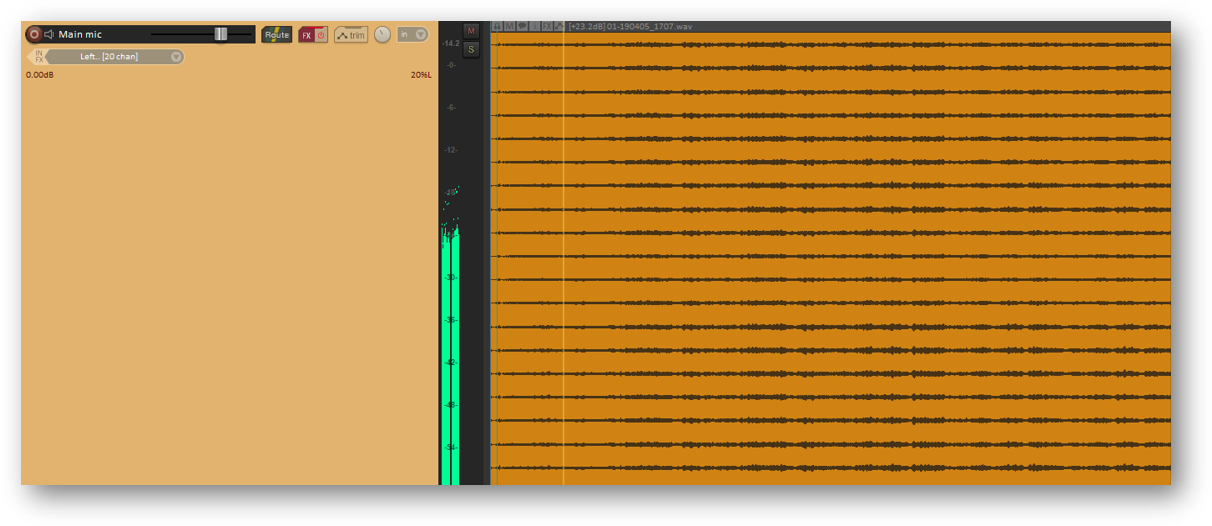 Resulting multi-channel audio file being played back in Reaper. 2. After the recording, we loaded both multi-channel files onto a single DAW session, onto separate tracks. We synchronized the files manually using a clear transient sound (the classic "clap to sync"). 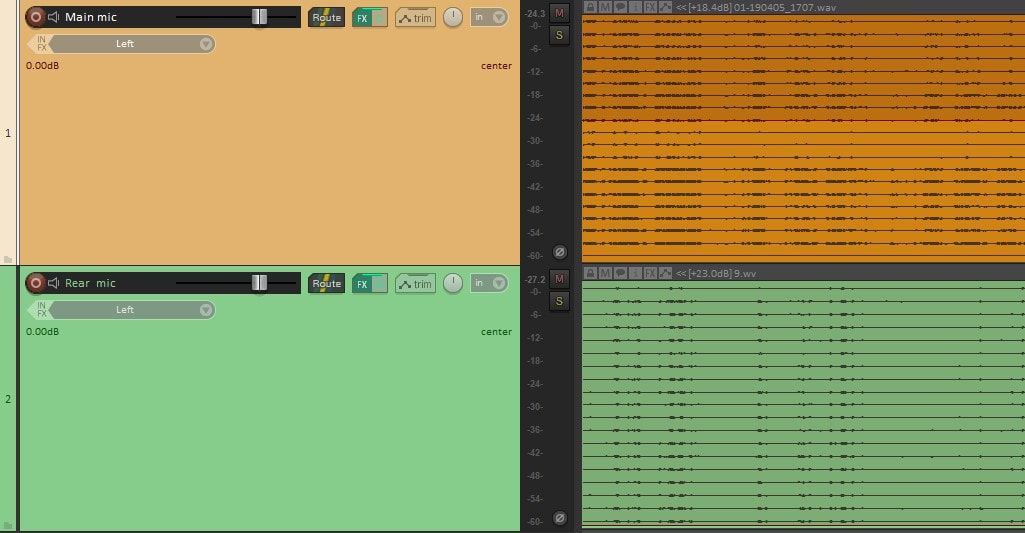 Two 19-channel audio files on 2 DAW tracks. 3. We added ZYLIA Studio PRO plugin to the tracks containing the multi-channel files (one instance of the plugin for each). The plugin converts the recorded information into perfect sound spheres, from which you can extract sounds from any direction. 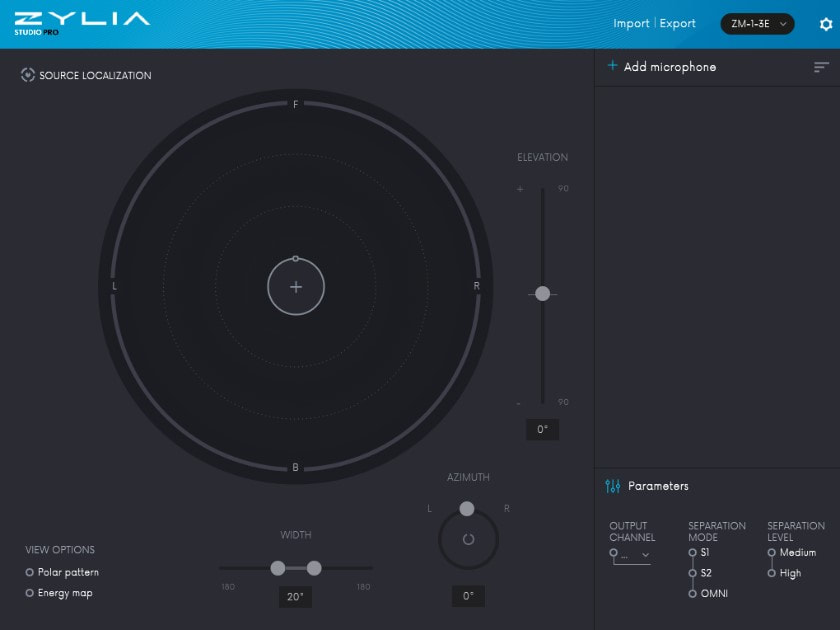 ZYLIA Studio PRO plugin interface before adding any virtual microphones. 4. We added virtual microphones, by clicking on the plus sign in the middle of the circle and defined their direction (in the horizontal and vertical planes) and polar patterns (width). Obs.: That means we basically set up a complex microphone arrangement after the recording, and one that can be tweaked or changed at any moment (!). NOTE: If you don’t know yet how to work with virtual microphones and ZYLIA Studio PRO, you can check the following additional resources: 4A. From the main microphone recordings, 7 virtual microphones were used as seen in the following screen capture: 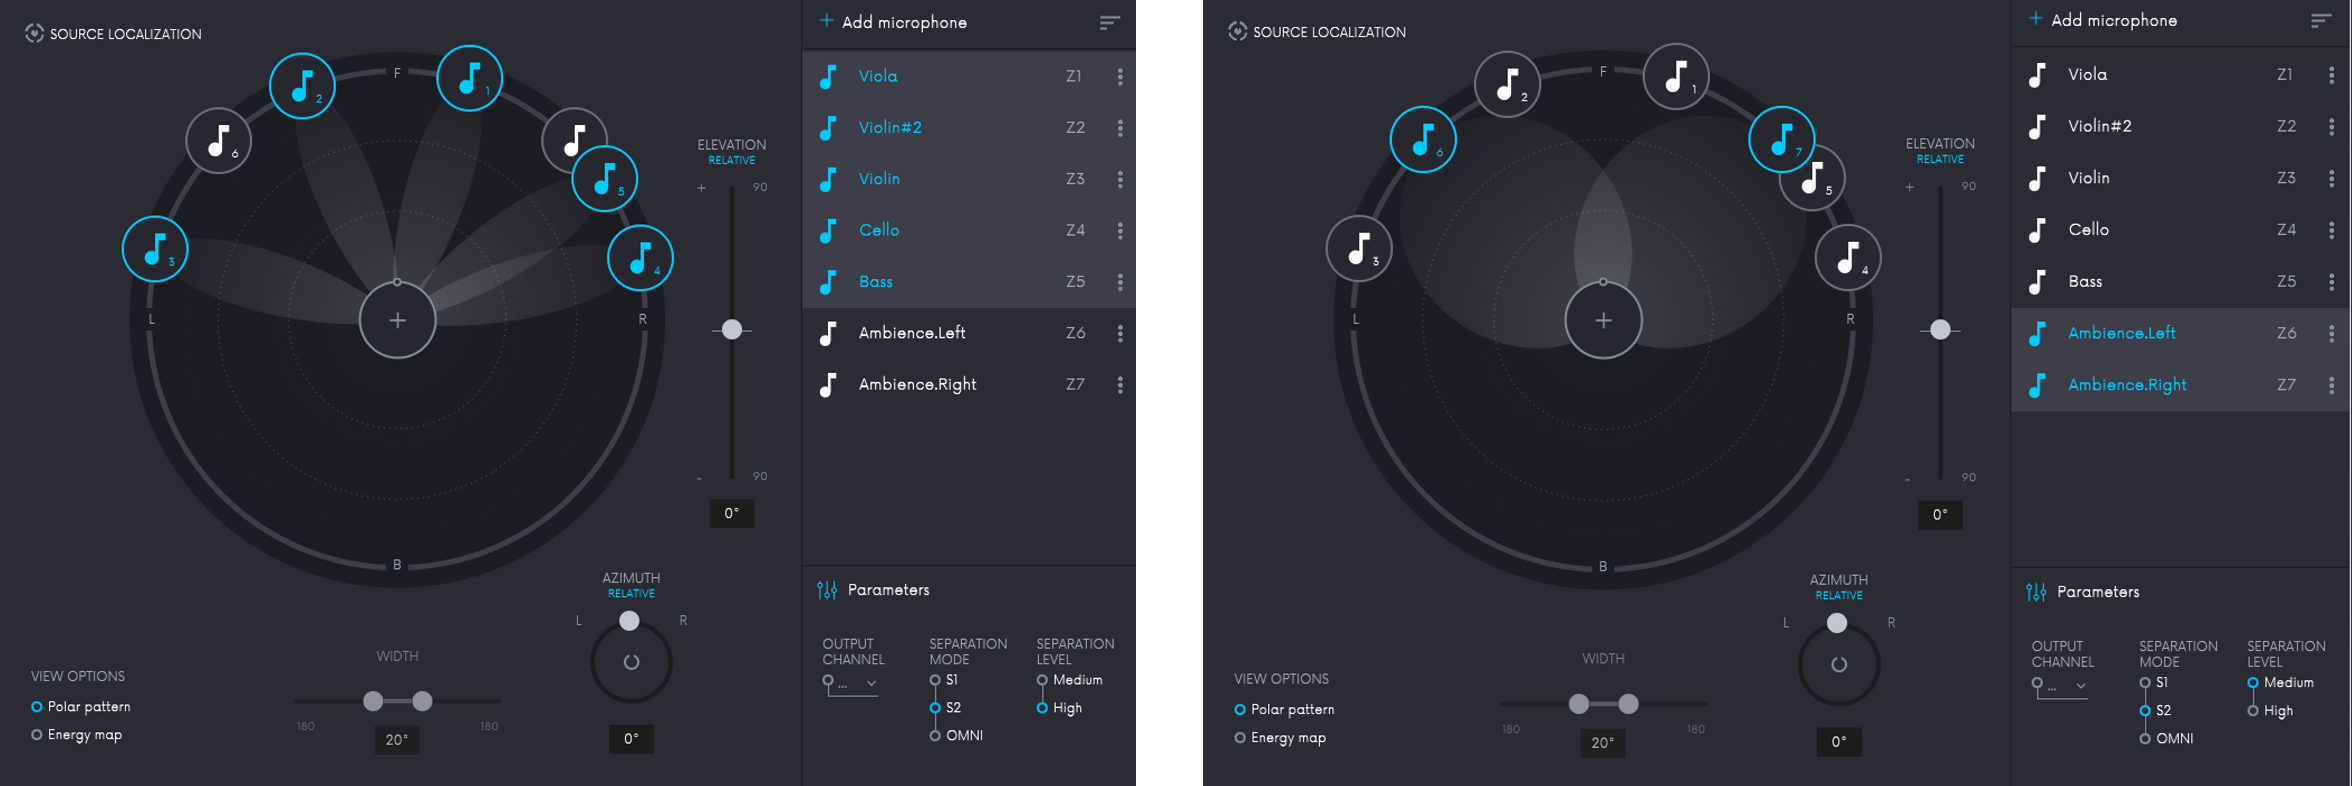 ZYLIA Studio PRO with 7 virtual microphones in place. The virtual microphones Z1 – Z5 were narrow (shotgun-like) ones, pointing at each instrument and using S2 separation mode. Z6 and Z7 form a wide stereo pair, pointing 45˚ up, to capture some of the overall sound and a great deal of reverberant sound. 4B. From the rear microphone recordings, 5 virtual microphones were used as seen in the following screen capture: 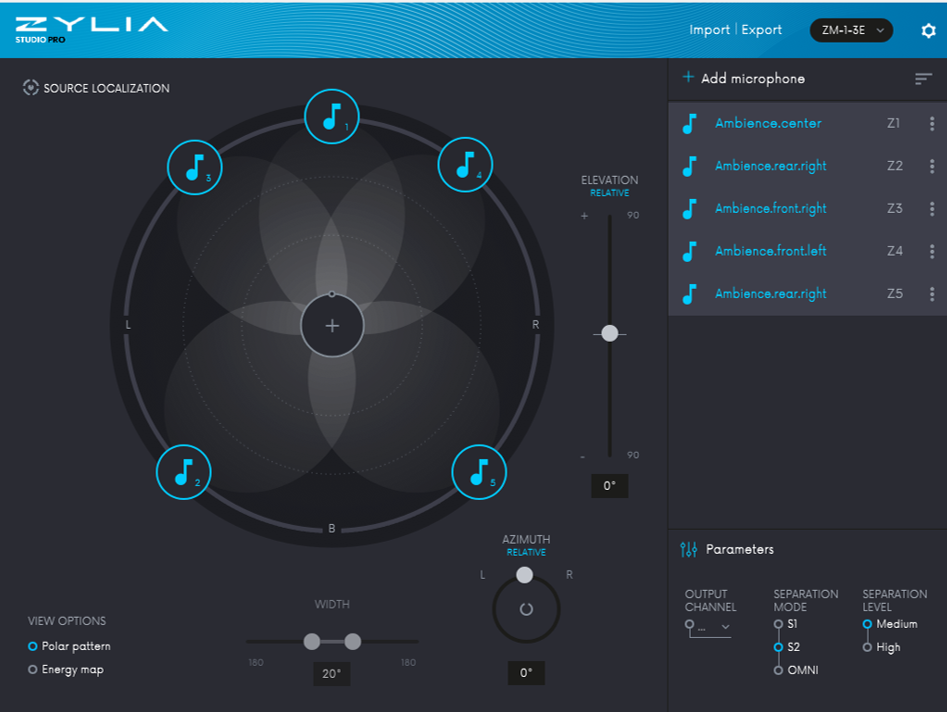 ZYLIA Studio PRO with 5 virtual microphones in place. Detailed configuration of each virtual microphone: Z1: 0˚ azimuth, 33˚ elevation, 60˚ width; Z2 and Z5 form a stereo pair with a sum of 90˚ azimuth, pointing up (-45˚ elevation), and with 60˚ width; Z3 and Z4 form a stereo pair with a sum of 80˚ azimuth, pointing down (-51˚ elevation), and with 60˚ width. 5. We directed each virtual microphone to individual tracks in our DAW and carried on with a regular basic mixing strategy (leveling, panning and EQing). 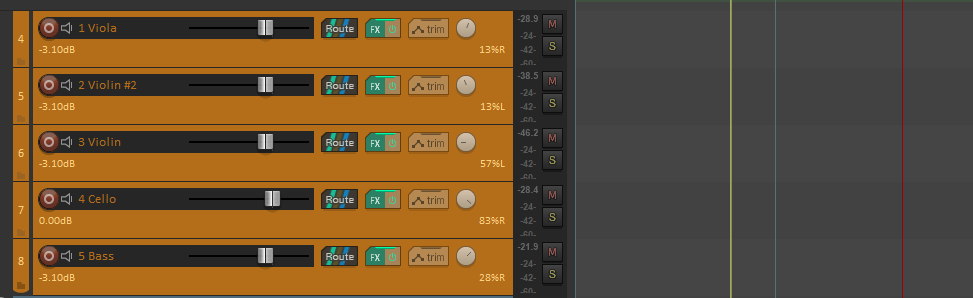 Section of DAW showing the tracks receiving signals from virtual microphones Z1-Z5 (Main ZM-1 microphone). To sum up
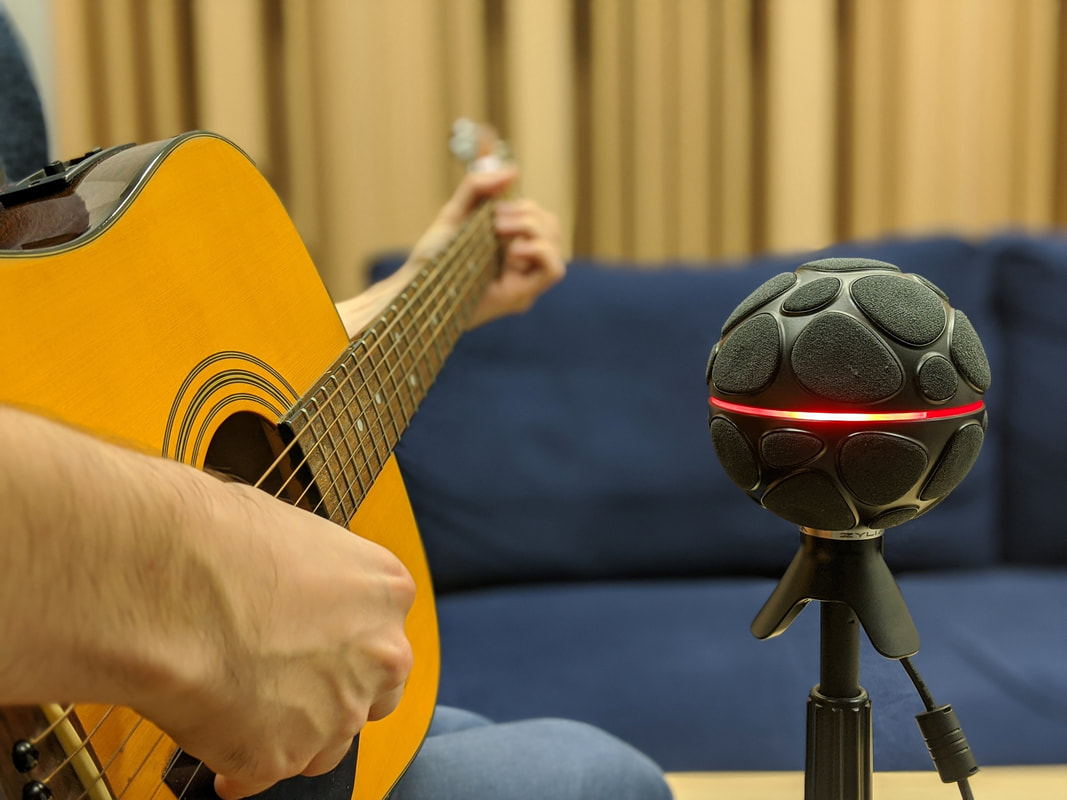
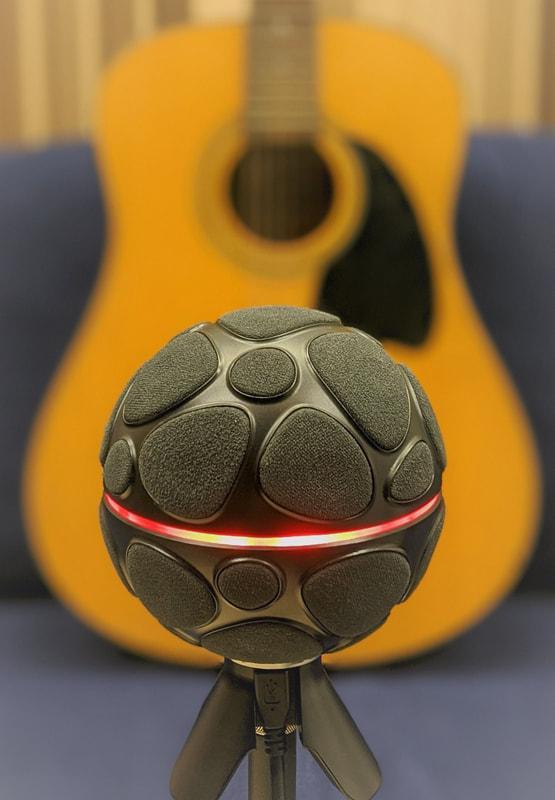
by Pedro Firmino In this article, we will give you an alternative way of recording and coloring your guitar tone using the ZYLIA ZM-1 microphone by taking advantage of multiple channel recording.  Please, remember that these are suggestions based on our own experience and might not be suitable for your specific situation. While trying our methods, make sure to listen and adapt to your instrument, environment, and musician. When miking a guitar it’s important to understand that this instrument is not designed to be experienced at close distances making it more challenging to find a balanced positioning for recording, especially if you plan to use the ZM-1 to obtain several channels for posterior mixing. After all, it’s one of the ZM-1 strengths. Here we will guide you to make the most out of the ZM-1 recording abilities. Step 1 Position the ZM-1 between the neck and the sound-hole.
At 25 cm distance, the results were quite flexible to work with, however, if you see clipping happening on the VU meter of ZYLIA Studio, reduce the gain on ZYLIA Control Panel or move the ZM-1 further from the sound source.
Record your take and take some time to listen to the results. If you’re happy with the tone of the guitar you may proceed to mixing stage, if not here are some options for you: - increasing distance of the ZM-1 and the guitar for more room tone and less presence. - positioning ZM-1 closer to neck, giving you more treble and percussive sounds. - positioning the ZM-1 closer to the soundhole, provides more lower end and less treble. - using another channel of the ZM-1 recordings to add brighter tone to the mix. This last option shows one of the great advantages of recording with the ZM-1, which it will be mentioned next. Step 3 Separate the take and Mix your tone. Using ZYLIA Studio or ZYLIA Studio PRO, you are able to get different tones from your instrument with a single recording due to the multiple channels. It can also be useful if you want to add some reflections from the environment. After Separating the take, try using the Auto-mix feature. The tone resulting of this feature might surprise you, but if that’s not the case you are always able to mix the tone by controlling the different channel parameters in the MIXER window. 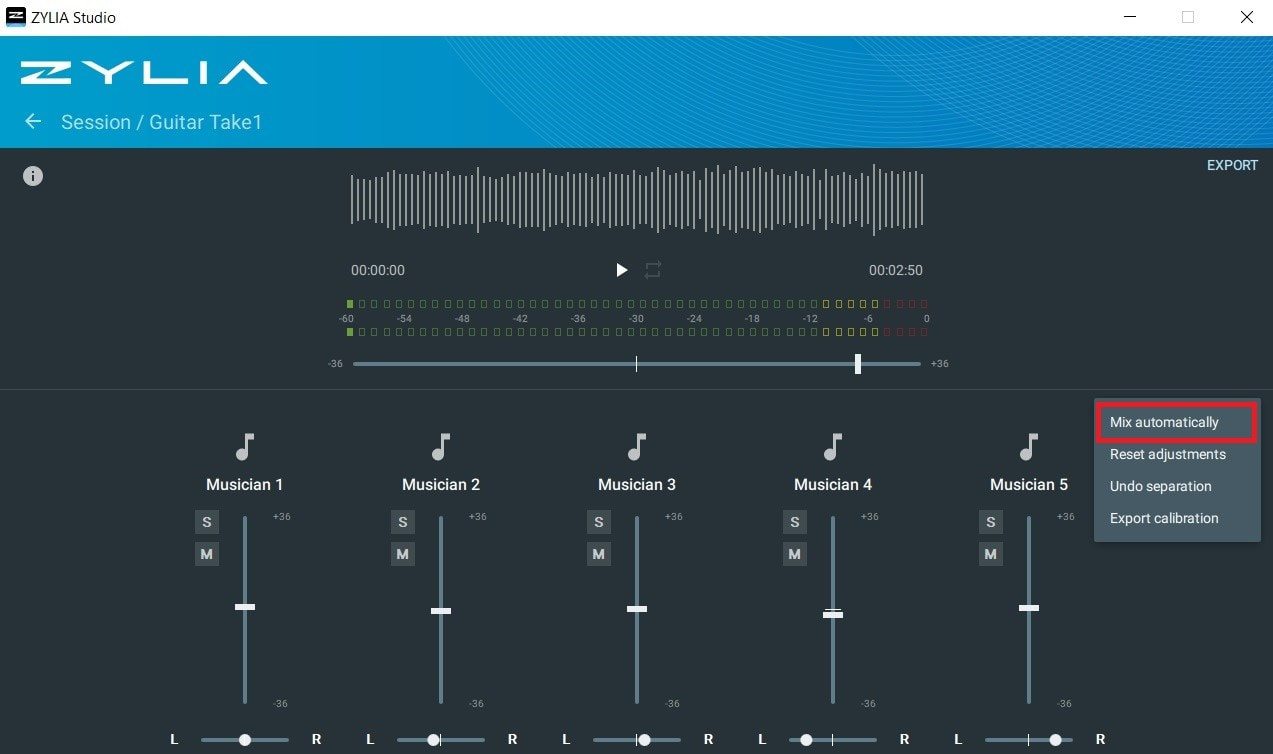 Are you looking for more low end in your tone? Simply adjust the level of the channel correspondent to the microphone closer to the sound-hole of the guitar (In this example Musician 2). Or perhaps you want more room tone and a wider stereo image of your recording? Increase the levels of the back microphones and apply panning (Musician 4 and 5).
|
Categories
All
Archives
August 2023
|


 RSS Feed
|
|
Connect with us |
|
© Zylia Sp. z o.o., copyright 2018. ALL RIGHTS RESERVED.
|