|
by Florian Grond, PhD
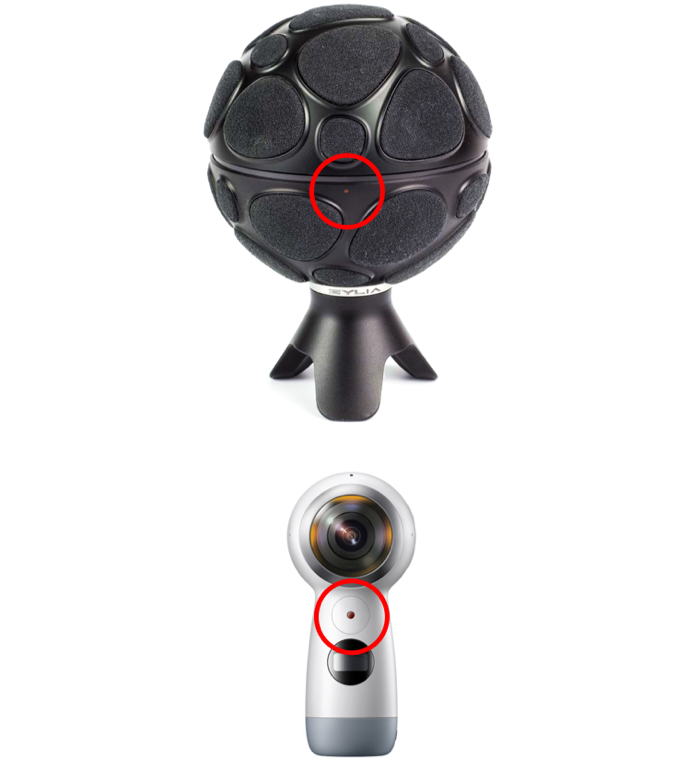
Content of the articleIn this blog entry, I will first give a brief overview of HOA, followed by an explanation of some relevant features of Dolby Atmos. Then, I will describe the general workflow connecting both approaches to create immersive audio experiences. I will conclude with some comments regarding the possibilities and limitations of some specific DAWs for the proposed workflow. Higher-order Ambisonics (HOA) overviewHigher-order Ambisonics (HOA) plays a key role in all situations that require isotropic sound scenes, i.e. scenes that uniformly cover each direction. These scenes comprise VR, AR, XR, video games and generally speaking 360° audiovisual content, for instance when streaming over YouTube or Facebook. The key advantage of HOA is the ability to transform and conveniently manipulate the sound scene in a uniform and mathematically rigorous way. Ambisonics started in the 70ies through Michael Gerzon’s work with what today is referred to as first-order Ambisonics (FOA) [1]. Higher-order Ambisonics was developed in the 90ies by various researchers [2]; the spatial resolution and the sense of depth in the sound scene improved significantly. Without explaining Ambisonics in detail here I will cover some aspects that are relevant to the workflow; if you want to know more, I have compiled more about HOA below [3]. The A- and the B-format It is important to know that the raw output of an Ambisonics microphone array, the A-format, needs to be converted into what is known as the B-format before using it in an Ambisonics production workflow. This is sometimes a bit of an obstacle for the novice. Unlike in a channel-based approach, the audio channels of the B-format are not associated in a direct way with spatial directions or positions, like the positions of speakers in the playback system, for instance. However, the more abstract representation of the sound scene in the B-format makes sound field operations like rotations fairly straightforward. Although multichannel audio is at its base, the B-format is only an intermediary step and requires decoding before you can listen to a meaningful output. This decoding process can either yield speaker feeds ranging from classic stereo to multichannel surround sound setups for a conventional channel-based output, or it can result in a binaural experience over headphones. This is just one of the reasons why one would like to deliver immersive audio recorded through Ambisonics over playback solutions that support Dolby Atmos. For delivering a mobile and immersive listener experience with comparably small hardware requirements, the capabilities of headphones with integrated head-tracking are particularly attractive. Ambisonic orders For FOA recordings, the A- and the B-format have both 4 channels. The spatial resolution is limited, and sound sources usually appear as if they are all at the same remote distance. For full-sphere HOA solutions the A-format has typically more channels than the B-format. As an example, the ZYLIA ZM-1 has 19 channels as raw A-format output and 16 channels after converting it to 3rd order Ambisonics. It is important to remember these channel counts when planning your workflow with respect to the capacities of the DAW in question. Dolby Atmos overviewDolby Atmos is a surround sound technology developed by Dolby Laboratories. On the level of channel counts and positions, it expands on existing surround sound systems by adding height channels. While Dolby Atmos as a format is agnostic with respect to the speaker layout of the playback system, the inner workings are in part inspired by a channel-based approach. Dolby Atmos is not isotropic as Ambisonics is, however, it does aim in a similar way to envelop the listener from many directions, hence the desire to explore links with the immersive quality of HOA recordings. In order to represent rich 360° audio content, Dolby Atmos can handle internally up to 128 channels of audio. The Audio Definition Model (ADM) ensures a proper representation of all the metadata related to these channels. Dolby Atmos files are distributed through the Broadcast Wave Format (BWF) [4]. From a mixing point of view, and also for combining it with Ambisonics, it is important to be aware of two main concepts in Dolby Atmos: beds and audio objects. Beds You can think of beds in two ways:
If you think for instance of a nature soundscape, this could be trees with rustling leaves and a creek with running water, all sound sources with more or less distinct positions. Take an urban soundscape as another example and think of traffic with various moving cars, these are sound sources that change their positions, but you would want to use the scene as is and not touch the sources individually in your mix. These are all examples of immersive audio content that you would send to beds. Audio objects Dolby Atmos also allows for sounds to be interpreted as objects with positions in three dimensions. In a mix, these are objects that allow for control of their position in x, y, and z independently of the position of designated speaker channels. See below [5], for reading up more on beds and objects. HOA recordings in Dolby AtmosThere are many ways how HOA sound material can be used in Dolby Atmos, involving both, beds and objects and the mixer is free to select or switch between those possibilities. For the scope of this article, let’s focus on mapping HOA to beds, in order to make a first step towards leveraging the immersive properties of Ambisonics with the end user format of Dolby Atmos. Mapping HOA to beds While beds are channel-based in their conception, they may be rendered differently, depending on the speaker count and layout of your system. Think of beds as your main mix bus and let’s think of input for beds as surround configurations (2.0, 3.0, 5.0, 5.1, 7.0, 7.1, 7.0.2, or 7.1.2). In order to take advantage of the high resolution of 3rd order recordings made with the ZYLIA ZM-1, we will pick the 7.0.2 configuration with 7 horizontal and two elevated frontal speakers and we will decode the Ambisonic B-format to a virtual 7.0.2 speaker configuration. This results in a proper input for a Dolby Atmos bed. The signal chain Starting with a raw recording made with the ZYLIA ZM-1 we will then have the following signal chain: 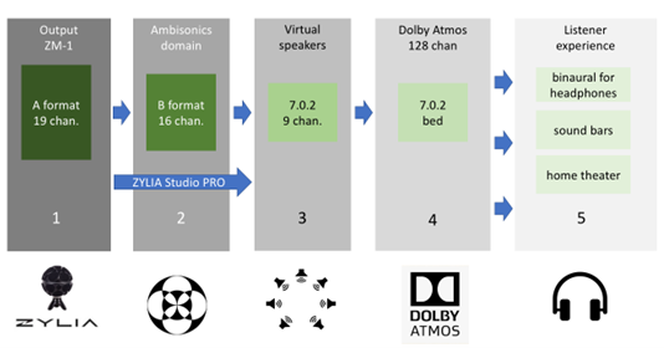 STEP 1 Step one is the raw output of the microphone array, the A-format. For the ZYLIA ZM-1 this is an audio file with 19 channels. From a post-production and mixing perspective, all that matters here is where you placed your microphone with respect to the sound sources. If you want your work environment to include this step of the signal chain, the tracks of your DAW need to be able to accommodate 19 channels. But this is not absolutely necessary, you can start with step 2. STEP 2 The 3rd order Ambisonic B-format contains 16 channels. For the conversion from step one to step two, you can use the Ambisonic Converter plugin from Zylia [6]. If your DAW cannot accommodate the necessary 19 channels for step one you can also convert offline with the ZYLIA Ambisonics Converter application, which also offers you batch conversion for multiple assets [7]. In many situations, it is advisable to start the signal chain with step 2, in order to save the CPU resources used by the A to B conversion for other effects. From a mixing perspective, operations that you apply here are mostly rotations, and global filtering, limiting or compression of the immersive sound scene that you want to send to Atmos beds. You will apply these operations based on how the immersive bed interacts with the objects that you may want to add to your scene later. There are various recognized free tools available to manipulate HOA B-format, for instance, the IEM [8] or SPARTA [9] plugin suites. 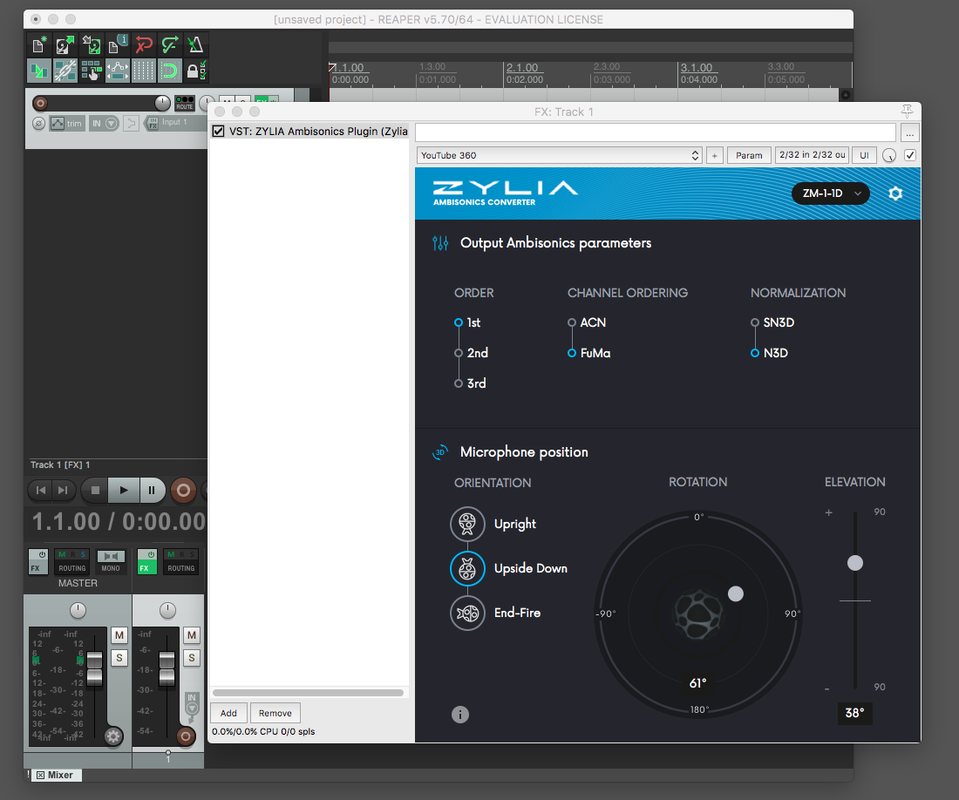 Zylia Ambisonics Converter plugin opened in Reaper STEP 3 Then, The Ambisonic B-Format needs to be decoded to a virtual surround speaker configuration. For this conversion from the B-format, you can use various decoders that are again available from multiple plugin suites like IEM and SPARTA. ZYLIA Studio Pro [10] allows you to decode to a virtual surround layout directly from step one, the raw A-format recordings, which means that you can bypass step 2. For some background audio content, this maybe a perfectly suitable choice. Part of the roadmap for ZYLIA Studio Pro is to also offer A-format input, making it a versatile high-quality decoder. From a mixing perspective and depending on the content of your bed input, you may want to choose different virtual surround configurations to decode to. Some content might be good on a smaller, more frontal bed e.g. 3.1, and other content will need to be more enveloping. If your DAW has a channel count per track that is limited to surround sound setups, you will need to premix these beds as stems.  Zylia Studio PRO plugin with 7.1.4 surround pre-set uploaded STEP 4 This bed then needs to be routed to Dolby Atmos. The details are beyond the scope of this article, and there are many excellent tutorials available that describe this process in detail. Here I want to mention that some DAWs have Dolby Atmos renderers built in, and you can study everything you practically need to know within these DAWs. With other DAWs, you will need to use the external Dolby Bridge [11]. This has a steeper learning curve to it but there are also many excellent tutorials out there that cover these topics [12]. There are also hardware solutions for Dolby Atmos renderings which interface with your speaker setup, but we will not cover them here. In Dolby Atmos, you will likely also integrate additional sources as objects, and you will control their 3D pan position with the Dolby Atmos Music Panner plug-in in your DAW. From a mixing perspective: the sonic interaction between the bed and the objects will probably make you revisit steps 2 and step 3 in order to rebalance, compress or limit your bed to optimise your mix. STEP 5 You will need to monitor your mix to make sure that the end user experience is perfect. Only very few of us will have access to a Dolby Atmos studio for their work. For bedroom studio owners, you can listen to your mix always over headphones as a binaural rendering, on some recent OSX platforms over the inbuilt Atmos speakers, and with AirPods even over headphones with built-in headtracking. These solutions might be options depending on what you are producing for. Regarding this highly debated question, on whether you can mix and master over headphones, I found the following article very insightful [13], elaborating on all pros and cons and also pointing out that the overwhelming majority of end users will listen to music over headphones. With regards to an Ambisonic mix, using headphones means that the listener will be always in the sweet spot of the spatial reproduction. The workflow in selected DAWsI will finish by discussing the steps of the signal chain on a couple of selected DAWs focusing on Ambisonics and beds only. In general, when planning your HOA to Dolby Atmos workflow, you need to understand how Dolby Atmos is supported in the DAW of your choice [14]. Either a Dolby Atmos renderer is integrated, or you need to get acquainted with the Dolby Bridge. On the side of HOA, you need to understand how many channels per track your DAW supports, and whether you can start working with the A-format, the B-format or premixed beds as stems. REAPER Reaper is amongst the first choices when it comes to higher-order Ambisonics, due to its 64-channel count per track. Hence for the HOA aspect of the workflow sketched above, there are no limitations. However, you will need to familiarize yourself with the Dolby Bridge and the Dolby Atmos Music Panner plug-in. PRO TOOLS In regular Pro Tools, you will also use the Dolby Atmos Music Panner plug-in and the Dolby Bridge. Since Pro Tools has a limitation of 16 channels per track, you will need to convert all your Ambisonic assets to B-format before you can start mixing. Upgrading to Pro Tools Studio or Flex [15] adds Dolby Atmos ADM BWF import/export, native immersive panning, I/O set-up integration with the Dolby Atmos Renderer, and a number of other Dolby Atmos workflow features as well as Ambisonics tracks. LOGIC In the most recent versions of Logic, Dolby Atmos is completely integrated, so no need to use the Dolby Bridge. For the monitoring of your mix, Logic will play nicely with all Atmos-ready features from Apple hardware. However, the channel count per track is limited to beds with 7.1.4. In theory, this means that you would have to premix all the beds as multichannel stems. While you can import ADM BWF files, as the Dolby Atmos project is ready for mixing, it is less obvious how to import a bed input as discussed above. In any case, once you have a premixed bed, the only modifications available to you in the mixing process are multi-mono plugins (e.g., filters), so you cannot rotate the Ambisonic sound field anymore at this point. To summarize for Logic, while Dolby Atmos is very well integrated, the HOA part of the signal chain is more difficult to realize. NUENDO Nuendo also has Dolby Atmos integrated and it also features dedicated Ambisonic tracks up to 3rd order which can be decoded to surround tracks. This means you have a complete environment for the steps of the workflow described above. DAVINCI RESOLVE While being mostly known as a video editing environment, DaVinci Resolve features a native Dolby Atmos renderer that can import and export master files. This allows for a self-contained Dolby Atmos workflow in Resolve without the need for the Dolby Atmos Production or Mastering Suite. DaVinci Resolve also has the Dolby Atmos renderer integrated and the tracks can host multichannel audio assets and effects. SummaryI hope this gives a general overview of how to connect HOA with Dolby Atmos. The proposed workflow is making use of beds in an orthodox way, but this is not the only way how HOA recordings can be mapped to Dolby Atmos. The 128 channels of Dolby Atmos including the object channels offer plenty of opportunities to explore. If you like this article, then please let us know in the comments what we should describe in more detail in future articles? References:[1] The publication by Michael Gerzon introducing FOA:
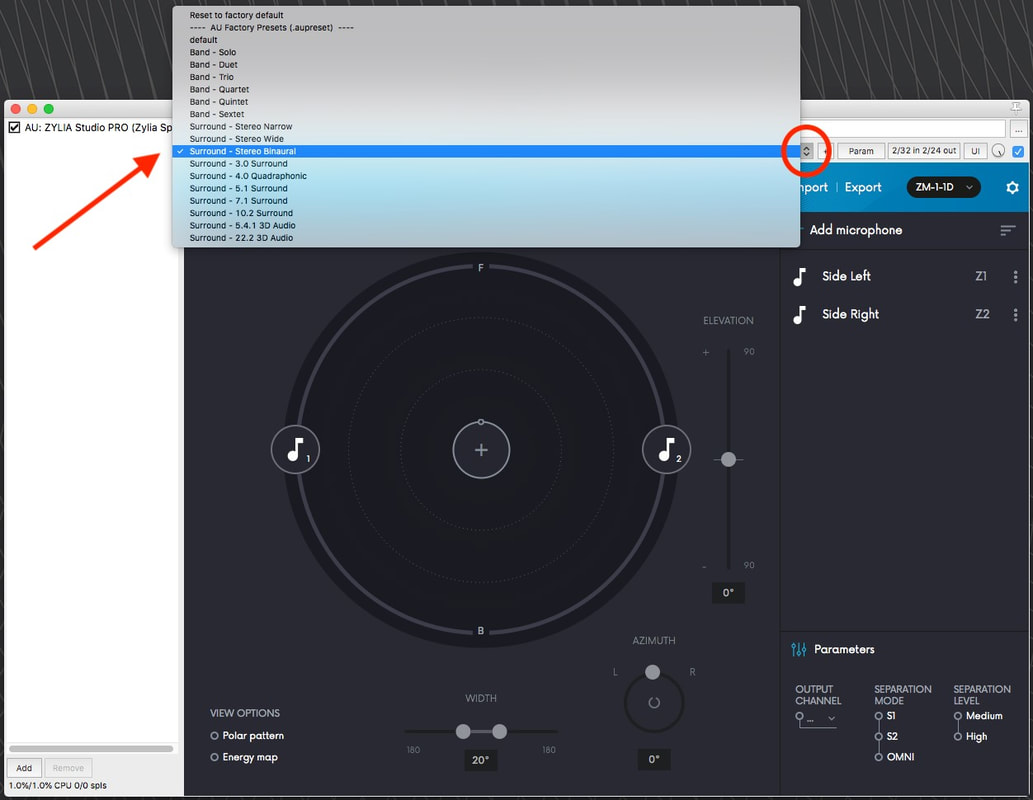
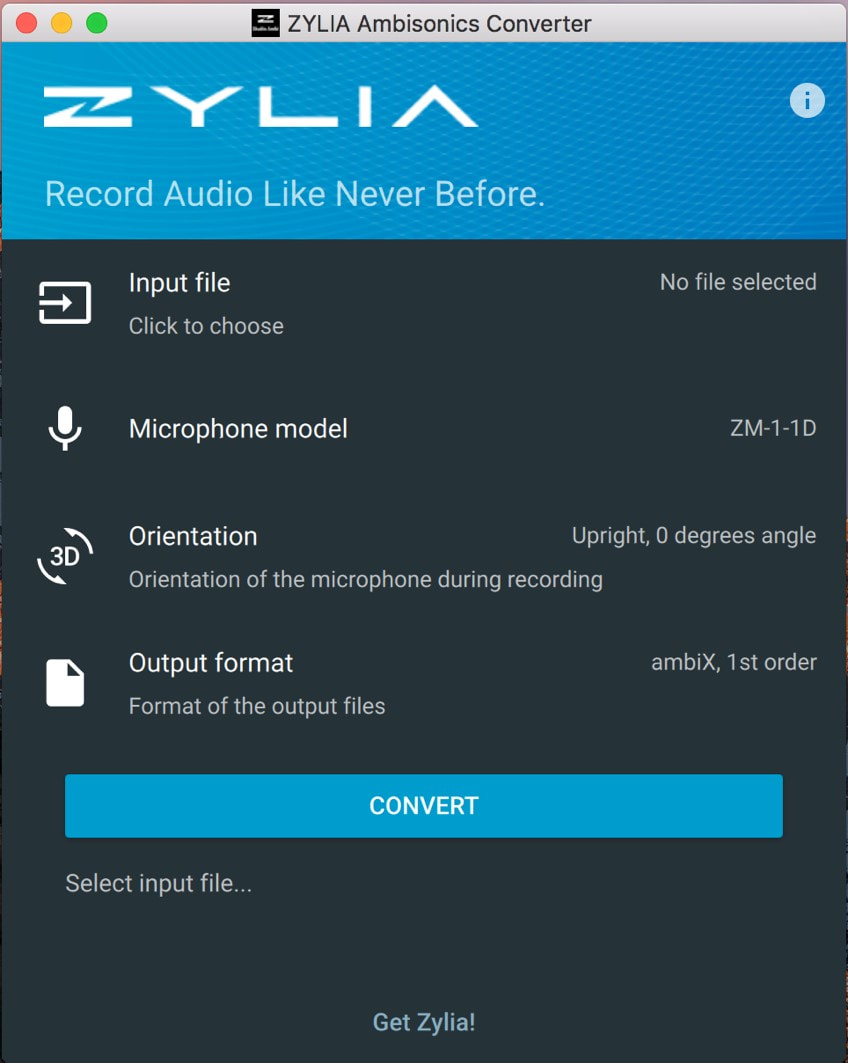
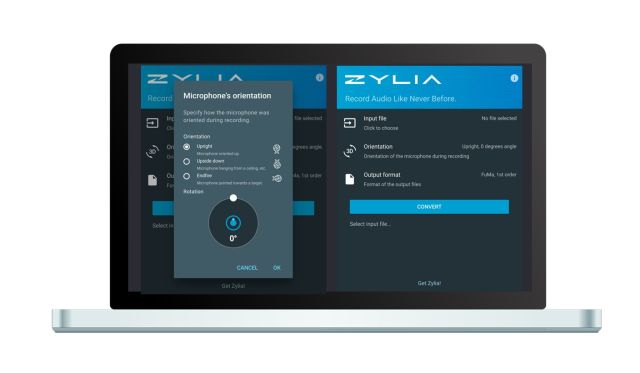
[6] The Zylia Ambisonics Converter plugin: LINK [7] The Zylia Ambisonics Converter: LINK [8] The IEM plugin suite: LINK [9] The SPARTA plugin suite: LINK [10] Zylia Studio Pro plugin: LINK [11] A video tutorial for using the Dolby Bridge with Pro Tools: LINK [12] A video tutorial for using the Dolby Bridge with Reaper: LINK [13] An blog post about the limits and possibilities of mixing Dolby Atmos via headphones by Edgar Rothermich: LINK [14] Information about Dolby support for various DAWs: LINK [15] Here you can compare Protools versions and their Dolby and HOA support: LINK #zylia #dolbyatmos #ambisonics
1 Comment
ZYLIA ZM-1 is a 3rd order Ambisonics microphone. That is excellent information if you want to capture and use 3D audio Impulse Responses (IR). In this case, you get a recorded 3rd order Ambisonics IR (3AIR). Below is a short introduction to the recording and using 3AIR with your podcast, film, or game production.  Recording of Ambisonics (spatial audio) Impulse Responses What do you need?
The process: 1. Start recording in the ZYLIA Studio application or your favorite DAW. 2. Pop the balloon where you want to have a source. We did this about 1 meter in front of ZM-1. 3. Stop the recording and export the raw 19-channel file. 4. Convert 19 channels A-format to Ambisonics B-format (3AIR) with the ZYLIA Ambisonics Converter plugin. The next step is a convolution of your 3AIR with your mono or multichannel signal to which you would like to add a reverberation effect. Requirments:
nThe process: 1. Create folder named "mcfx" in C://Users/your-name/AppData/Roaming/ (~/Library/ on macOS). 2. Create folder named "convolver_presets" in C://Users/your-name/AppData/Roaming/mcfx (~/Library/mcfx on macOS). 3. Start recording in the ZYLIA Studio application. 4. Pop the balloon in a place where you want to have a source. We did this about 1 meter in front of ZM-1. 5. Stop the recording and export the raw 19-channel file. 6. Open the file in DAW (e.g., Audacity) and process the IR recording in the following way:
8. Export the file from DAW as 19 channel. 9. Open ZYLIA Ambisonics Converter and convert the 19 channel file to 3-rd order Ambisonics with SN3D normalization and ACN channel ordering. 10. Save the file to C://Users/your-name/AppData/Roaming/mcfx/convolver_presets (~/Library/mcfx/colvolver_presets on macOS). In case you want to apply 3AIR to a mono file:
# in out gain delay offset length chan file # --------------------------------------------------------------------- # /impulse/read 1 1 0.1 0 0 IR_length 1 16_channel_IR.wav /impulse/read 1 2 0.1 0 0 IR_length 2 16_channel_IR.wav /impulse/read 1 3 0.1 0 0 IR_length 3 16_channel_IR.wav /impulse/read 1 4 0.1 0 0 IR_length 4 16_channel_IR.wav /impulse/read 1 5 0.1 0 0 IR_length 5 16_channel_IR.wav /impulse/read 1 6 0.1 0 0 IR_length 6 16_channel_IR.wav /impulse/read 1 7 0.1 0 0 IR_length 7 16_channel_IR.wav /impulse/read 1 8 0.1 0 0 IR_length 8 16_channel_IR.wav /impulse/read 1 9 0.1 0 0 IR_length 9 16_channel_IR.wav /impulse/read 1 10 0.1 0 0 IR_length 10 16_channel_IR.wav /impulse/read 1 11 0.1 0 0 IR_length 11 16_channel_IR.wav /impulse/read 1 12 0.1 0 0 IR_length 12 16_channel_IR.wav /impulse/read 1 13 0.1 0 0 IR_length 13 16_channel_IR.wav /impulse/read 1 14 0.1 0 0 IR_length 14 16_channel_IR.wav /impulse/read 1 15 0.1 0 0 IR_length 15 16_channel_IR.wav /impulse/read 1 16 0.1 0 0 IR_length 16 16_channel_IR.wav # -----------------------end of file -----------------------------------
In case you want to apply IR to 19 channel file:
# in out gain delay offset length chan file # --------------------------------------------------------------------- # /impulse/read 1 1 0.1 0 0 IR_length 1 16_channel_IR.wav /impulse/read 2 2 0.1 0 0 IR_length 2 16_channel_IR.wav /impulse/read 3 3 0.1 0 0 IR_length 3 16_channel_IR.wav /impulse/read 4 4 0.1 0 0 IR_length 4 16_channel_IR.wav /impulse/read 5 5 0.1 0 0 IR_length 5 16_channel_IR.wav /impulse/read 6 6 0.1 0 0 IR_length 6 16_channel_IR.wav /impulse/read 7 7 0.1 0 0 IR_length 7 16_channel_IR.wav /impulse/read 8 8 0.1 0 0 IR_length 8 16_channel_IR.wav /impulse/read 9 9 0.1 0 0 IR_length 9 16_channel_IR.wav /impulse/read 10 10 0.1 0 0 IR_length 10 16_channel_IR.wav /impulse/read 11 11 0.1 0 0 IR_length 11 16_channel_IR.wav /impulse/read 12 12 0.1 0 0 IR_length 12 16_channel_IR.wav /impulse/read 13 13 0.1 0 0 IR_length 13 16_channel_IR.wav /impulse/read 14 14 0.1 0 0 IR_length 14 16_channel_IR.wav /impulse/read 15 15 0.1 0 0 IR_length 15 16_channel_IR.wav /impulse/read 16 16 0.1 0 0 IR_length 16 16_channel_IR.wav # -----------------------end of file -----------------------------------
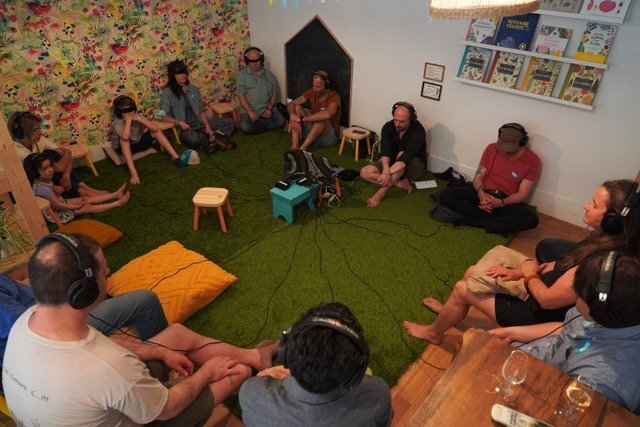
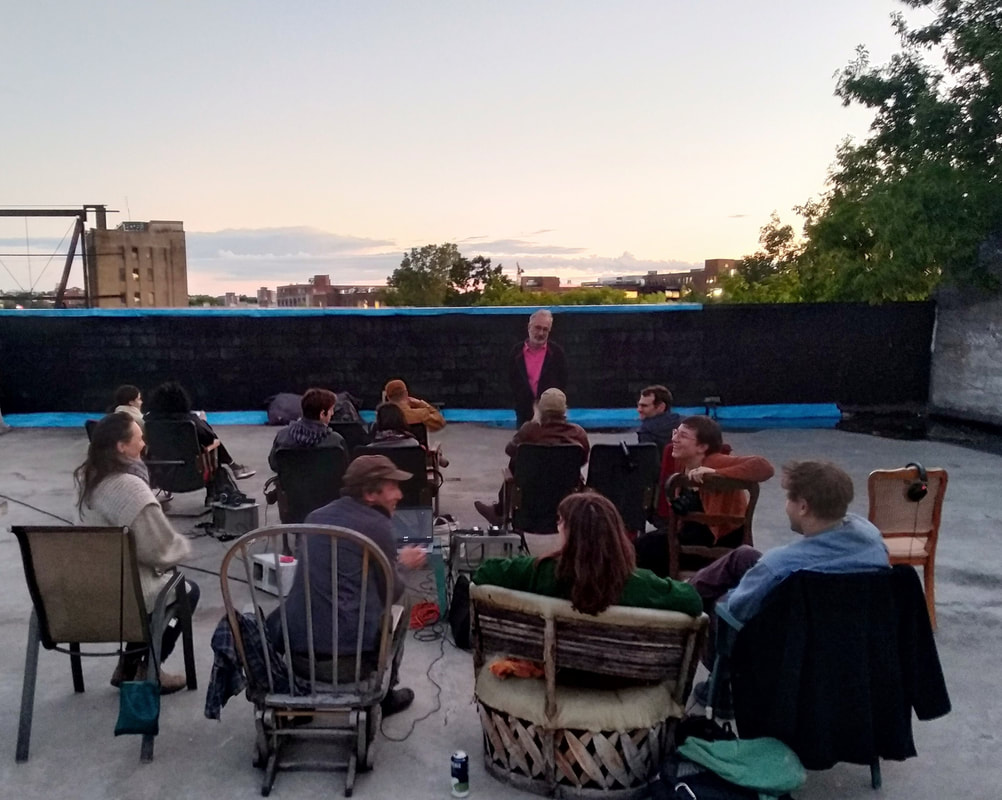
The theory behind Ambisonics Impulse Response measurement A more detailed description you can find in here: These articles go deeper into the technics of recording an impulse response. Raw Impulse Response recorded with ZM-1 can be converted to B-format (Ambisonics) and used to add reverbs in Ambisonics encoding. Please share your work on Record with Zylia Facebook page! QUATRE : un projet immersif reliant des paysages sonores naturels et de la musique enregistrée en ambisonie multipoint d’ordre élevé.Last year, our creative sound engineer Florian Grond had the privilege to accompany Christophe Papadimitriou during the production of QUATRE, an immersive work of audio art connecting soundscapes with music and improvisation. The music was recorded with ZYLIA’s 6DoF VR/AR set in the studios of the Orford Music centre in Quebec, Canada and the nature soundscapes were recorded with a single ZYLIA ZM-1 microphone outdoors, the whole composition was mixed and mastered as a binaural album. Christophe was so kind to grant us an interview and to speak about what moves him as an artist and what inspired him to embark on this immersive audio journey. L'année dernière, notre ingénieur du son créatif Florian Grond a eu le privilège d'accompagner Christophe Papadimitriou lors de la production de QUATRE, une œuvre d'art audio immersive reliant les paysages sonores à la musique et à l'improvisation. La musique a été enregistrée avec l'ensemble 6DoF de ZYLIA dans les studios du centre musique Orford au Québec, Canada, et les paysages sonores de la nature ont été enregistrés avec un seul ZYLIA ZM-1 microphone en extérieur, l'ensemble de la composition a été mixé et masterisé comme un album binaural. Christophe a eu la gentillesse de nous donner une interview et de parler de ce qui le touche en tant qu'artiste et de ce qui l'a inspiré à se lancer dans ce projet audio immersive. 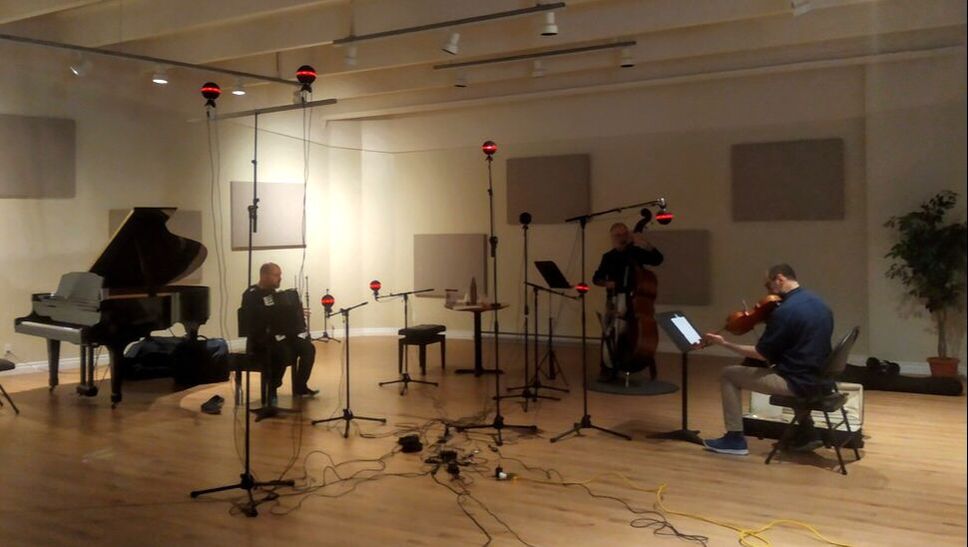 Photo: The 3 musicians of the project QUATRE recording in multipoint higher-order Ambisonics with ZYLIA’s 6DoF system: from left to right Luzio Altobelli, Christophe Papadimitriou, and Omar-Abou Afach. Photo: Les 3 musiciens du projet QUATRE enregistrant en ambisonie d'ordre supérieur en multipoint avec le système 6DoF de ZYLIA : de gauche à droite Luzio Altobelli, Christophe Papadimitriou, et Omar-Abou Afach. Zylia: Hello Christophe, tell us about yourself and your artistic journey? Bonjour Christophe, parlez-nous de vous et de votre parcours artistique ? Christophe Papadimitriou: I arrived in Quebec from France in 1978. I live in Montreal and I have performed as a musician ever since I graduated from Concordia University in 1992. There, I studied double bass with the great jazz musician Don Habib and classical music with Éric Lagacé. Since then, I have shared the stage with many artists from Montreal, especially from the jazz and world music scene as well as with chanson artists. For the past 10 years, I have been lucky enough to be able to play and record my own compositions for theatre projects as well as for jazz and world music productions, which is what I like most! I love composing and sharing with the public the fruit of my creativity and my imagination. Je suis arrivé au Québec de France en 1978 et je vis à Montréal où je travaille comme musicien depuis ma sortie de l’Université Concordia en 1992. J’y ai étudié la contrebasse avec les grands professeurs et artistes jazz et classiques Don Habib et Éric Lagacé. Depuis, j’ai partagé la scène avec de nombreux artistes montréalais, surtout en jazz, musique du monde et chanson. Depuis les derniers 10 ans, j’ai la chance de pouvoir jouer et enregistrer mes propres compositions au sein de projets autant en théâtre, jazz et musique du monde. C’est ce qui me plait le plus, j'adore composer et partager avec le public le fruit de ma créativité et de mon imagination. 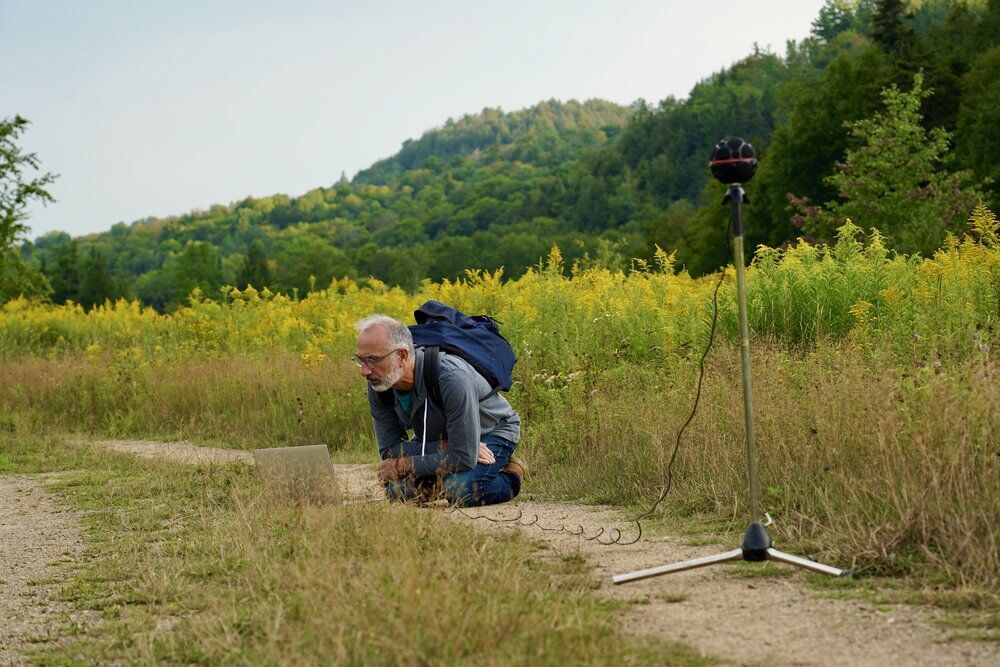 Photo: Christophe Papadimitriou recording a typical Quebec summer sound scape with the ZYLIA ZM-1 microphone. Photo: Christophe Papadimitriou enregistre une paysage sonore typique de l'été québécois avec le ZM-1 microphone de ZYLIA. Zylia: As a double bass player and musician, which are your favorite audiences? En tant que contrebassiste et musicien, quels sont vos publics préférés ? Christophe Papadimitriou: I am lucky to be able to work a lot and to have the opportunity to perform on stage, about a hundred performances a year. This direct contact with the public is so important for me, since it means that I can get an immediate response from the audience. This is true especially with young audiences, who are very expressive and do not censor themselves. I like it when music provokes strong sensations and I also enjoy taking risks, especially during moments of improvisation, where I particularly feel alive as musician and experience a unique and intense moment with the public. J’ai la chance de travailler beaucoup et l’opportunité de me produire sur scène, environ une centaine de représentations par an. Ce contact avec le public est le plus important pour moi, car j’ai une réponse immédiate de la part du public. Notamment avec les jeunes, qui sont très expressifs et n’ont pas de censure. J’aime quand la musique provoque des sensations fortes et j’adore aussi la prise de risques, notamment lors de moments improvisés, ou les musiciens vivent, en même temps que le public, un moment unique et intense. Zylia: Now here comes a big question, what is the meaning of music and art for you? Maintenant, voici une grande question, quelle est la signification de la musique et de l'art pour vous ? Christophe Papadimitriou: For me, music is the most faithful way to express emotions and inner feelings. Transcending words and images, music allows musicians and audiences to connect and to share simultaneously both collective and individual experiences. When the magic works and the musicians and the audience are transported by this positive energy, then we can experience a moment of grace… These moments are rare and for that, very precious. Pour moi, la musique est le moyen d’exprimer le plus fidèlement les émotions et l'intériorité. Transcendant les mots et les images, la musique permet aux musiciens et à l’auditoire de se connecter ensemble et de vivre simultanément une expérience à la fois collective et individuelle. Quand la magie opère et que musiciens et audience sont transportés par cette énergie positive, alors nous pouvons vivre un moment de grâce…Ces moments sont rares et pour ça, très précieux.  Photo: Recording the soundscape of a winter night with the ZYLIA ZM-1 mic at the Orford music centre Photo: Enregistrement du paysage sonore d'une nuit d'hiver avec ZM-1 mic de ZYLIA au centre musique Orford Zylia: You created QUATRE, what motivated you to embark on this project? Vous avez créé QUATRE, qu’est-ce qui vous a motivé à vous lancer dans ce projet ? Christophe Papadimitriou: The Covid pandemic had a significant impact on many levels on our society and forces us to reconsider, if this was not already the case, the connection we have between us and with the planet. Questioning human activity and our impact on nature became an absolute priority for me. In general, this realization has an impact on the arts and it became clear to me that this would be the material for my next project. This is how the idea came about to create a work based on the cycle of the seasons with the desire to reconnect with the nature that surrounds us. With this work, I want to create a dialogue between music and the sounds of nature, a moment of personal and quasi-meditative respite where the listener is invited to encounter nature in a different way and to recreate a link with what is precious. La pandémie de Covid a eu un impact important sur plusieurs plans de notre société et nous oblige à prendre conscience, si ce n’était pas déjà le cas, de notre interconnexion au niveau planétaire. Une remise en question de l’activité humaine et de notre impact sur la nature sont des enjeux absolument prioritaires. Cette prise de conscience a naturellement un impact sur l’art en général et pour moi, il est devenu évident que ce serait la matière mon prochain projet. C’est ainsi qu’est née l’idée de créer une œuvre basée sur le cycle des saisons avec la volonté de reconnecter avec la nature qui nous entoure. Je voulais par cette œuvre créer l’effet d’un dialogue entre musique et sons de la nature, un moment de répit personnel et quasi-méditatif où l’auditeur est invité à rencontrer autrement la nature et à recréer du lien avec le précieux. Zylia: Who are the other musicians in QUATRE? Qui sont les autres musiciens de QUATRE ? Christophe Papadimitriou: Key contributors to the project are Luzio Altobelli (accordion and marimba), Omar Abou Afach (viola, oud and nai) and Florian Grond (sound design). In addition to the great mastery of their instruments, Luzio and Omar bring their sensitivity and humanity to each piece of the work. It was very interesting to observe during the production of Quatre (which took place over more than a year), how the group dynamic evolved over the seasons. Our cultural differences and also the points that bring us together. All this is reflected in the recorded music. We can hear moments of great unity and also solos where the instrumentalists can let themselves go to follow their own vision, to express their feeling of the moment. Quatre is a work with written pieces but it also leaves plenty of room for improvisation. Thus, the musicians were able to express themselves in their own musical language which enriched the work with various traditional timbres (Middle East, Mediterranean and Quebec). Collaborateurs essentiels au projet : Luzio Altobelli (accordéon et marimba), Omar Abou Afach (alto, oud et nai) et Florian Grond (design sonore). En plus de leur évidente maîtrise instrumentale, Luzio et Omar apportent leur sensibilité et leur humanité dans chaque pièce de l'œuvre. Il a été très intéressant de constater pendant la réalisation de Quatre (qui s'est déroulée sur plus d’un an), la dynamique de groupe qui évoluait au fil des saisons. Nos différences culturelles et aussi les points qui nous rassemblent. Tout ceci se perçoit dans la musique enregistrée. On peut entendre des moments d’une grande unité et aussi des solos ou l’instrumentiste peut se laisser aller à sa propre vision, son ressenti du moment. Quatre est une œuvre avec des pièces écrites mais qui laisse toujours une bonne place à l'improvisation. Ainsi, les musiciens ont pu s’exprimer dans leur propre langage et l’œuvre est riche de sonorités diverses (Moyen Orient, Méditerranée et Québec). Photo: In order to share the project with various communities, QUATRE organises binaural listening sessions indoors and outdoors. Up to 12 people can connect with headphones for an individual and yet collective experience of the work. Photo: Afin de partager le projet avec diverses communautés, QUATRE organise des sessions d'écoute binaurale en intérieur et en extérieur. Jusqu'à 12 personnes peuvent se connecter avec des écouteurs pour une expérience individuelle et pourtant collective de l'œuvre. Zylia: QUATRE was realized as a multipoint higher order Ambisonics recording using ZYLIA’s 6DoF set, what is the appeal of immersive audio for you? QUATRE a été réalisé comme un enregistrement en ambisonie d'ordre supérieur avec multiple point de captation avec le set ZYLIA 6DoF, quel est l'intérêt de l'audio immersif pour vous ? Christophe Papadimitriou: During an improvised COVID concert outdoors on my terrace, Florian recorded us for the first time, starting with a single ZM-1, which was when I discovered immersive audio recording technology. A bird was singing along while we played, and I was immediately taken by the possibility of connecting my music with the sounds of nature and treating it like a 4th instrument. It is through this technology that we can really feel surrounded by the sound universe that we have created. Quatre is conceived as a journey, a walk, through Quebec's nature through the seasons. To support this feeling, we have integrated footstep sounds (in the snow, in the sand, in the water) in each season to help the listener to imagine herself walking in the forest or more generally in nature. The feedback we got from listeners show that the immersive effect was quite a success. Pendant un concert Covid improvisé sur ma terrasse, Florian nous a enregistré pour la première fois, d’abord avec un seul ZM-1, c’était là que j’ai découvert la technologie d’enregistrement en audio immersif. Un oiseau chantait le long de notre jeu et j’ai été charmé par la possibilité de connecter ma musique avec les sons de la nature, et de traiter celle-ci comme un 4e instrument. C’est cette technologie qui nous a permis de réellement se sentir entouré par l’univers sonore ainsi créé. Quatre est conçue comme un voyage dans la nature québécoise au fil des saisons. D’ailleurs, nous avons intégré à chaque saison des sons de pas (dans la neige, dans le sable, dans l’eau) qui aident l’auditeur à se projeter en train de se promener en forêt ou plus général en nature. Les témoignages que nous avons reçus après l’écoute montrent que l’effet d’immersion est bien réussi. Zylia: Also, you had it mastered as a binaural piece for headphones, tell us why? Aussi, vous l'avez fait masteriser en tant que pièce binaurale pour casque, dites-nous pourquoi ? Christophe Papadimitriou: I am convinced that listening through headphones offers the best conditions for total listener presence. The work has many subtleties and the dynamic range of the sound is great, going from very soft to loud, so headphones are necessary to appreciate every detail. Today, a lot of people listen to music through headphones, but often while multitasking at the same time. To fully enjoy the music of Quatre, we suggest a moment of respite where the audience, comfortably seated, is completely dedicated to the act of listening. We are currently in the process of setting up several collective listening sessions with headphones in the Montreal area. These sessions will accommodate about fifteen listeners at a time and are created with the aim of discovering this work and providing an experience connecting art, nature and humans. Nous sommes convaincus que l’écoute au casque offre les meilleures conditions pour une présence totale de l’auditeur. L'œuvre a beaucoup de subtilités et l'amplitude sonore est grande, passant de très doux à fort, le casque est nécessaire pour ne rien manquer. Beaucoup de gens écoutent leur musique au casque de nos jours, mais souvent en faisant une autre tâche en même temps. Pour profiter de l’expérience au maximum, nous privilégions un moment de répit ou l’auditeur, confortablement installé, se dédie complètement à l’écoute. Nous sommes en train de mettre en place plusieurs séances d’écoute collectives au casque, dans la région de Montréal. Ces séances permettant une quinzaine d'auditeurs à la fois sont créées dans le but de faire découvrir cette œuvre et de faire vivre une expérience connectant art, nature et humains. Support our approach and the artists by downloading Quatre here: Appuyez notre démarche et supportez les artistes en téléchargeant Quatre ici : https://christophepapadimitriou.bandcamp.com/album/quatre-sur-le-chemin Want to learn more about multi-point HOA music and soundscape recordings? Contact our Sales team:Some of you, who came across the term ‘3D sound’, probably are wondering what it actually is? Intuitively, we may understand it by analogy to 3D space, which as we know is made up of three dimensions: width, depth, and height. In real life, any position in space is characterized by these dimensions. Now imagine, that you are outside, for example in a park, full of various sounds. You can hear children laughing on the playground behind you; a dog is barking on your left, a couple of people are talking while sitting on a bench in front of you – you can hear their voices more and more clearly when you move towards them. We may say that you are in the 3-dimensional sound space. When you move, the sound you hear changes as well, corresponding to the position of your ears (its intensity, direction, height and even timbre). Reproducing this natural human way of hearing in the recording isn’t easy, however, we already have the technology which allows us to do it – it is binaural and Ambisonics sound.
The most common type of recordings – which you hear while listening to the music on your computer or watching TV –is stereo. You may also come across mono recordings but these have been outdated with the introduction of stereo mixing. Stereo sound basically allows you only to hear if the sound comes from left or right which is the main advantage over the mono-type of audio. Bellow, you may find some great recordings that will allow you to hear the difference between these different formats. We have also summarized their characteristics in the bullet points, to present the information most clearly.
MONO SOUND
STEREO SOUND
BINAURAL SOUND
AMBISONICS SOUND
#zylia #binaural #ambisonics #3Daudio #surround #spatial #soundby Tomek Ciotucha All concerts and gigs are canceled, and you are sitting at home and wondering what to do with your free time, how to show your creative work to the world, stream your concert from your apartment, or just play guitar for others? We have a solution for you! Take the ZYLIA microphone, connect it to your laptop and start streaming your home concert or solo session to the world. #stayhome #stayathome #homerecording #stream #music #concert #twitch #ambisonics #FOA #streaming #facebook #youtube
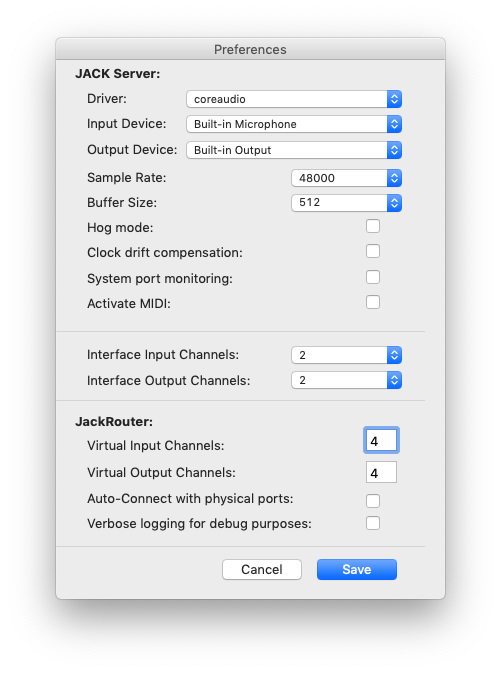
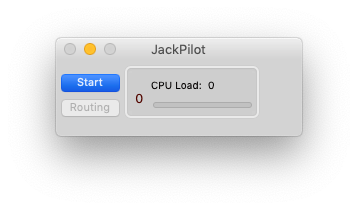
To download the software use the link below: https://jackaudio.org/downloads/ And choose to download JACK2 binaries: 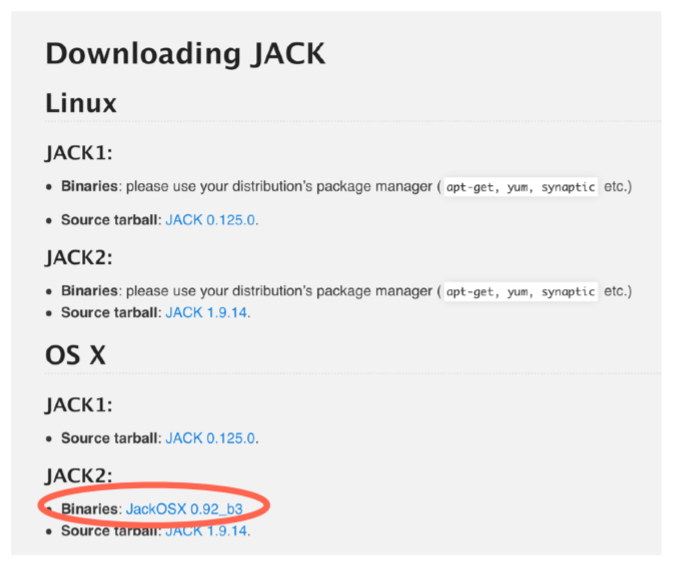 After restarting your computer when the installation is finished, open the app JackPilot. The “Preferences” window should show up when you open the app for the first time. If not, open it by clicking on the JackPilot/Preferences in the upper right corner. In the Preferences window choose leave the “Built-in Microphone” and “Built-in Output” in the devices settings. Set the Sample Rate to 48000 and set the number of Virtual Input and Output channels to 4. Click Save.
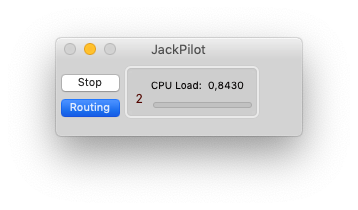
Now go to OBS and specify the amount of input channels to 4 and select the JackRouter as an input device (Mic/Auxillary Audio). 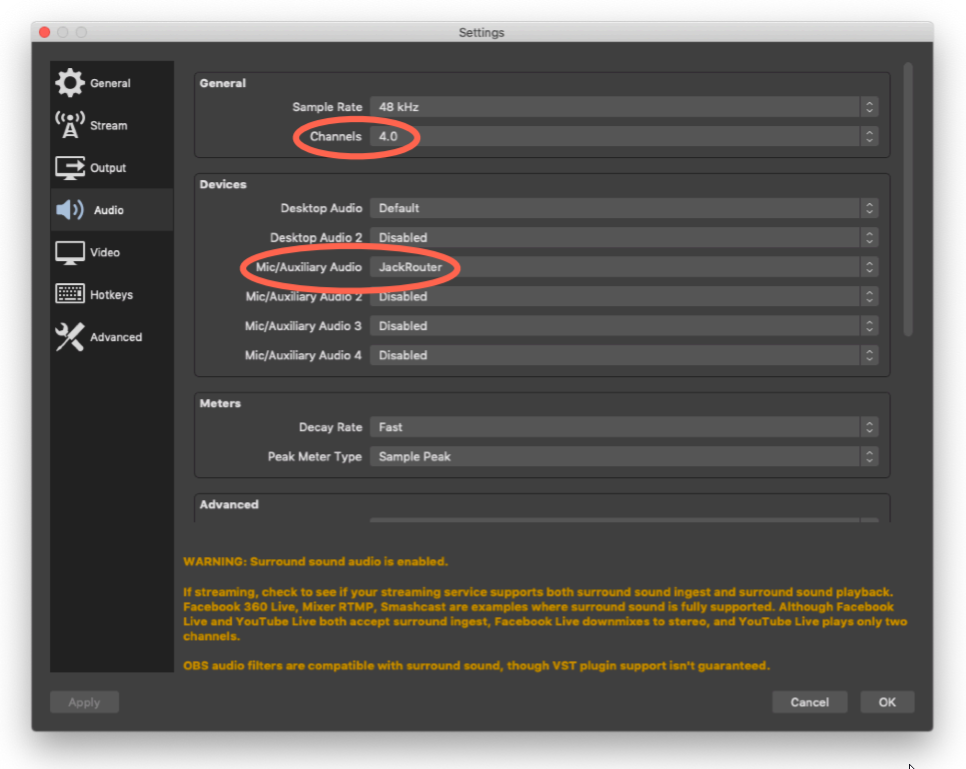 Click OK to save the settings. You might have to restart the OBS. Then, open the Reaper project called “ZM-1 FOA Streaming via JackPilot.RPP”. If you haven’t connected your ZYLIA microphone array already, do it now. Go to preferences and select ZYLIA as an Input Device and JackRouter as an Output Device. You have to tick the box marked in the image below to allow use of different input and output devices. 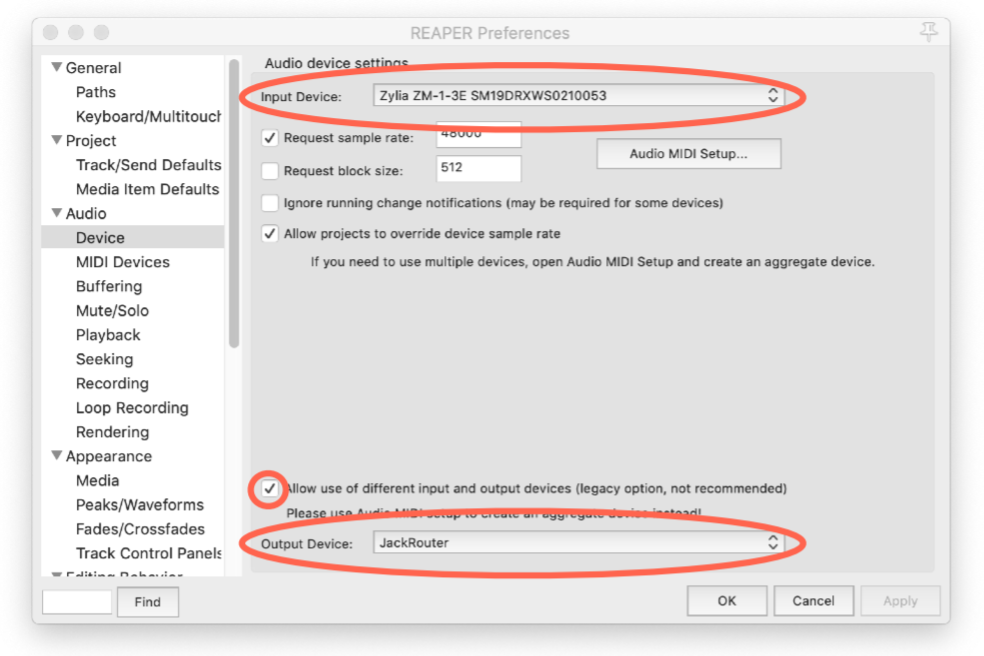
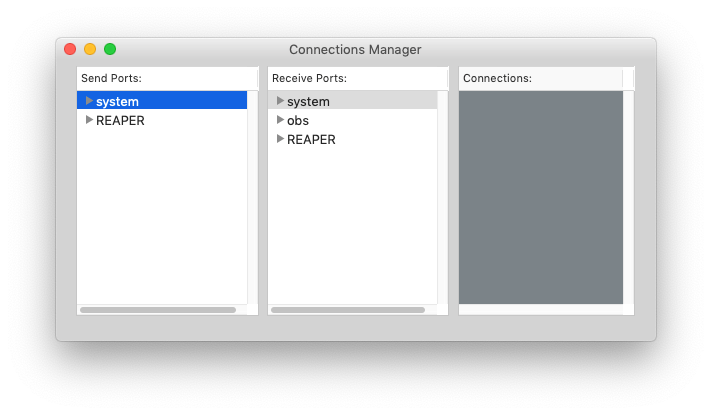
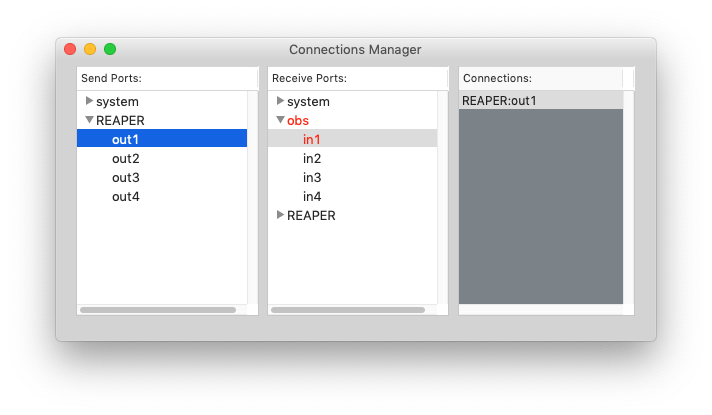
In the Connections Manager window click on the two triangles highlighted in the image below. The Send Ports/REAPER list shows the output channels from Reaper, and the Receive Ports/obs list shows the input channels in OBS. There should be 4 channels per each list. Remember, that first you have to choose JackRouter as an Input Device in OBS and as an Output Device in Reaper for the channels show up in the JackPilot’s Connections Manager window. 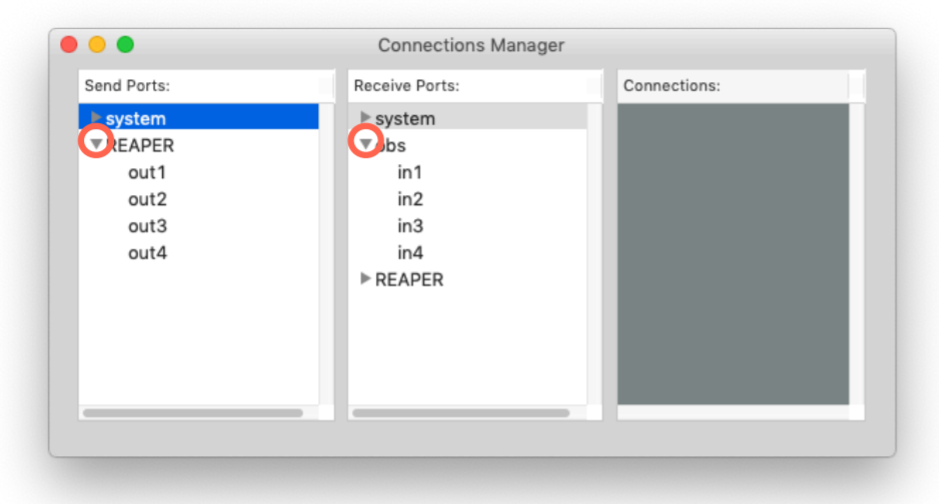
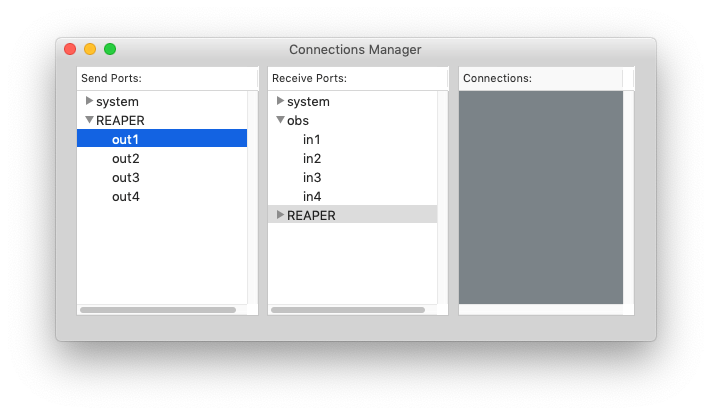
Now do the same with the rest of the channels: Out1 -> in1 Out2 -> in2 Out3 -> in3 Out4 -> in4 Now everything is set up and you should be able to stream first order ambisonics captured with your Zylia! You can use this project as an input - DOWNLOAD
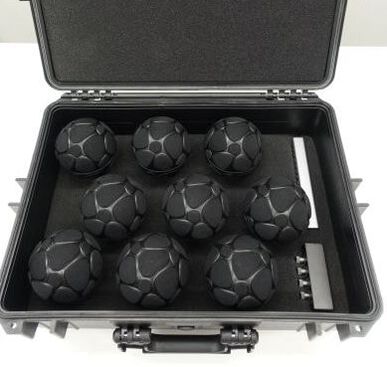
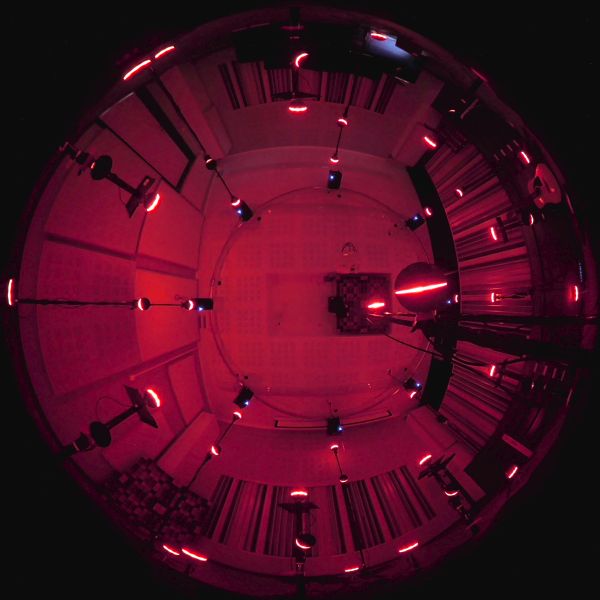
Zylia introduced a six-degrees-of-freedom (6DoF) multi-level microphone arrays installation for navigable live recorded audio.What does it mean? We are working on technology that gives people the possibility to listen to a concert or live performance from any point in the audio scene. With our technology you are able to record an audio scene from different points of the space – the center of the stage, from the middle of a string quartet, audience, or backstage. Audio recorded in such a way can be used together with virtual reality projections and allow the user to freely move around the space giving the natural experience of audio scene and the possibility to listen to it from different perspectives. 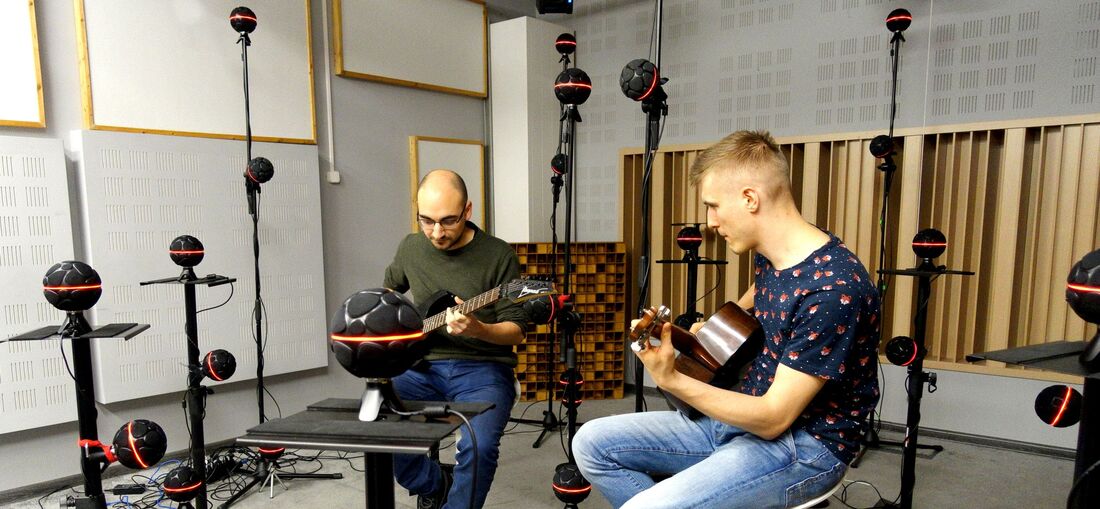 6DoF installation and test setup The first step of test recordings was to install 9 3rd order Ambisonics microphone arrays on the same level and record musicians playing their performance. Such an approach allowed the listener to move around those 9 points and listen to their music from different perspectives. However, microphones placement on a single level introduced limitations in terms of audio resolution in the vertical plane. Since we like challenges we decided to increase the number of microphones to 53 and build an installation on five different levels. It allowed us to freely move in every direction of the recorded scene in a truly immersive experience. The second idea behind this test setup was to check the limits of Ambisonics recordings in order to achieve a fully navigable audio scene. We placed the microphones arrays densely in the recorded scene and we received a spatial audio image of very high resolution. Technical aspects: We used 53 19-channel mic arrays – which gave us 1007 audio channels recorded simultaneously. Microphones were connected to a USB hub and the recordings were operated via a single laptop. The audio recorded from each microphone array was converted to 3rd order Ambisonics using our ZYLIA Ambisonics Converter plugin (it can be done in real-time or offline). After the recording, we used our interpolation software. This software is a MaxMSP plugin, that generates 3rd order Ambisonics spheres based on the signal from all microphones in the position you are at the moment. When you put your headphones and VR headset and move around the space the algorithm in MaxMSP takes your position and interpolates 3D sound in the position you are at the moment. 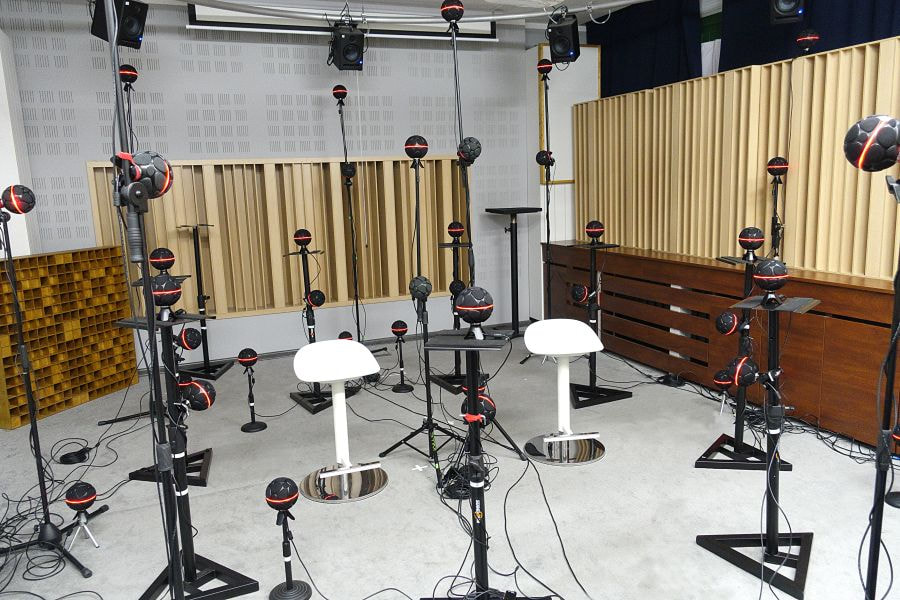 We used 3rd order Ambisonics microphone arrays. It is important because the higher the order the more precision we get in the spatial localization of sound around the listener. We are able to recreate the sound with a very high spatial resolution which influences the audio quality - an extremely important aspect for listeners. With this simple approach, you can record the natural audio scene for your VR/AR productions and use it right away without complicated work-flow in post-production. You can record live events and stream audio directly to the listener giving him the possibility to freely choose the position in this real-time recorded space for an ultimate immersive audio experience. Application: Cinematic trailers for VR, audio for games, live performances recording, domes with multi-loudspeakers installations
 We are happy to announce a new release of ZYLIA Ambisonics Converter v. 1.2.0 and ZYLIA Ambisonics Converter Plugin v. 1.1.0. Here are all the changes. ZYLIA Ambisonics Converter v. 1.2.0
◦ Sensitivity of rotation slider 
ZYLIA Ambisonics Converter Plugin v. 1.1.0
◦ Wrong sample rate warning 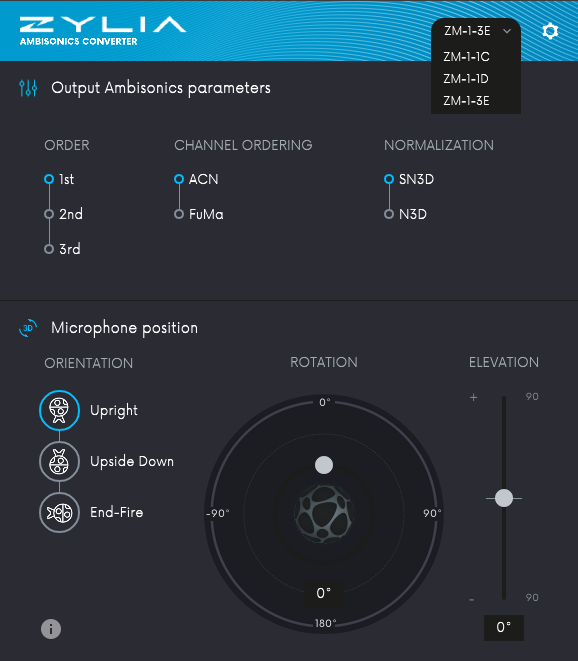 Download link - ZYLIA Ambisonics Converter plugin
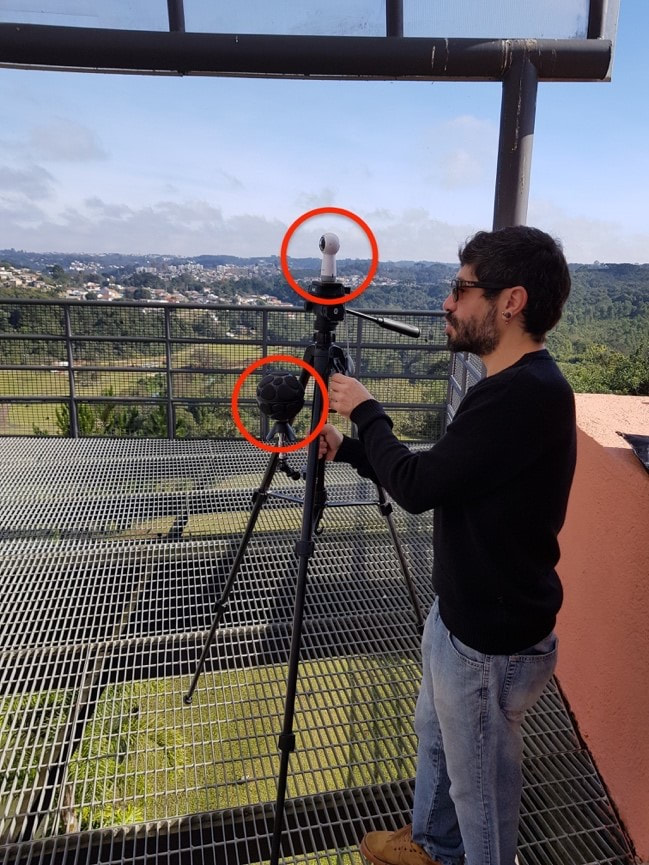
By Eduardo Patricio In this post we present two videos in different formats, but edited from the same source material captured on the 20th of June 2018, at Barigui park (Curitiba, Brazil). The audio was recorded with the ZYLIA ZM-1 3rd order Ambisonics spherical microphone array while the video was captured by a 360-degree camera (Gear 360). Below, you can watch both videos and find some information on how to achieve the two different results, with focus on preparing the audio recorded with the ZM-1 microphone for each scenario. Scenario AInteractive, immersive video with full 3D sound (media components: 360-degree video + Ambisonics audio) Scenario BNon-interactive video with fixed perspective 3D sound (media components: Tiny planet” video + binaural audio)
The microphone and the camera were placed on a single camera stand with a small clamped extension arm (see picture below). Both devices were aligned vertically with a small horizontal offset. We made sure the microphone and the camera always had the same relative facing direction (front of the microphone aligned with the camera side where the recording button is found).
For scenario B, we used the video from Gear 360 in ‘tiny planet’ format and a binaural audio track. Since, the source material is the same as the one from scenario A, we’ll list here only the steps that differ. Scenario B steps:
 Choosing binaural preset on ZYLIA Studio PRO in REAPER #ambiencerecording #ambisonics #binaural #soundscapes #immersiveaudio #360recording
We are happy to announce a new version of ZYLIA Ambisonics Converter. We introduced a few changes based on your input and suggestions.
We added a batch processing. Now, it is possible to process multiple 19 channels wave files within a single session.
There are also quality improvements and bug fixes for 2nd and 3rd order HOA. This update significantly increases the perceptual effect of rotation in HOA domain as well as corrects spatial resolution for 2nd and 3rd order. It is recommended to update to this new version. By Jakub Zamojski & Lukasz Januszkiewicz Recording and mixing surround sound becomes more and more popular. Among the popular multichannel representation of surround sound systems like 5.1, 7.1 or cinematic 22.2, especially worthy of note is an Ambisonics format, which is a full-sphere spatial audio technique allowing to get a real immersive experience of 3D sound. You can find more details about Ambisonics here (What is the Ambisonics format?). Our previous blog post “2nd order Ambisonics Demo VR” described the process of combining audio and the corresponding 360 video into fine 360 movie on Facebook. Presented approach assumes using of 8-channel TBE signal from ZYLIA Ambisonics Converter and converts audio into the Ambisonics domain. As a result we get a nice 3D sound image which is rotating and adapting together with the virtual movement of our position. However, it is still not possible to adjust parameters (gain, EQ correction, etc.) or change the relative position of the individual sound sources present in the recorded sound scene. In this tutorial we are going to introduce another approach of using ZYLIA ZM-1 to create a 3D sound recording, which gives much more flexibility in sound source manipulation. It allows us not only to adjust the position of instruments in recorded 3D space around ZYLIA microphone, but also to control the gain or to apply any additional effects (EQ, Comp, etc.). In this way we are able to create a fancy spatial mix using only one microphone instead of several spot mics!
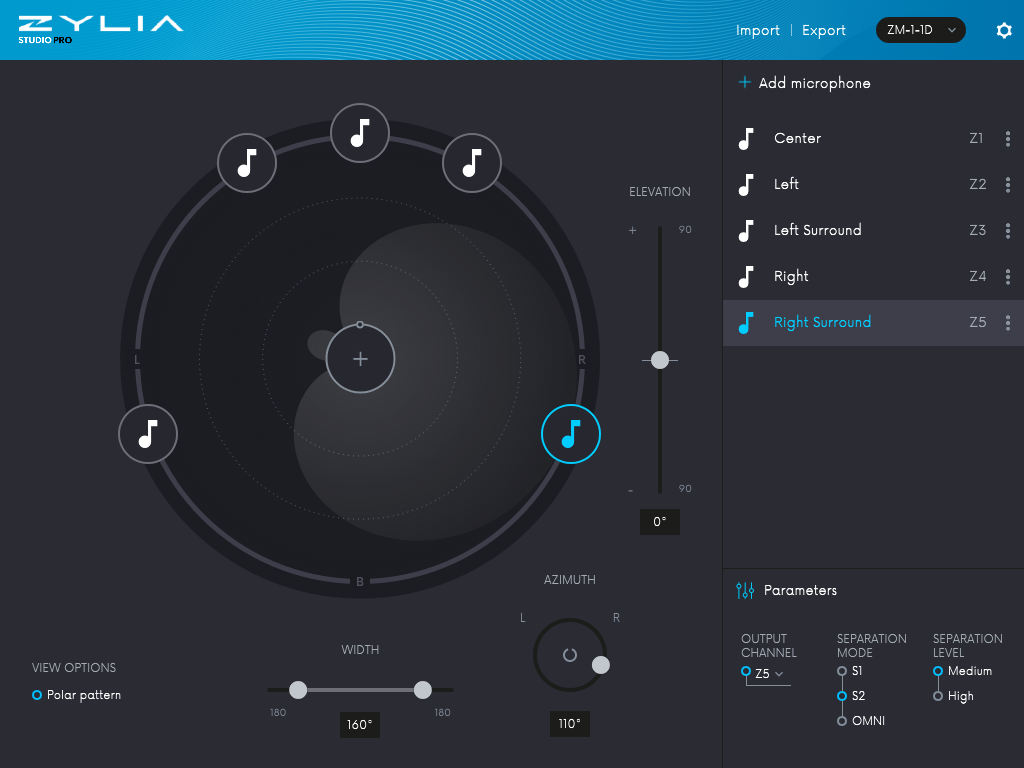
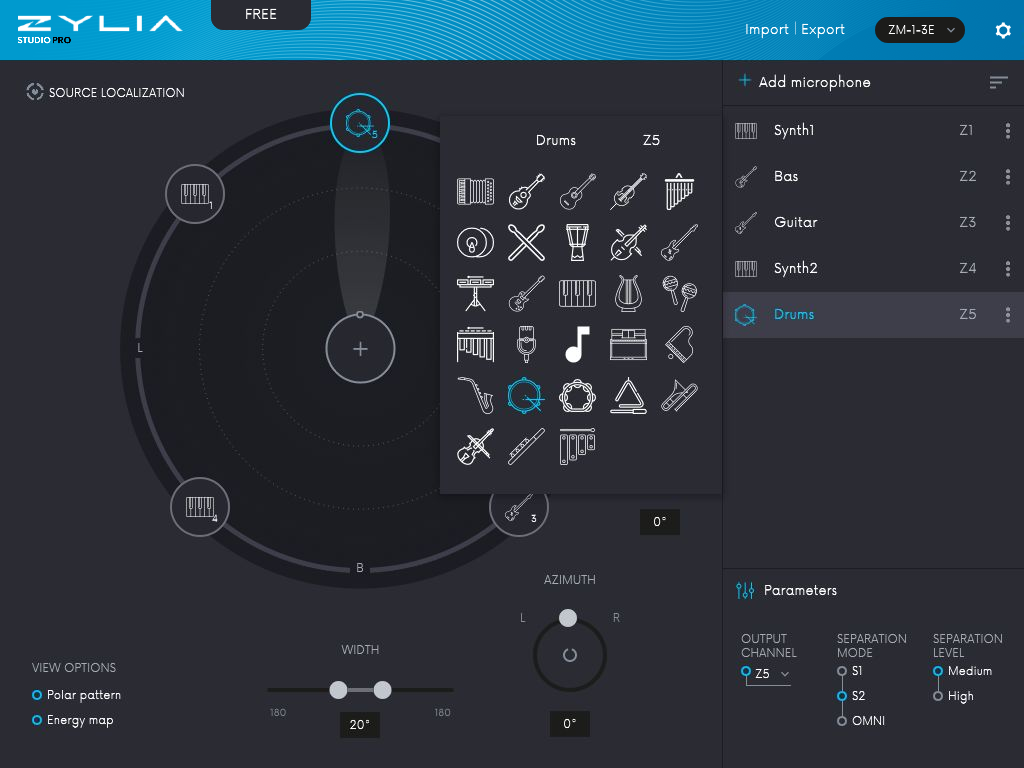
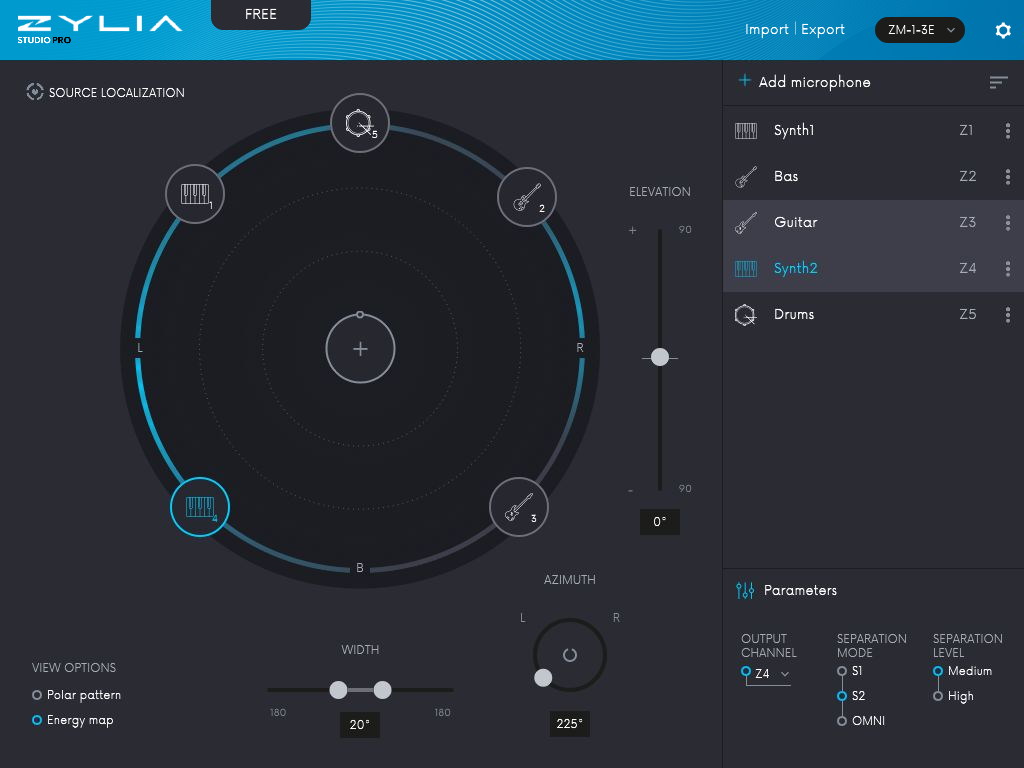
Spatial Encoding of Sound Sources – TutorialIn the end of July 2017, using ZYLIA ZM-1 microphone we have recorded a band called “Trelotechnika”. All band members were located around ZM-1 microphone, 4 musicians and one additional sound source – drums (played from a loudspeaker). During the post-production process, we applied ZYLIA Studio PRO VST plug-in (within Reaper DAW) on recorded 19-channel audio track. This allowed us to separate the previously recorded instruments and transfer them into the individual tracks in the DAW. Those tracks were then directed to the FB360 plug-ins, where encoding to the Ambisonics domain was performed. “Spatial Encoding of Sound Sources” - a step-by-step descriptionBelow, you will find a detailed description of how to run a demo session presenting our approach of recording and spatial encoding of sound sources. Demo works on Mac Os X and Windows. DOWNLOAD STAGE
TUTORIAL After opening the session, you will see several tracks:
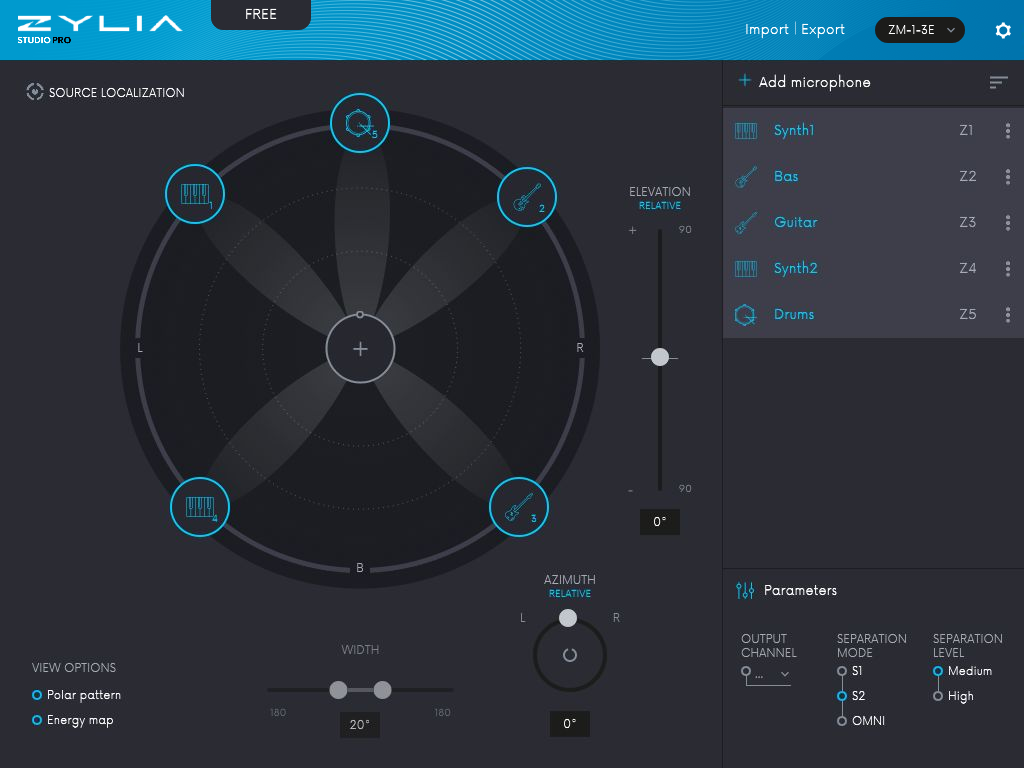 3. Separated signals from ZYLIA Studio PRO are passing to 5 individual tracks. You are able to adjust the gain, you can also mute or solo instruments, or you can apply some audio effects. A good practice is to use a high-pass filter for non-bass and low-pass for bass instruments to reduce a spill between them. We applied these filters to our session: 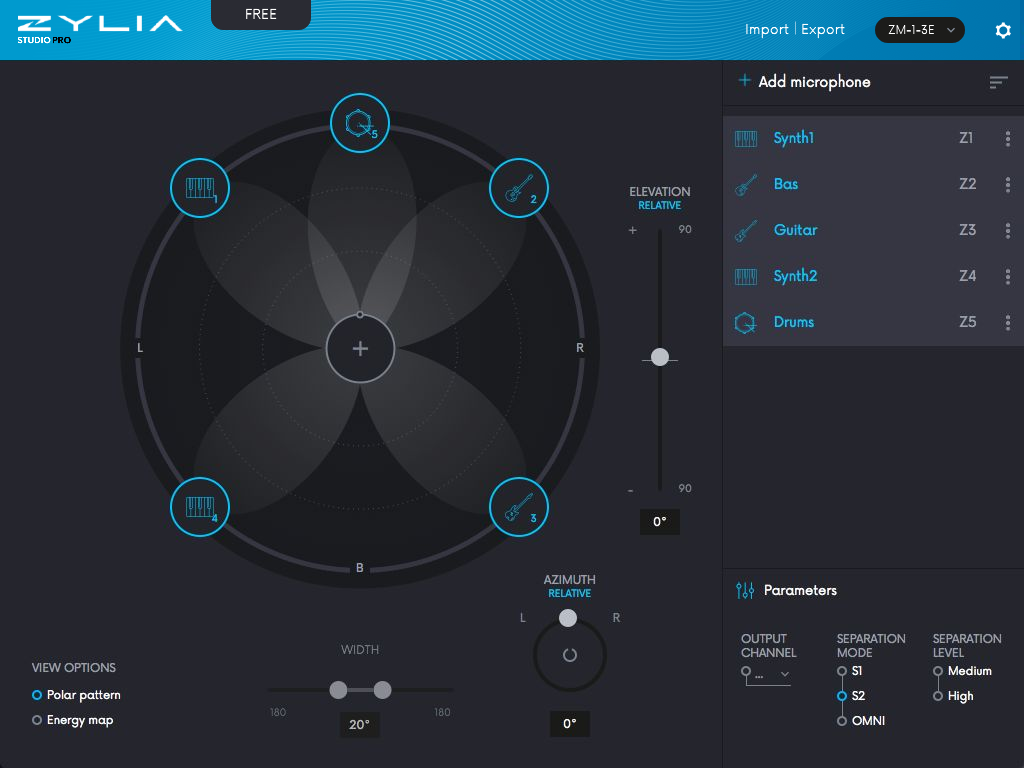 4. Spatialiser track – receives 5 signals from tracks with separated instruments. Spatialiser allows to distribute sound sources in desired positions in the 3D space. a) Click on FX and choose FB360 Spatialiser.
d) Back to Spatialiser view. You will see an equirectangular picture and five circles with numbers. Each circle represents a sound source position in the space. By default, sources are located in the positions corresponding to the real positions of the instruments in the picture, but it is possible to adjust it by clicking on the circle and dragging it around the picture. 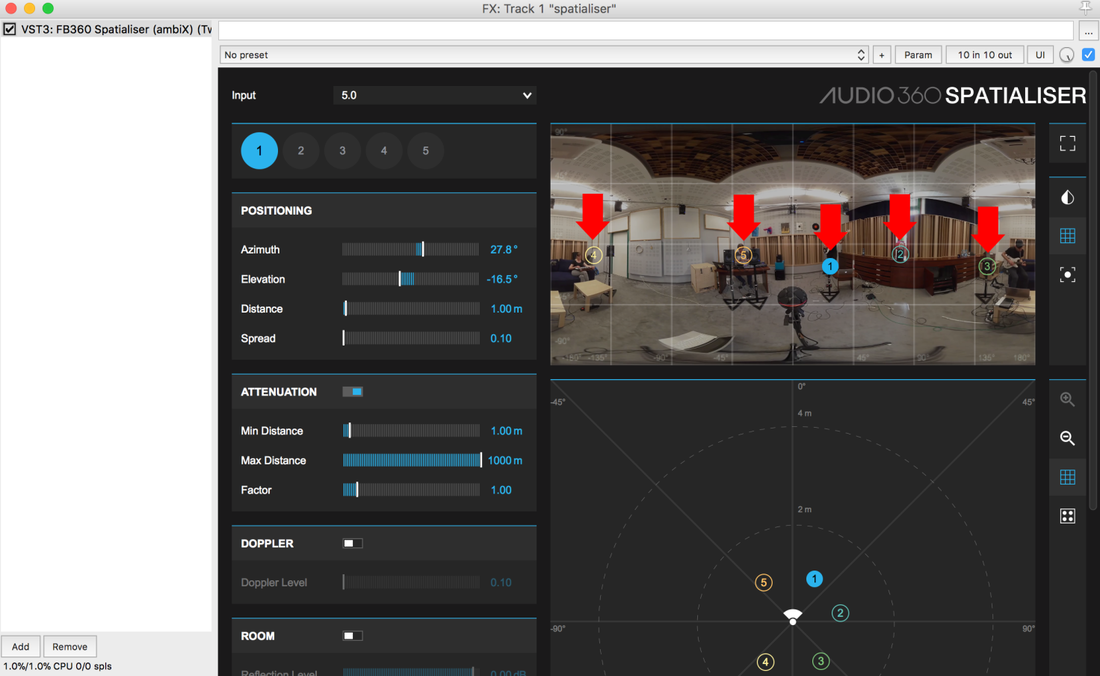
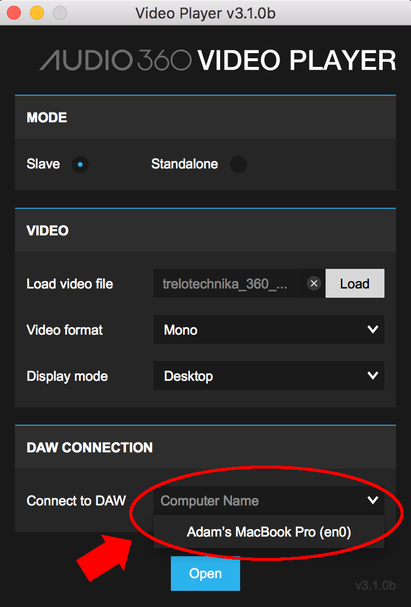
6. Now video is synchronized with audio. Adjusting the location of play-head in REAPER’s time line will affect the video’s time. Tap space bar to play audio and video. Rotation of the video in the player is tracked by the decoded and binauralized Ambisonics sound.
7. A good practice is to play video from the beginning of file to keep the synchronization. In some cases, it is necessary to close the VideoClient + VideoPlayer and load 360 video again to recover the synchronization. 8. Now you are able to rotate video across the pitch and yaw axis. Your demo is ready to run. |
Categories
All
Archives
August 2023
|

 RSS Feed
|
|
Connect with us |
|
© Zylia Sp. z o.o., copyright 2018. ALL RIGHTS RESERVED.
|