How to stream 3D audio in binaural format with ZYLIA ZM-1 and ZYLIA Ambisonics Converter Plugin4/9/2020 by Tomasz Ciotucha You are probably sitting at home and taking advantage of excess time and learning new things. If someone is interested in getting new skills in binaural streaming then this blog post is for you.
The binaural audio takes advantage of psychoacoustic principles to mimic the human hearing system. It forms an immersive projection that appears to be around your head - not between your ears and headphones. Here you have a popular example of binaural audio (listen on headphones): Using ZYLIA ZM-1 you can capture high-resolution binaural audio. This can occur in real-time, so you can stream it online to other people. To achieve this, you will need ZYLIA Ambisonics Converter Plugin, Soundflower, IEM Binaural Decoder, and, of course - a ZYLIA ZM-1 microphone array. In this post, you will find out how to set everything up on your Mac system. We have also prepared a Reaper template project for you, but you can do it in any DAW which supports 19-channel tracks. The template project is available for download just below this paragraph. In this post you will find out how to set everything up.
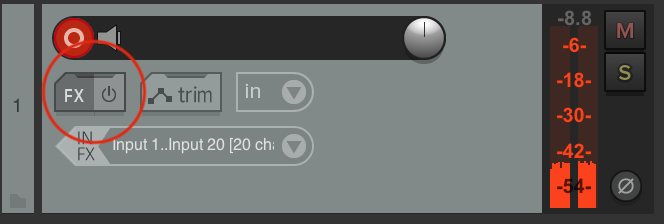
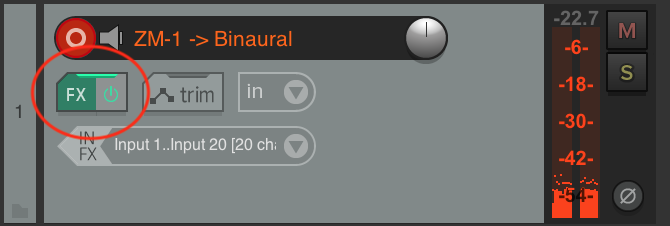
1. IEM Binaural DecoderYou will have to install the whole IEM suite. Visit the page: https://plugins.iem.at/ Download the suite and install the software. Now you can proceed to the next steps. 2. SoundflowerTo download the software use the link below: https://github.com/mattingalls/Soundflower/releases/tag/2.0b2 Scroll down to the bottom of the site and click on “Soundflower-2.0b2.dmg” in the “Assets” area to start downloading. 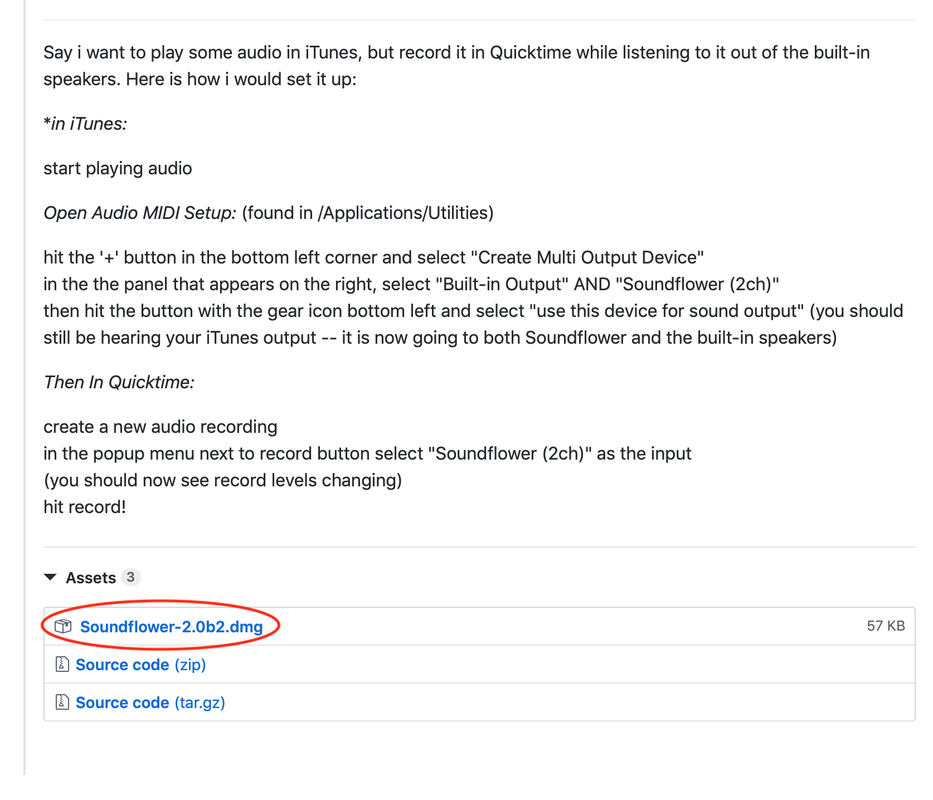 After the successful installation in “Audio MIDI Setup” there should show up “Soundflower (2ch)” and “Soundflower (64ch)” devices. This step is just to check if the Soundflower is installed correctly. 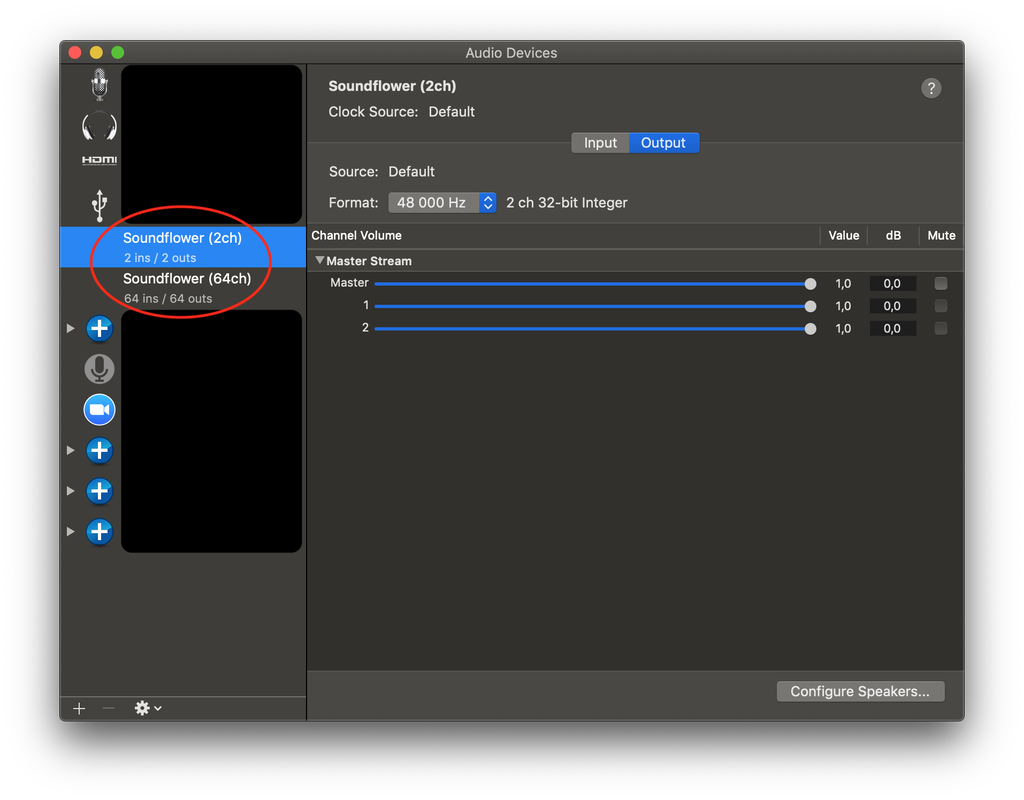 3. ReaperIf you want to use the Reaper template project provided by us, you can jump to point 3.b after completing the steps described in this paragraph. You can download the project from this site. If you want to set up the Reaper session on your own, proceed through point 3.a. Make sure that your ZYLIA ZM-1 microphone array is connected to your computer. If you are using the template, open it, and if not, create a new project. First you have to go to Reaper’s preferences and select Zylia as an Input Device and Soundflower (2ch) as an Output Device. You have to tick the box marked in the image below to allow use of different input and output devices 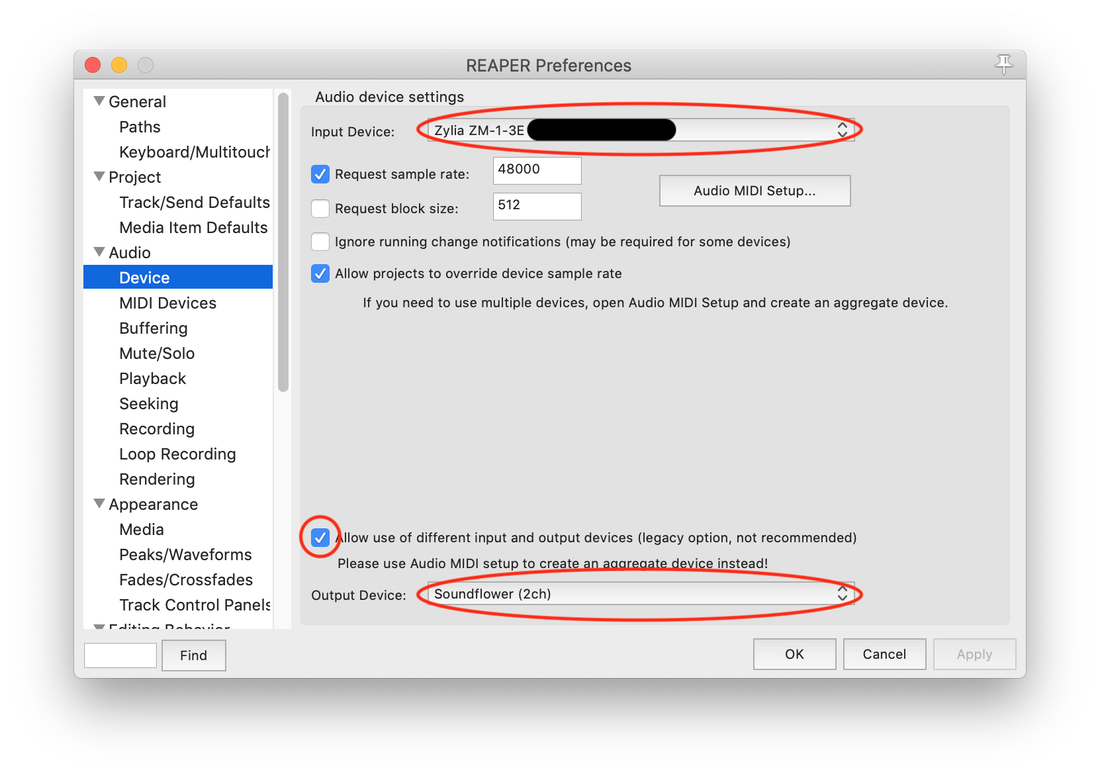 3.a Setting up a new Reaper projectIn the new project create an audio track by hitting ⌘ + T. Then you have to configure the track’s routing, by hitting the “Route” button which is next to the track’s fader in the mixer session (marked “1” in the image). A new window should appear. There, you have to specify the amount of track channels to 20 (marked “2” in the image). Make sure that “Master send” is ticked. 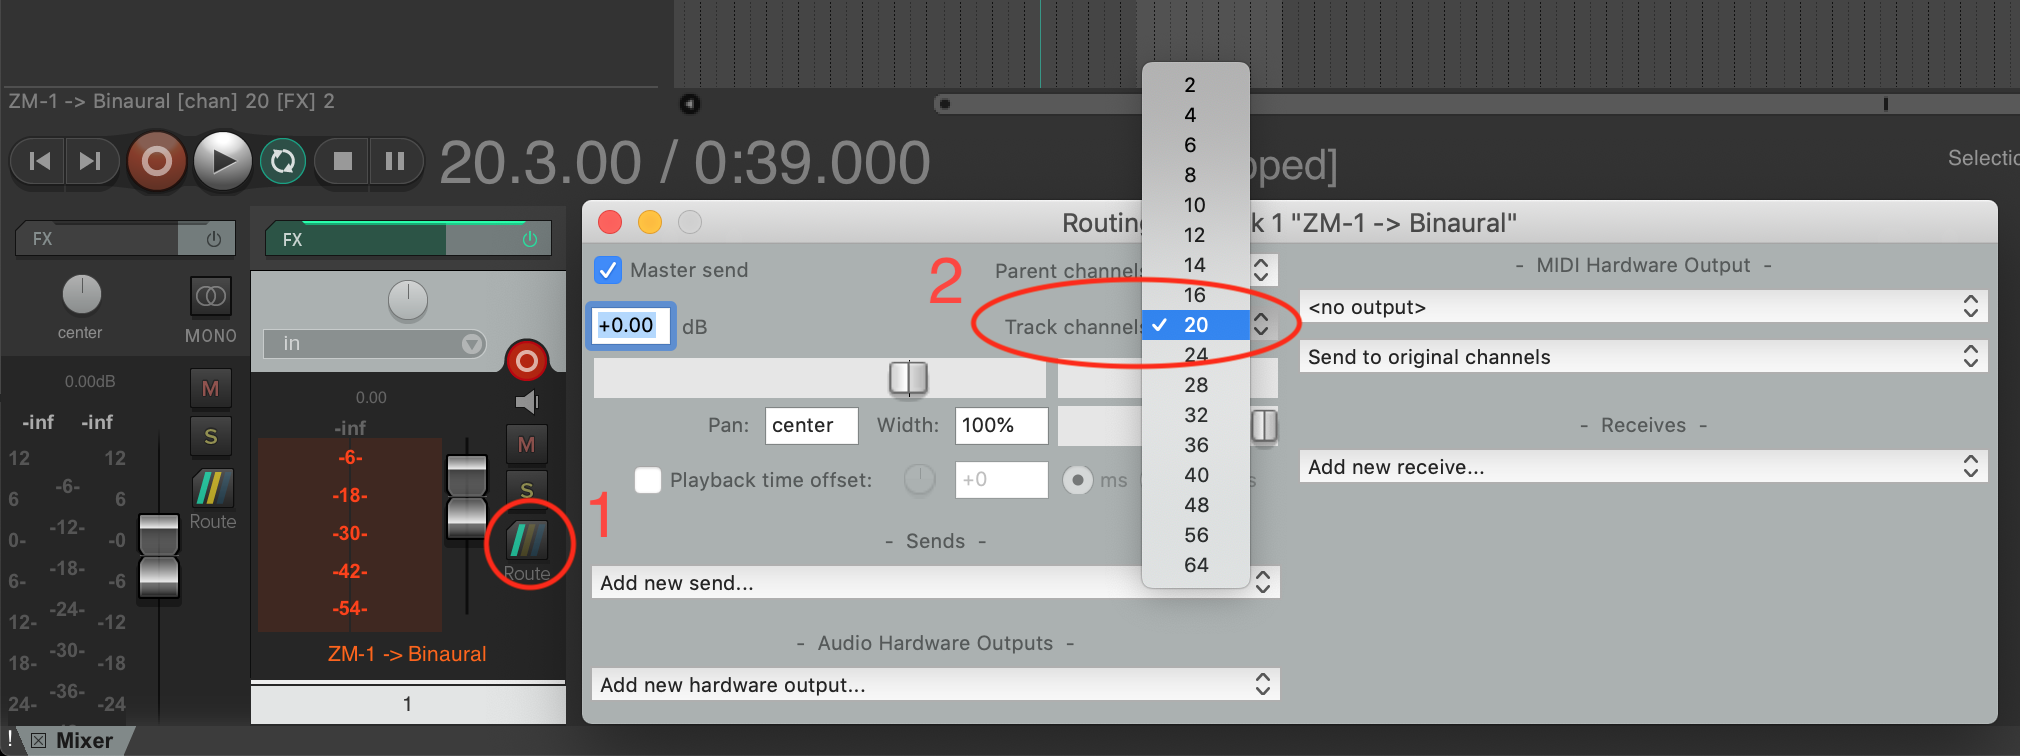 Then you have to arm the track by clicking the red circle in the track panel (marked “1” in the image). Before the next step, you may have to make the track a bit wider by dragging its bottom line down (marked with an arrow in the image) so the “IN FX” shows up (orange rectangle in the image). 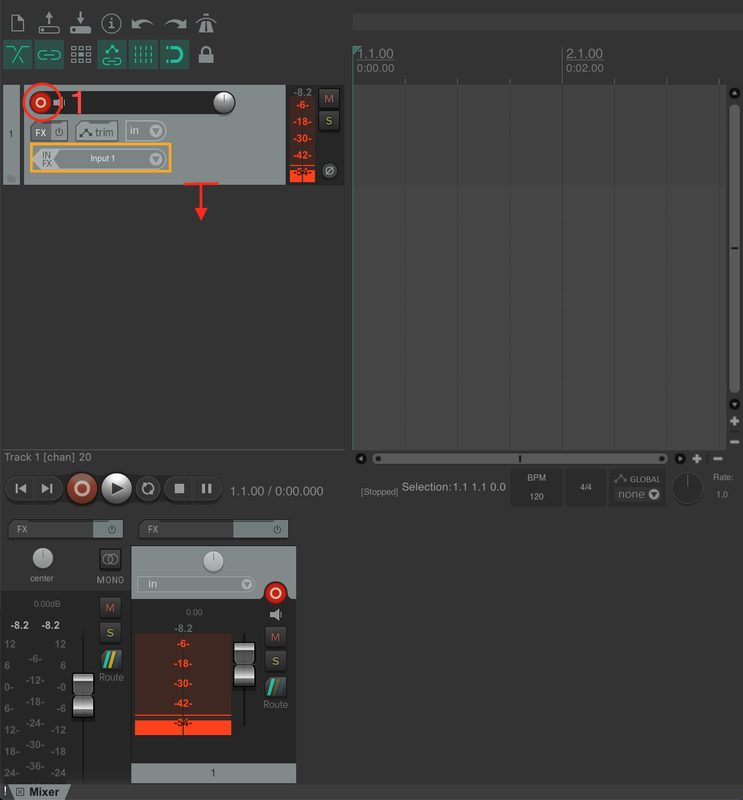 Now, select input channels to “Input 1..Input 20 [20 chan]” by clicking on the area highlighted in the image. 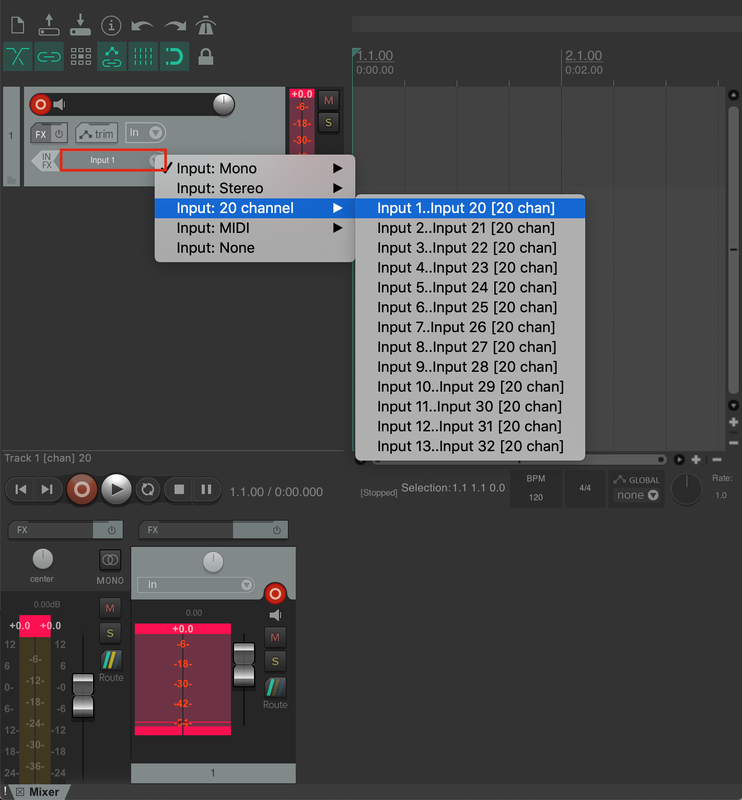
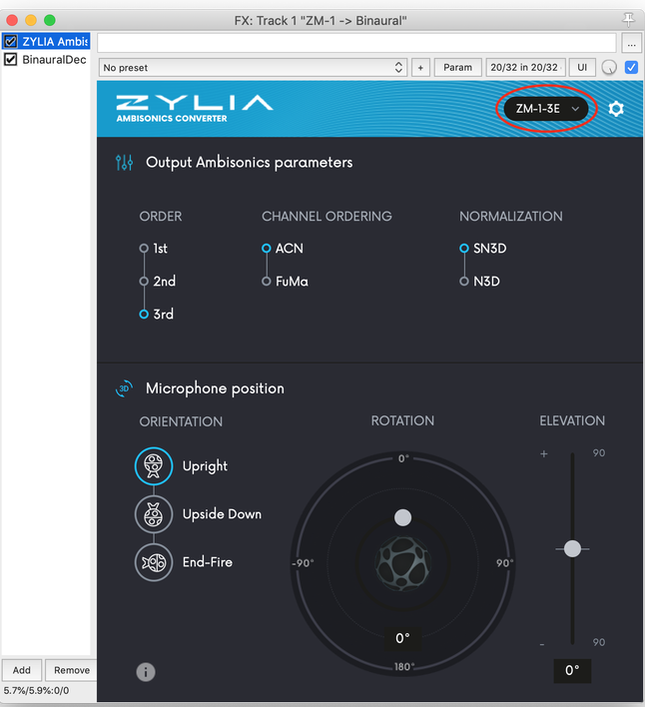
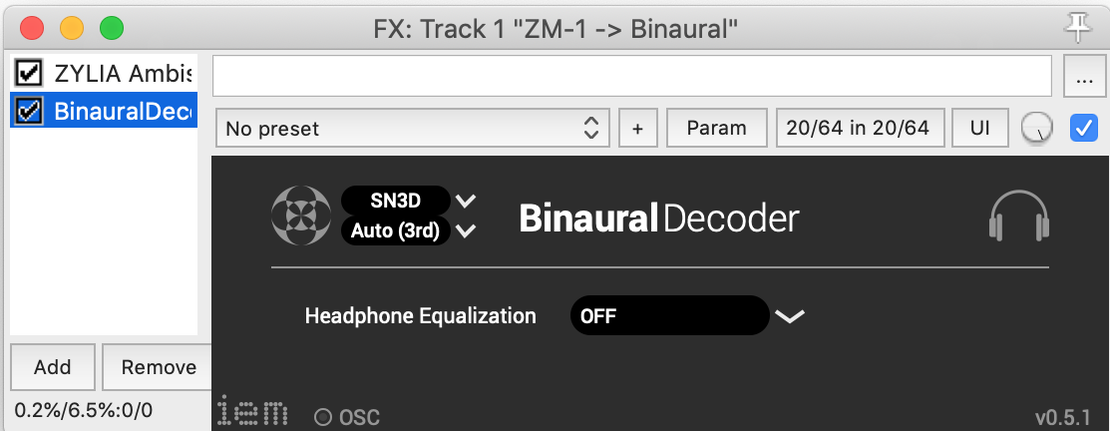
Two new windows should show up. Search for ZYLIA Ambisonics Converter Plugin and add click OK. Then add another plugin, IEM Binaural Decoder. If you haven’t downloaded the IEM plugin yet, go back to the first step of this tutorial. If you managed to set everything as described here, now you can proceed to next steps described in point 3.b. 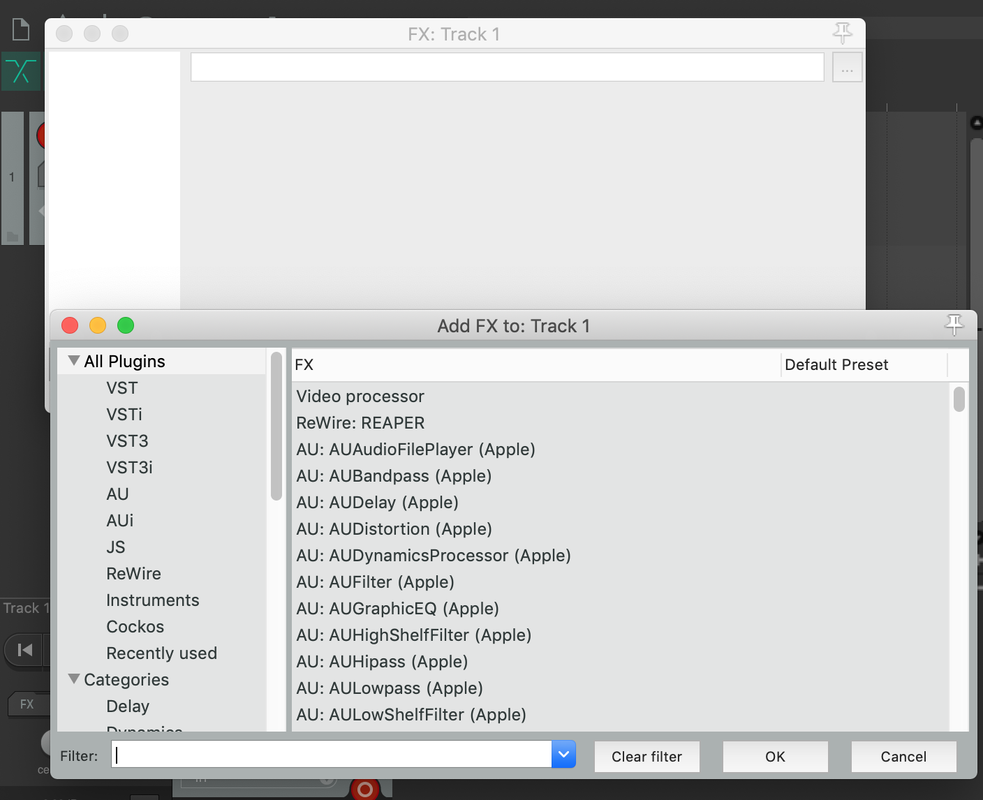 3.b Using template project
4. Setting up streaming software (in this case OBS)In OBS, go to preferences and specify the number of input channels to Stereo and select the Soundflower (2ch) as an input device (Mic/Auxillary Audio). Disable the Desktop Audio. 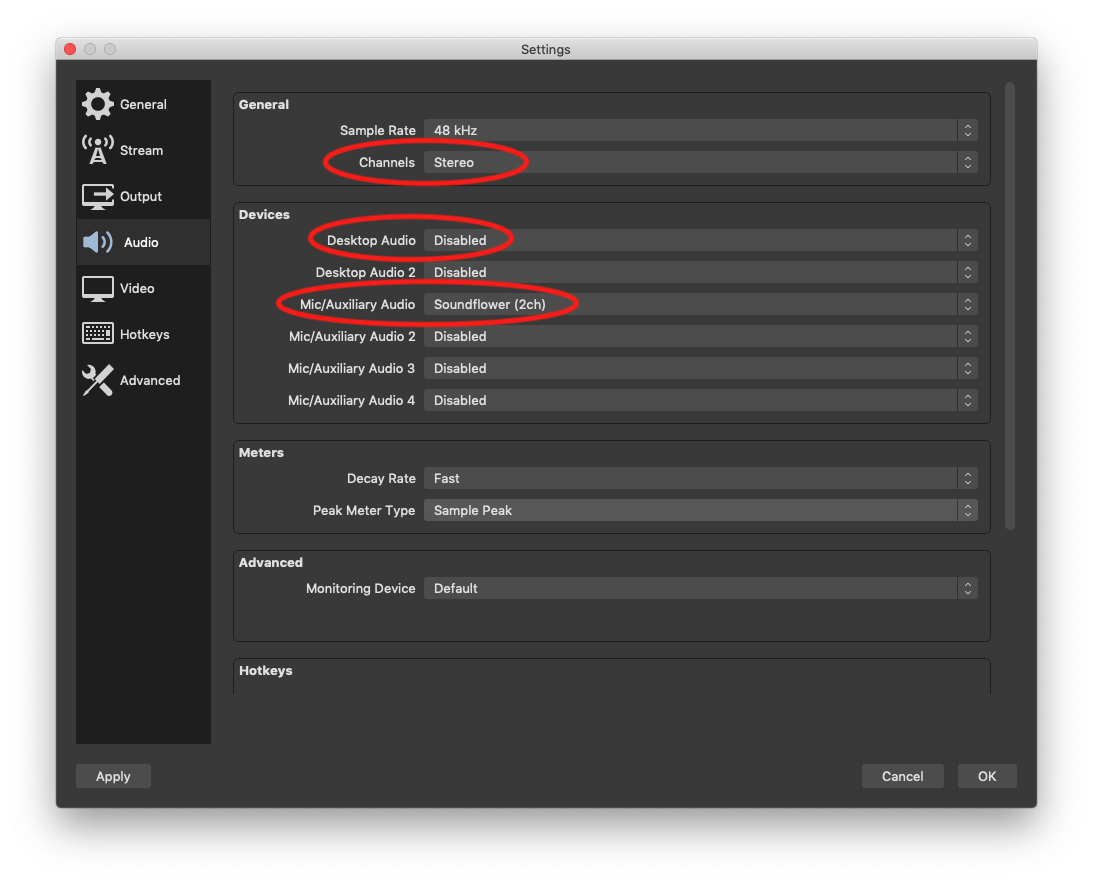 Click OK to save the settings. You might have to restart the OBS. Now everything should be set up and you should get input signal from your ZYLIA ZM-1, as marked here in the image below. 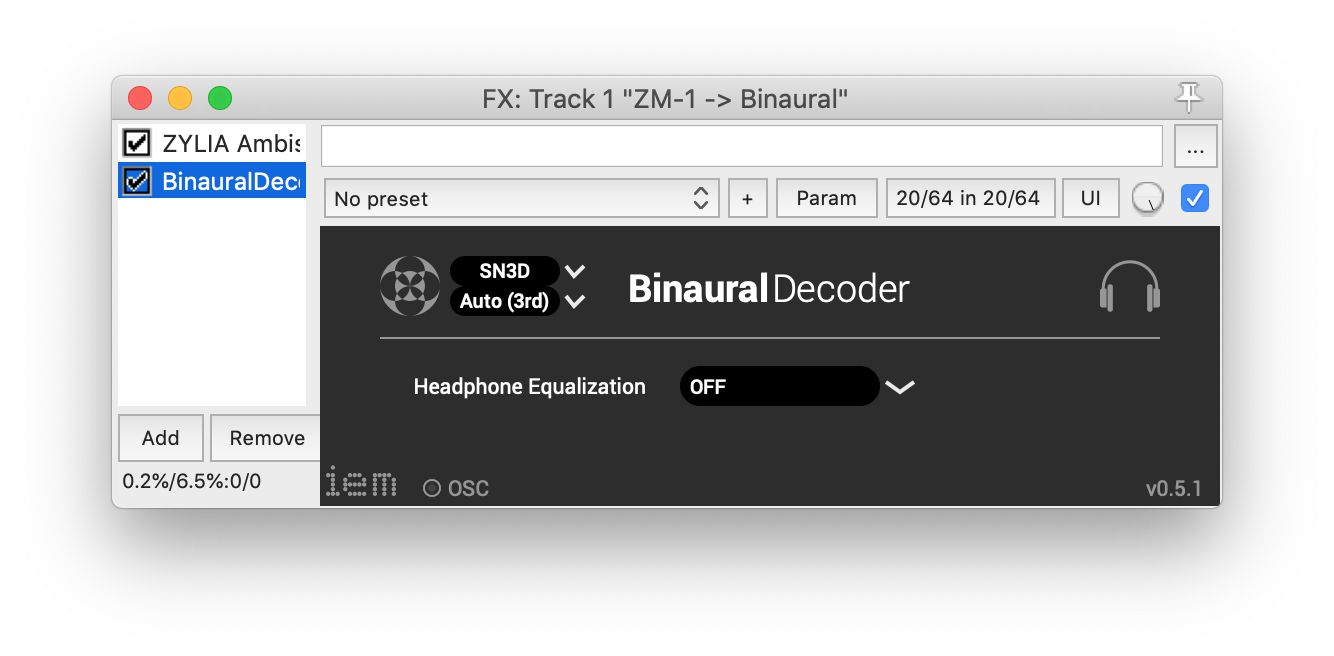
#zylia #3Daudio #stream #streaming #audio #binaural #OBS #reaper #IEM #soundflower #music #concert #gig #homerecordin #homeconcert #concertathome
2 Comments
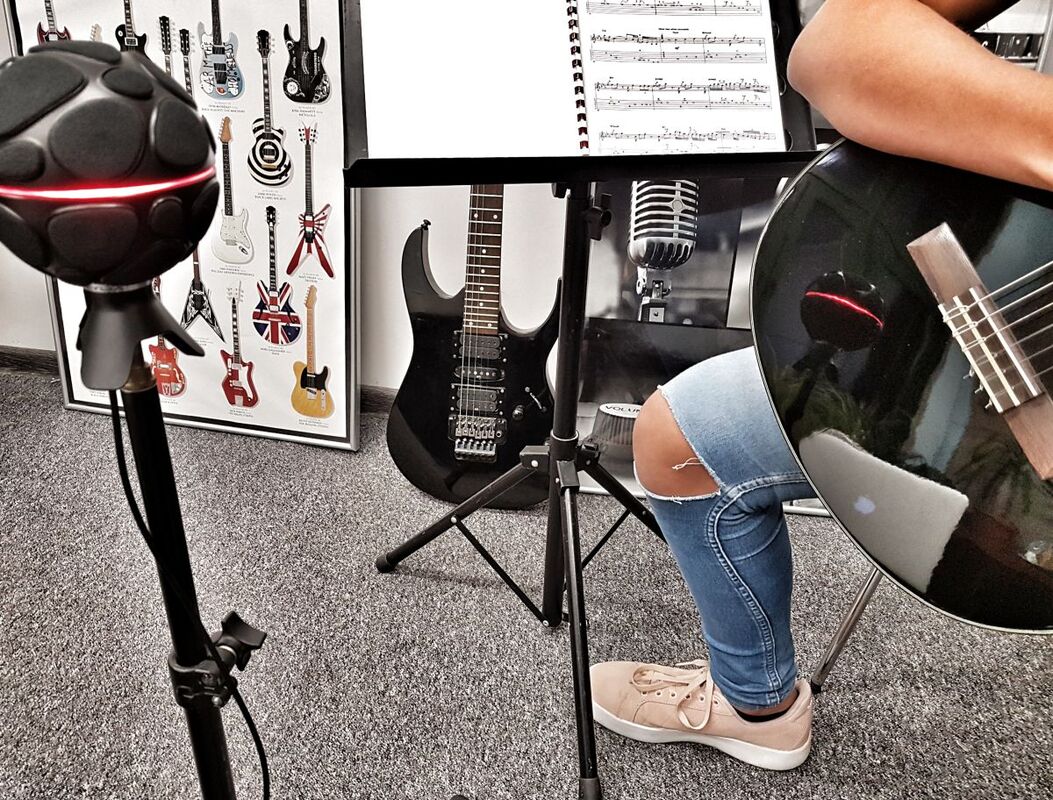
By Marek Kabacinski, Grzegorz Skowron, Pedro Firmino, Tomasz Ciotucha & Anna Czerwoniec All concerts and gigs are canceled, and you are sitting at home and wondering what to do with your free time, how to show your creative work to the world, stream your concert from your apartment, or just play guitar for others? We have a solution for you! Take the ZYLIA microphone, connect it to your laptop and start streaming your home concert or solo session to the world. #stayhome #stayathome #homerecording #stream #music #concert #twitch #zylia #streaming #facebook #youtube #ambisonics #FOA #OBS #reastream #audio #microphone #video  These days we have in our hands all tools needed to broadcast events to the entire world. Live streaming lets you connect with your fans during your concerts, backstage Q&As, or press conferences. Thanks to apps like YouTube, Facebook Live, Twitch you can stream events and show what’s happening anywhere and everywhere in real time. If you want to share an event giving your fans the feeling of being next to you, you need both – video and audio in high quality. While the video quality on our smart phones is surprisingly good, the built-in microphones are still not good enough to stream all the details of your music. We have several instructions for you:
 Equipment, use best live streaming microphonesIf you want to spread your performance all over the world, it is very important to invest in good quality microphones. If you can afford the cost of a microphone, it's well worth it. The quality of audio really matters. If people can't hear what you're playing, they will simply quit your channel after seconds. When you record with standard microphones you must remember that each instrument needs to be equipped with one microphone. Is is also recommended to have one microphone for ambient recording – allowing your fans to hear your conversations between pieces.
It looks like you will need a lot of mics, cables and equipment, and perhaps even a sound operator? Don’t worry. Instead of all this stuff for audio recording, you can simply use ZYLIA MUSIC. ZYLIA ZM-1 is a spherical microphone array designed for multi-track audio recording. It captures all sound sources that are present in the audio scene. You can put ZYLIA in the middle of the band, record everyone and everything with one mic connected to your laptop with a USB cable and stream it to the world. by Tomek Ciotucha All concerts and gigs are canceled, and you are sitting at home and wondering what to do with your free time, how to show your creative work to the world, stream your concert from your apartment, or just play guitar for others? We have a solution for you! Take the ZYLIA microphone, connect it to your laptop and start streaming your home concert or solo session to the world. #stayhome #stayathome #homerecording #stream #music #concert #twitch #ambisonics #FOA #streaming #facebook #youtube
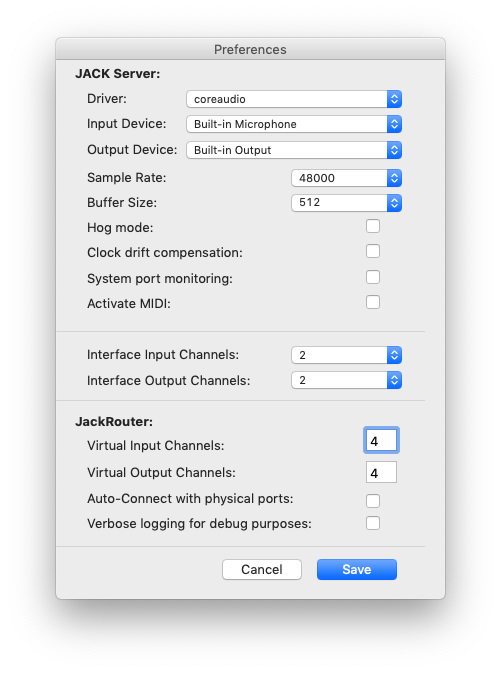
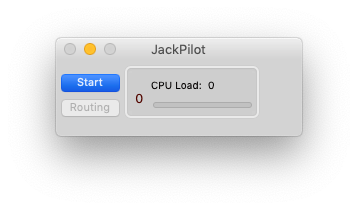
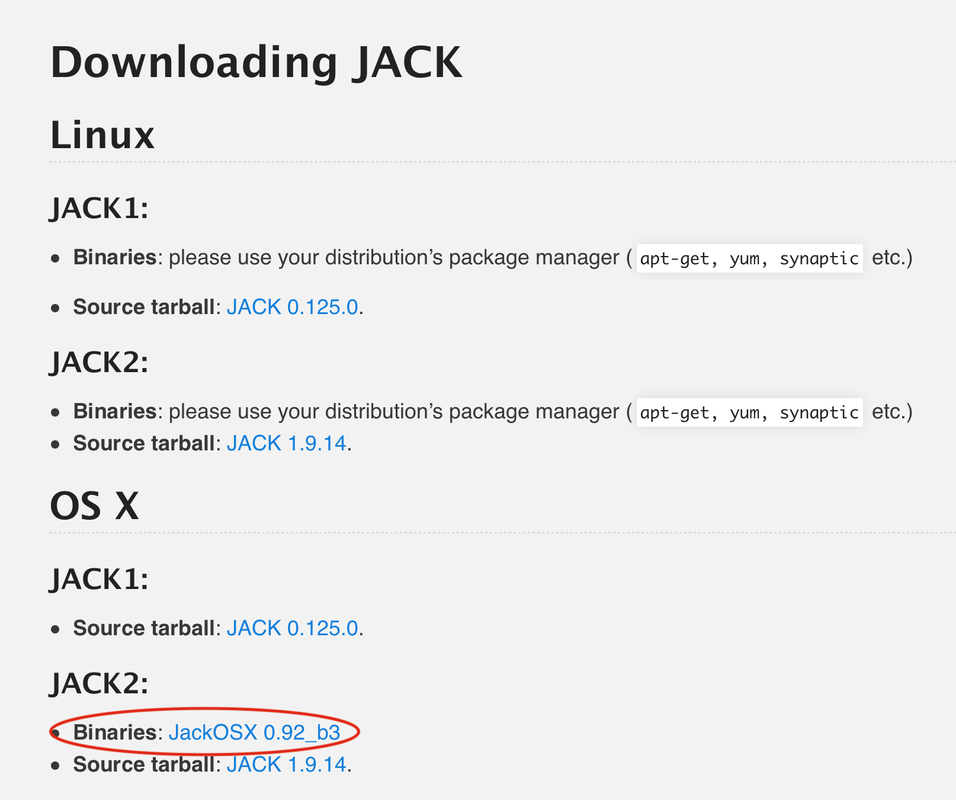
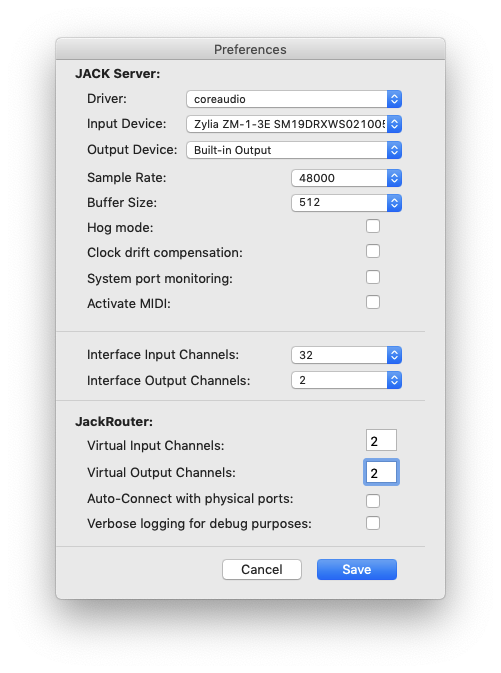
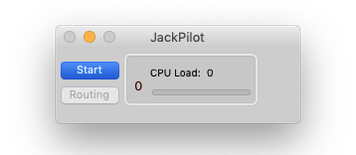
To download the software use the link below: https://jackaudio.org/downloads/ And choose to download JACK2 binaries: 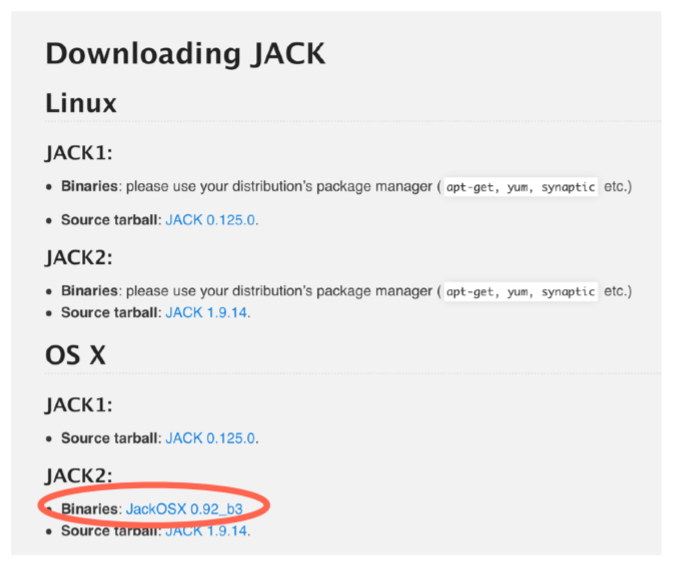 After restarting your computer when the installation is finished, open the app JackPilot. The “Preferences” window should show up when you open the app for the first time. If not, open it by clicking on the JackPilot/Preferences in the upper right corner. In the Preferences window choose leave the “Built-in Microphone” and “Built-in Output” in the devices settings. Set the Sample Rate to 48000 and set the number of Virtual Input and Output channels to 4. Click Save.
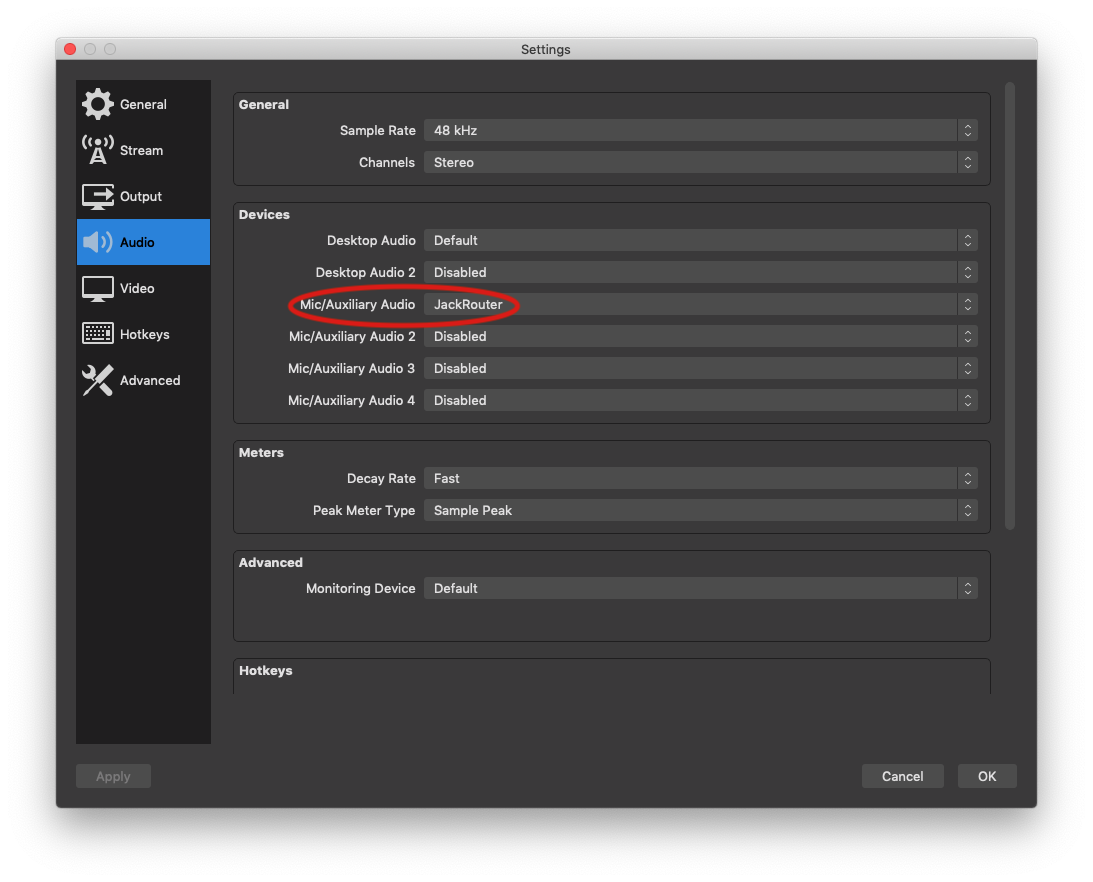
Now go to OBS and specify the amount of input channels to 4 and select the JackRouter as an input device (Mic/Auxillary Audio). 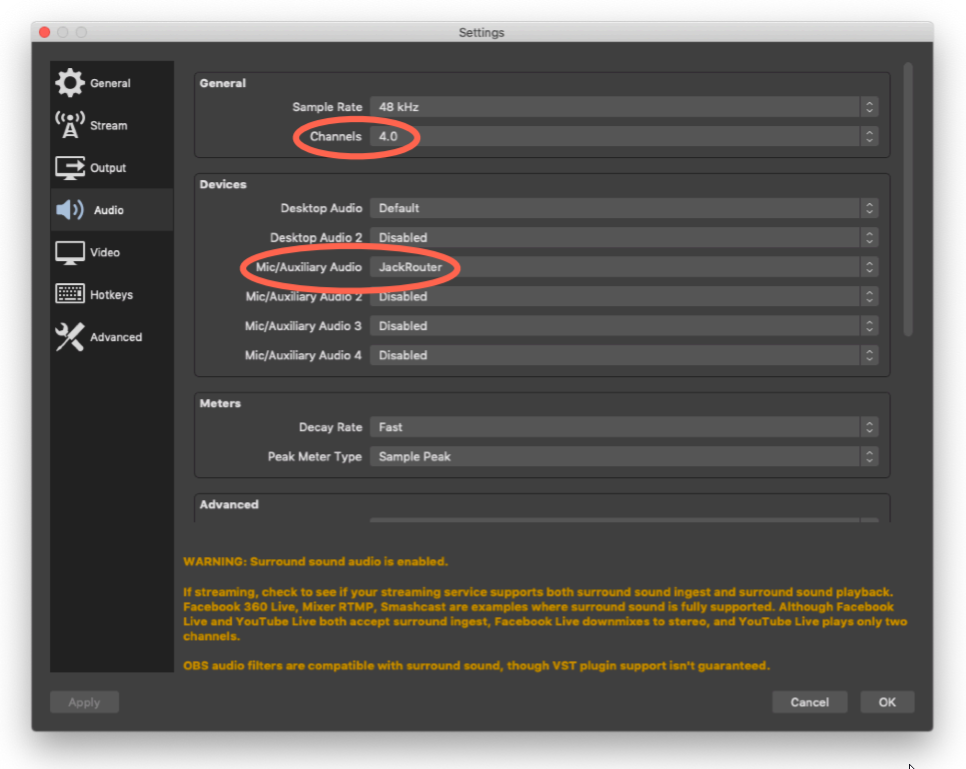 Click OK to save the settings. You might have to restart the OBS. Then, open the Reaper project called “ZM-1 FOA Streaming via JackPilot.RPP”. If you haven’t connected your ZYLIA microphone array already, do it now. Go to preferences and select ZYLIA as an Input Device and JackRouter as an Output Device. You have to tick the box marked in the image below to allow use of different input and output devices. 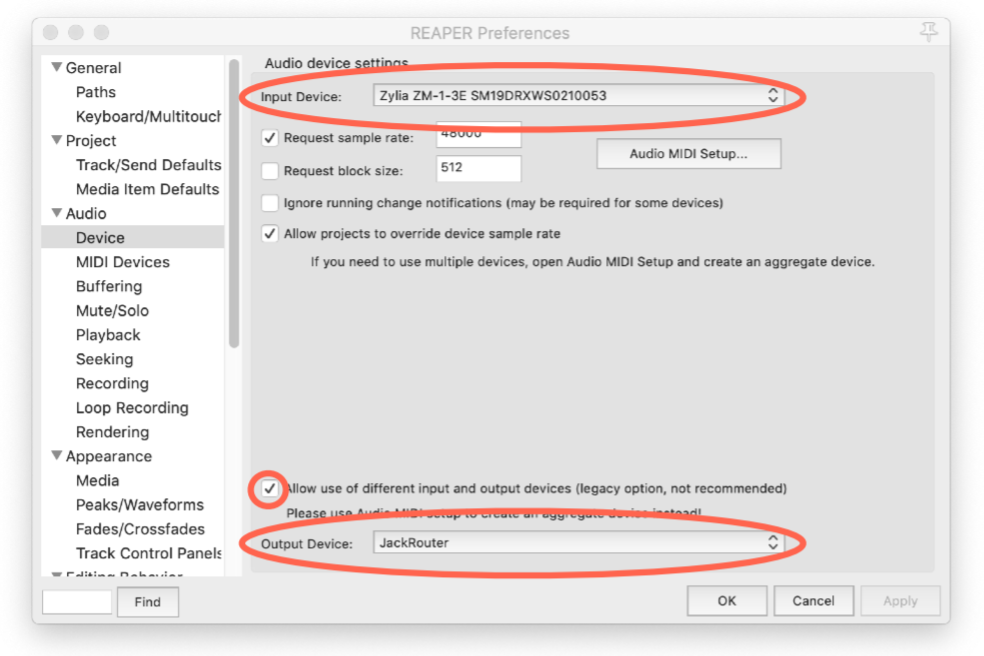
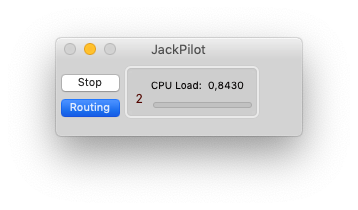
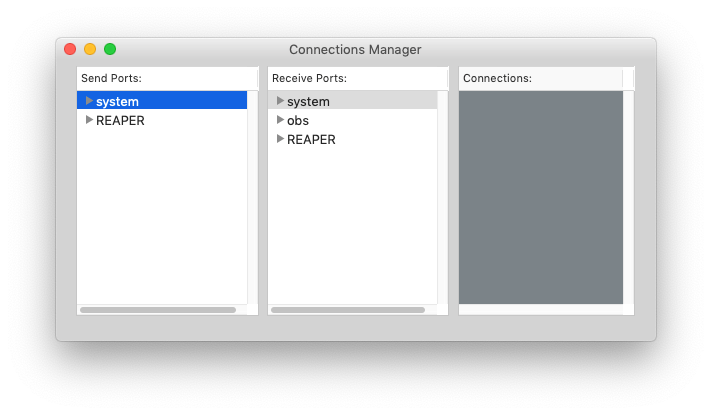
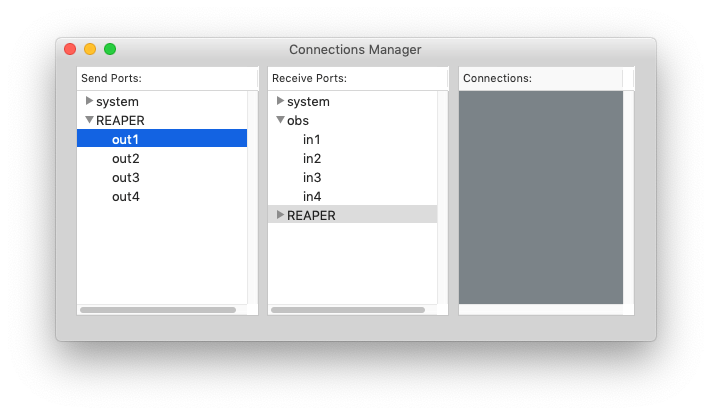
In the Connections Manager window click on the two triangles highlighted in the image below. The Send Ports/REAPER list shows the output channels from Reaper, and the Receive Ports/obs list shows the input channels in OBS. There should be 4 channels per each list. Remember, that first you have to choose JackRouter as an Input Device in OBS and as an Output Device in Reaper for the channels show up in the JackPilot’s Connections Manager window. 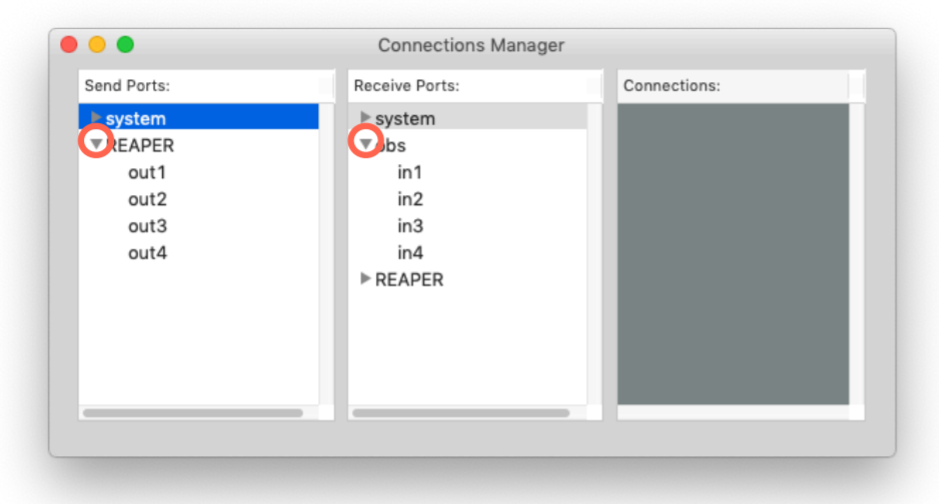
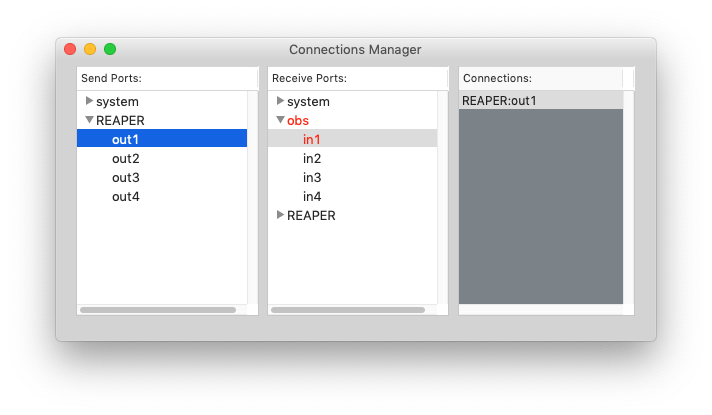
Now do the same with the rest of the channels: Out1 -> in1 Out2 -> in2 Out3 -> in3 Out4 -> in4 Now everything is set up and you should be able to stream first order ambisonics captured with your Zylia! You can use this project as an input - DOWNLOAD
by Marek Kabacinski All concerts and gigs are canceled, and you are sitting at home and wondering what to do with your free time, how to show your creative work to the world, stream your concert from your apartment, or just play guitar for others? We have a solution for you! Take the ZYLIA microphone, connect it to your laptop and start streaming your home concert or solo session to the world. #stayhome #stayathome #homerecording #stream #music #concert #twitch #zylia #facebook #youtube #streaming
First of all, plug ZYLIA ZM-1 mic to your laptop with Windows operating system 1. Download Voicemeeter program from this website: https://www.vb-audio.com/Voicemeeter/index.htm 2. Install the program (you will have to restart your computer after that) 3. Open Voicemeeter 4. Choose ZYLIA ZM-1 as A1 Hardware out: 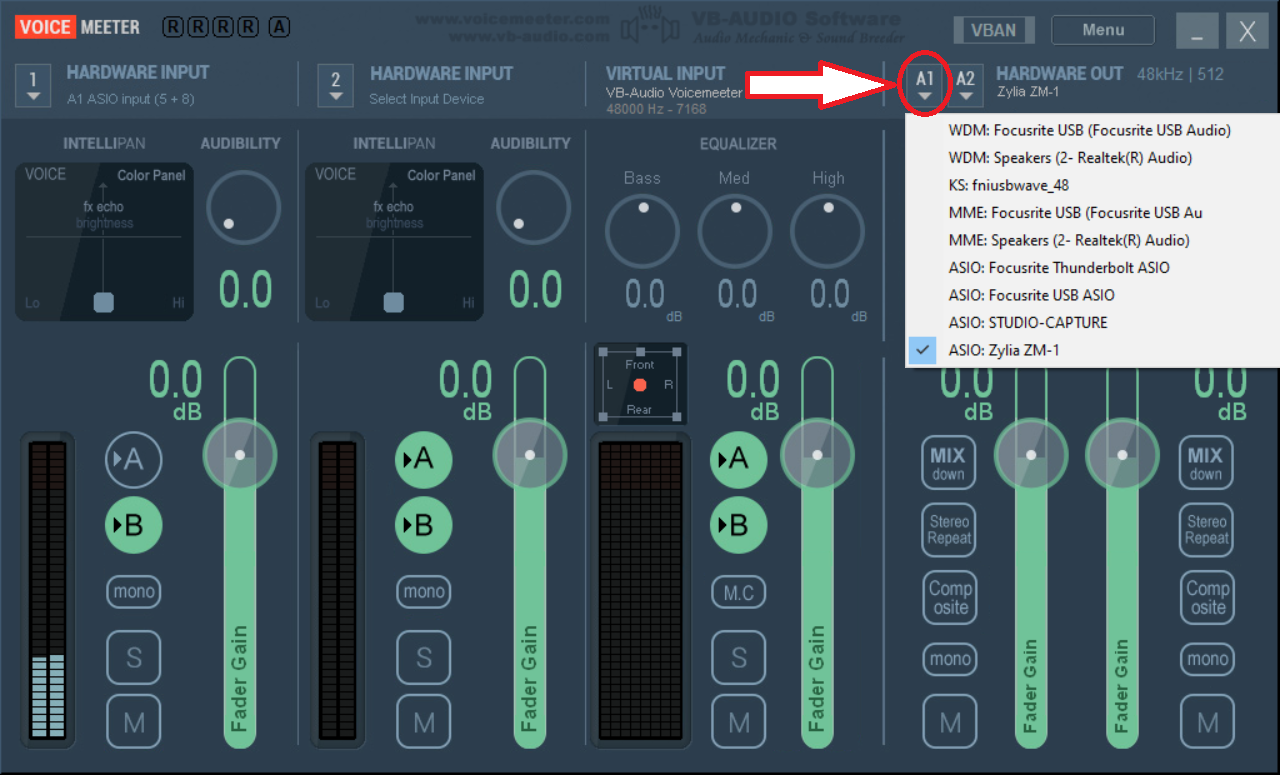 5. Click on Menu and choose System Settings/Options… 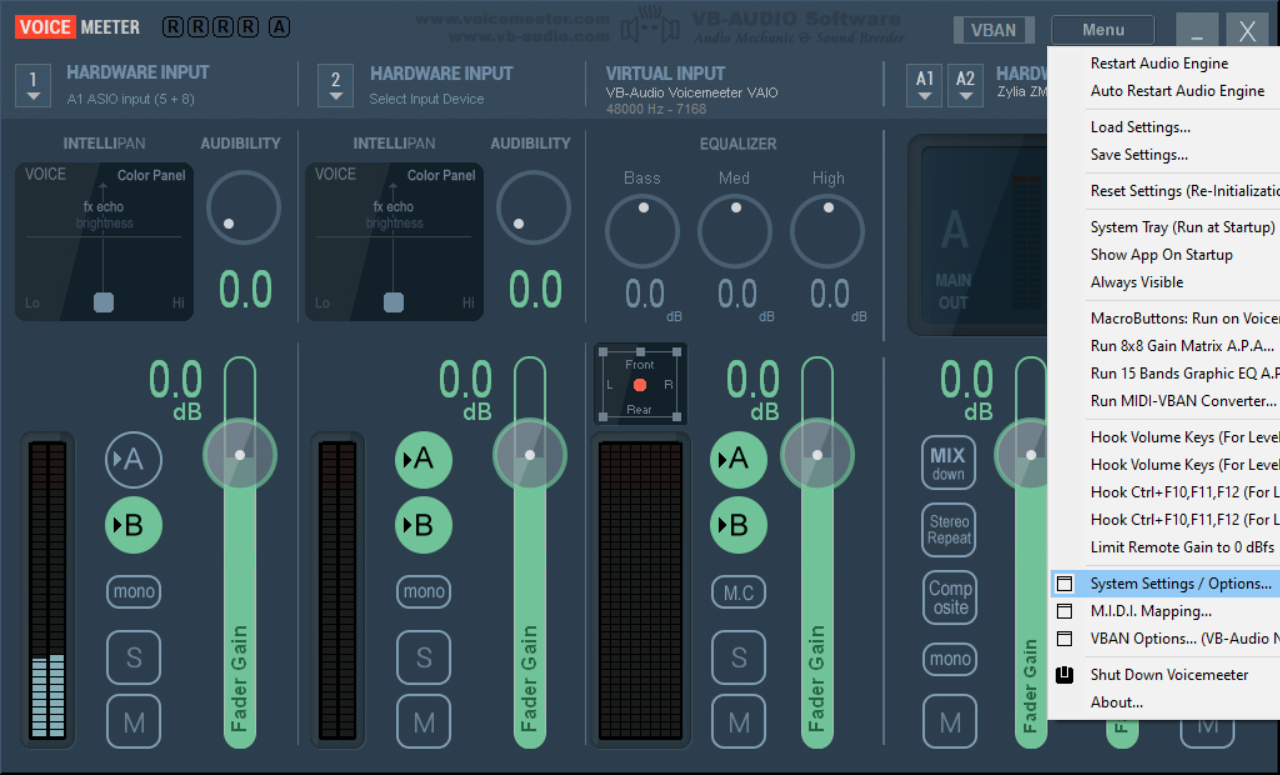 6. Setup the settings as shown on the screenshot below (you have to click on the field to choose a channel number): 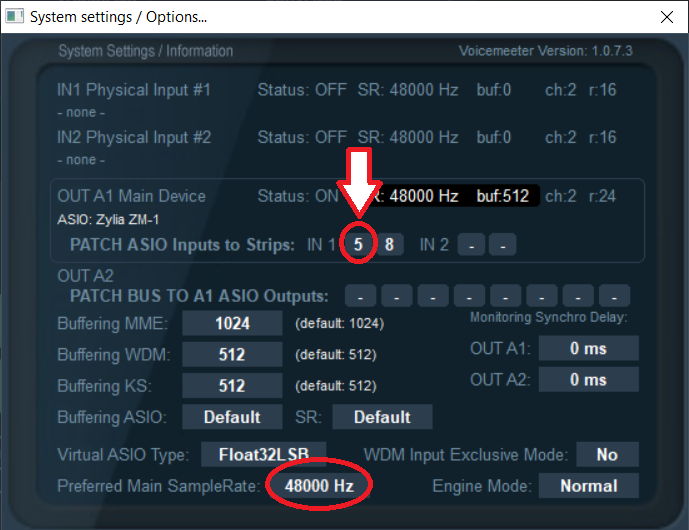 7. On first hardware input choose routing to B: 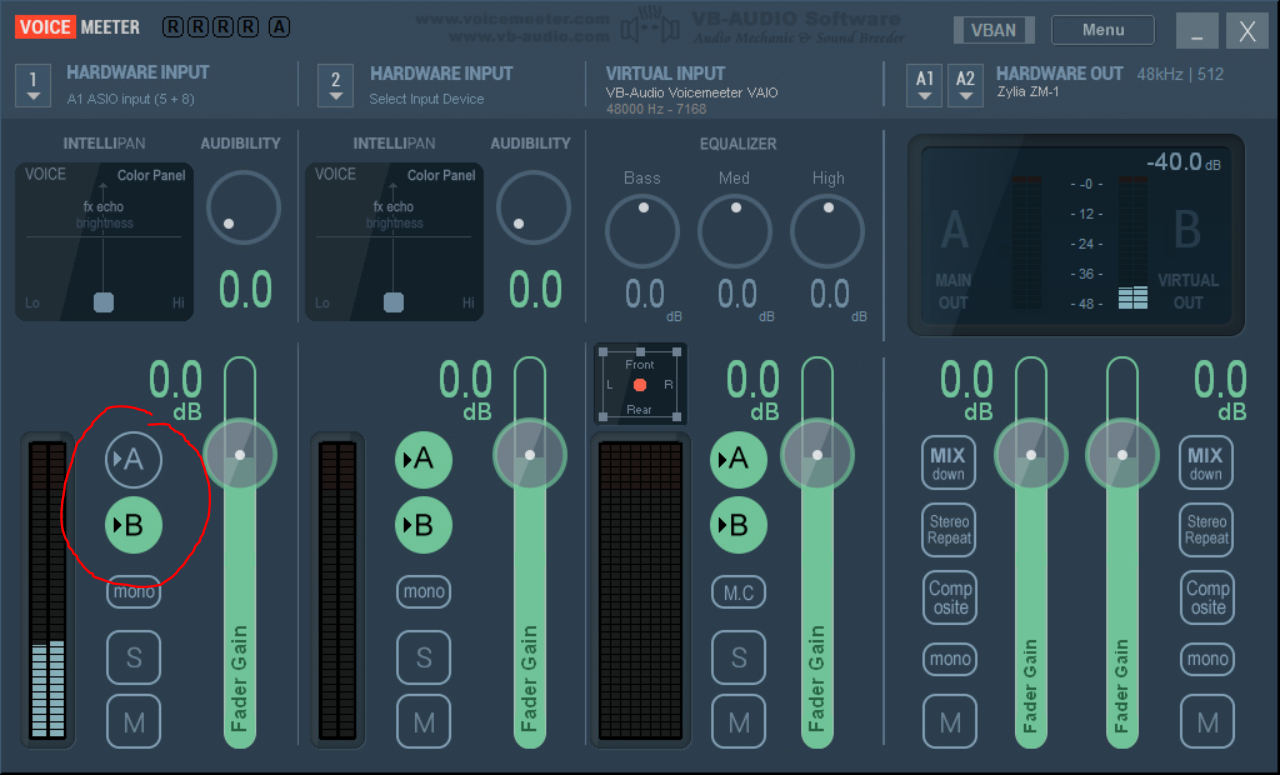 8. Now the signal from ZM-1 will be routed to VoiceMeeter Output device: 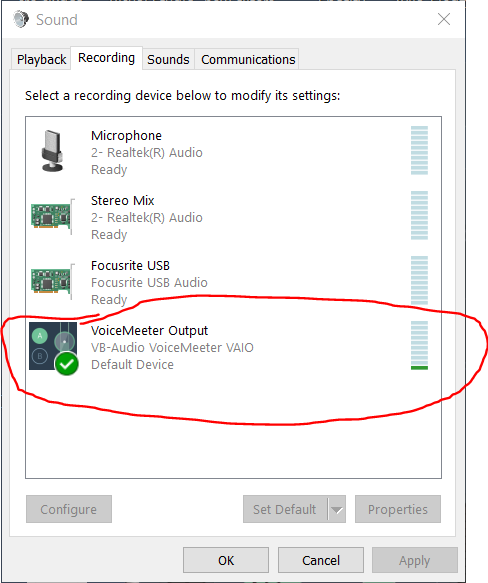 9. Launch OBS Studio and click on settings: 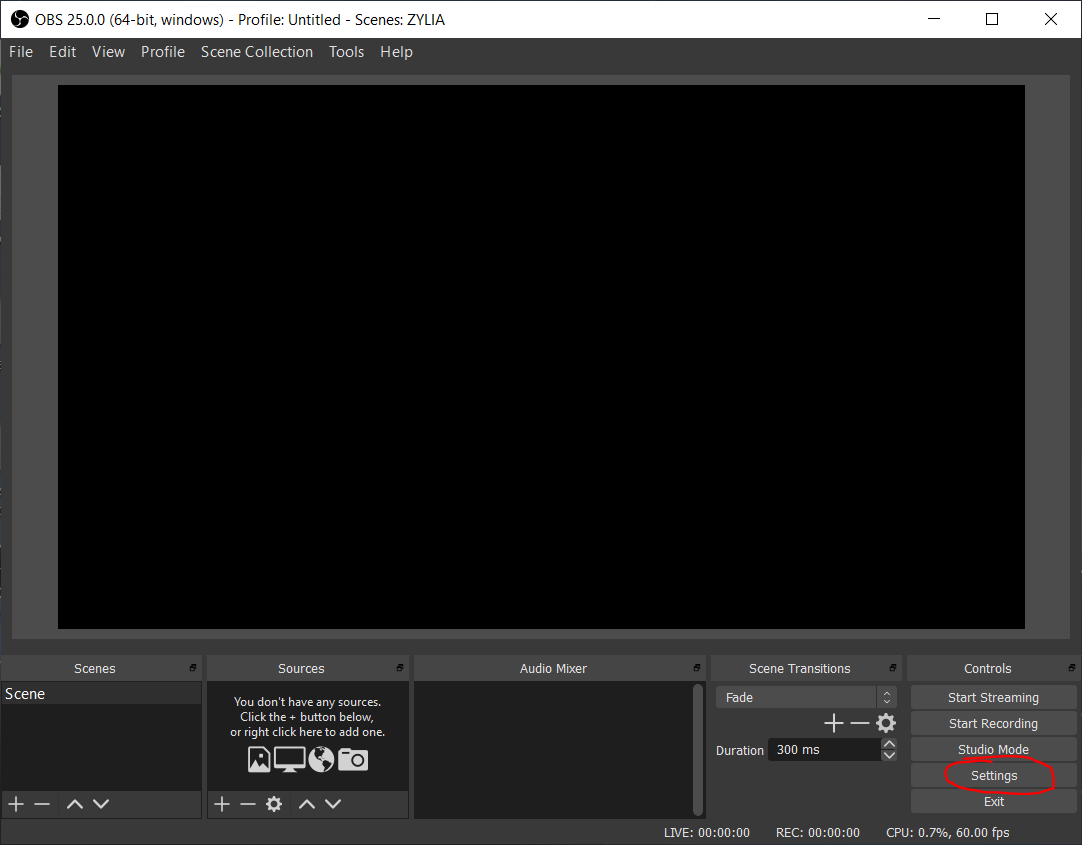 10. Go to Audio settings and choose Voicemeeter device as a Mic/Auxiliary Audio: 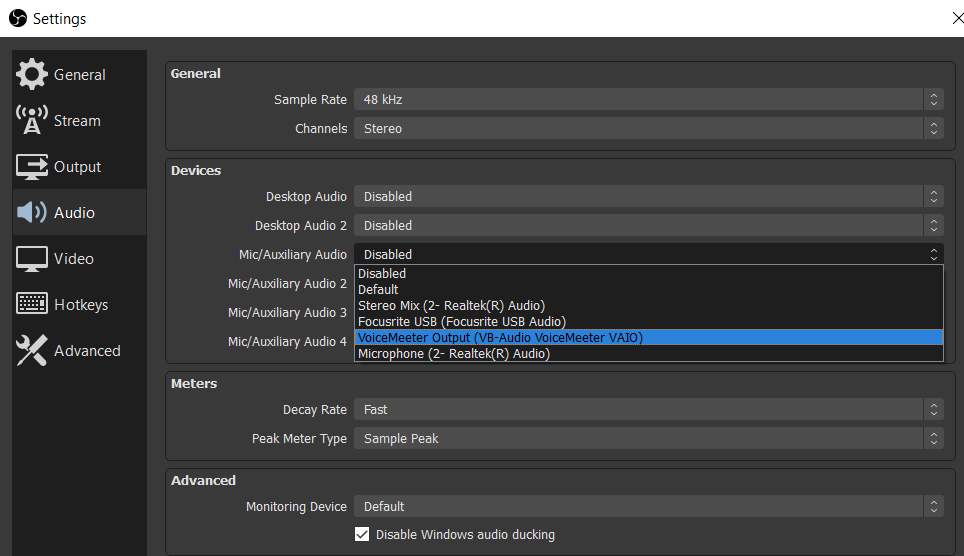 11. Now you should be able to see Mic/Aux device in Audio Mixer: 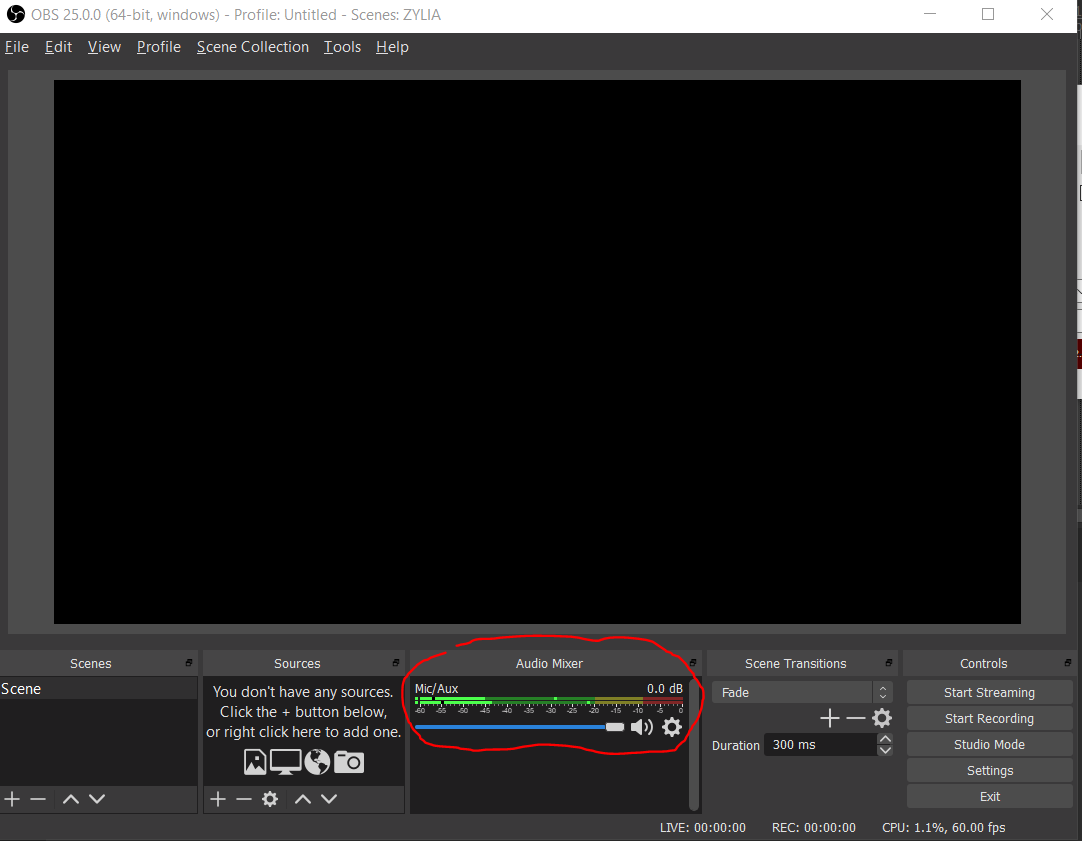 12. You are now ready to start stream :)
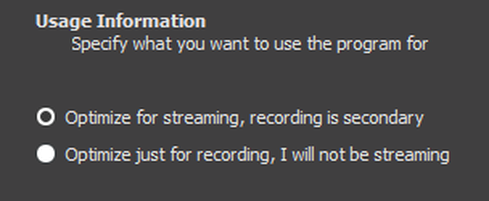
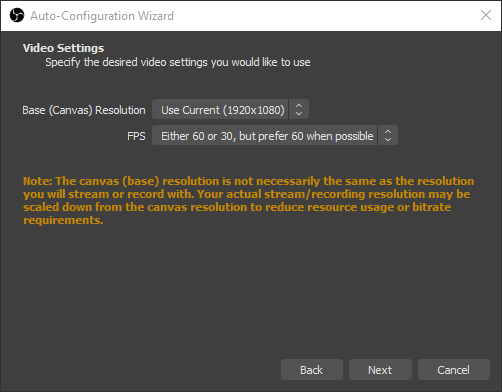
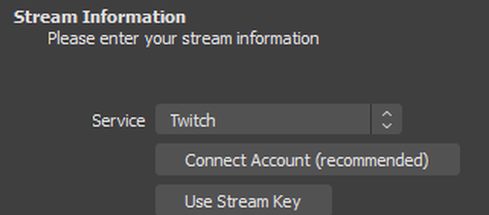
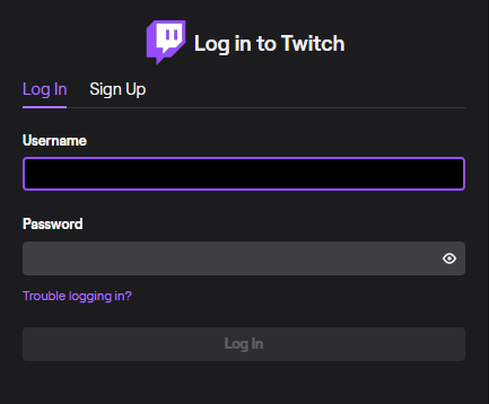
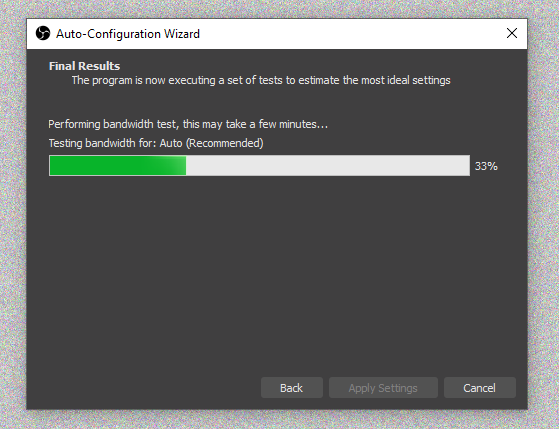
by Grzegorz Skowron All concerts and gigs are canceled, and you are sitting at home and wondering what to do with your free time, how to show your creative work to the world, stream your concert from your apartment, or just play guitar for others? We have a solution for you! Take the ZYLIA microphone, connect it to your laptop and start streaming your home concert or solo session to the world. #stayhome #stayathome #homerecording #stream #music #concert #twitch #facebook #youtube #OBS #streaming #audio Once you have set up your audio input, you are ready to connect OBS with your Twitch account (Don't have an account? Sign up on Twitch.tv) This part is fairly easy thanks to the configuration wizard.
by Marek Kabacinski All concerts and gigs are canceled, and you are sitting at home and wondering what to do with your free time, how to show your creative work to the world, stream your concert from your apartment, or just play guitar for others? We have a solution for you! Take the ZYLIA microphone, connect it to your laptop and start streaming your home concert or solo session to the world. #stayhome #stayathome #homerecording #stream #music #concert #360camera #Ambisonics #facebook #streaming 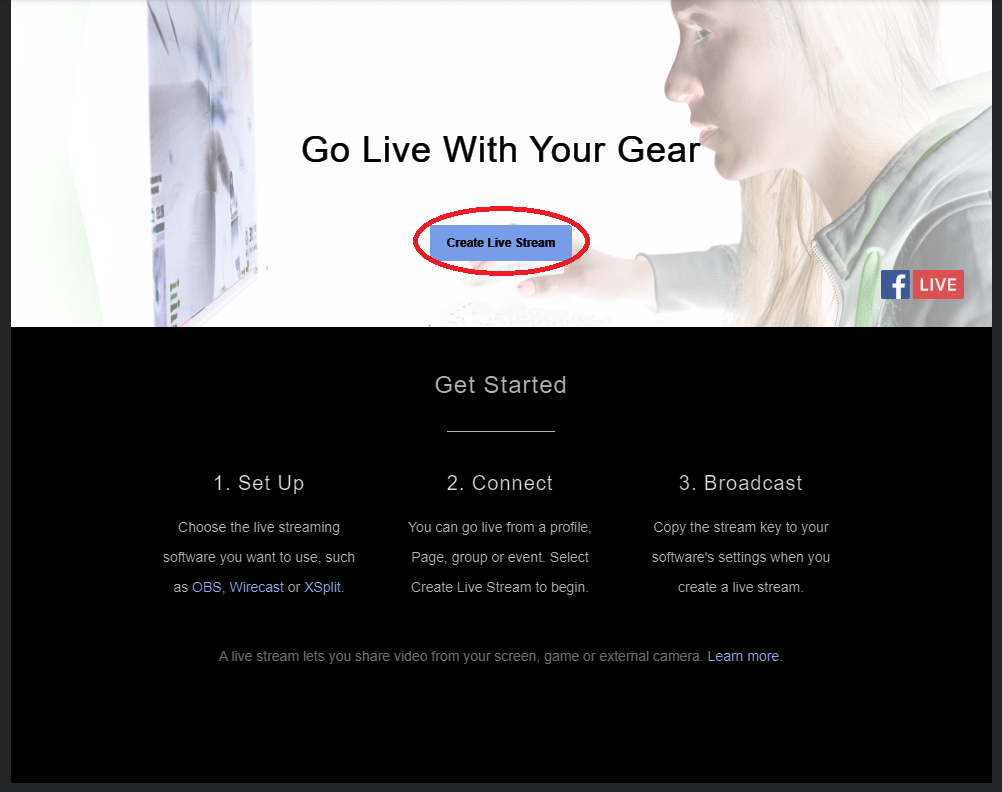 3. Click on Broadcast this as a spherical video and choose an option for you 360 camera 4. Click on This broadcast has Audio 360. 5. Start Stream by OBS using stream key. 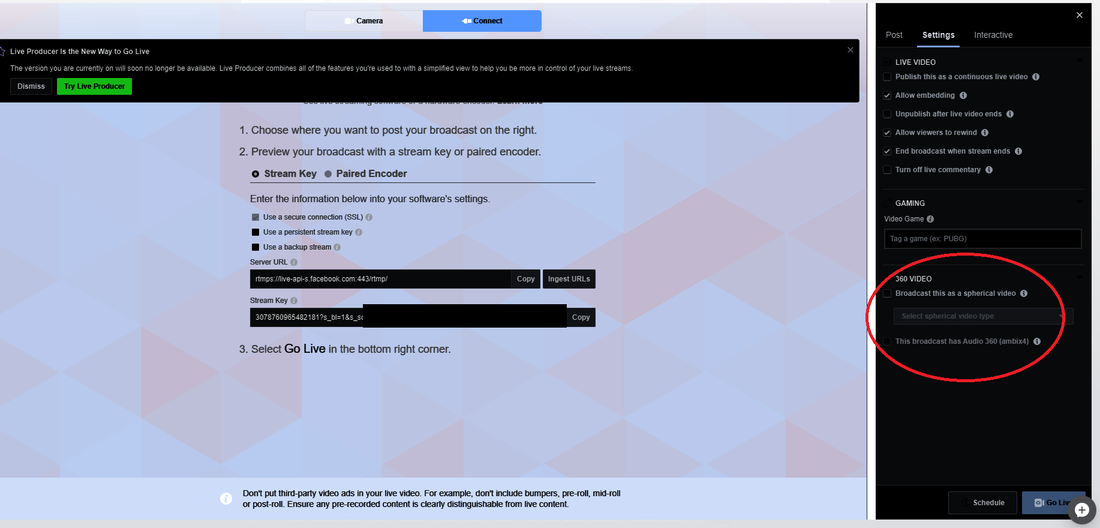 by Pedro Firmino All concerts and gigs are canceled, and you are sitting at home and wondering what to do with your free time, how to show your creative work to the world, stream your concert from your apartment, or just play guitar for others? We have a solution for you! Take the ZYLIA microphone, connect it to your laptop and start streaming your home concert or solo session to the world. #stayhome #stayathome #homerecording #stream #music #concert #twitch #reastream #facebook #youtube #obs In the situation you are playing with a band and would like additional control to mix the audio from the ZM-1, you can also apply the following workflow for streaming: Step 1 On the track receiving input from the ZM-1, add ZYLIA Studio PRO plugin. Remember to disable the track master send 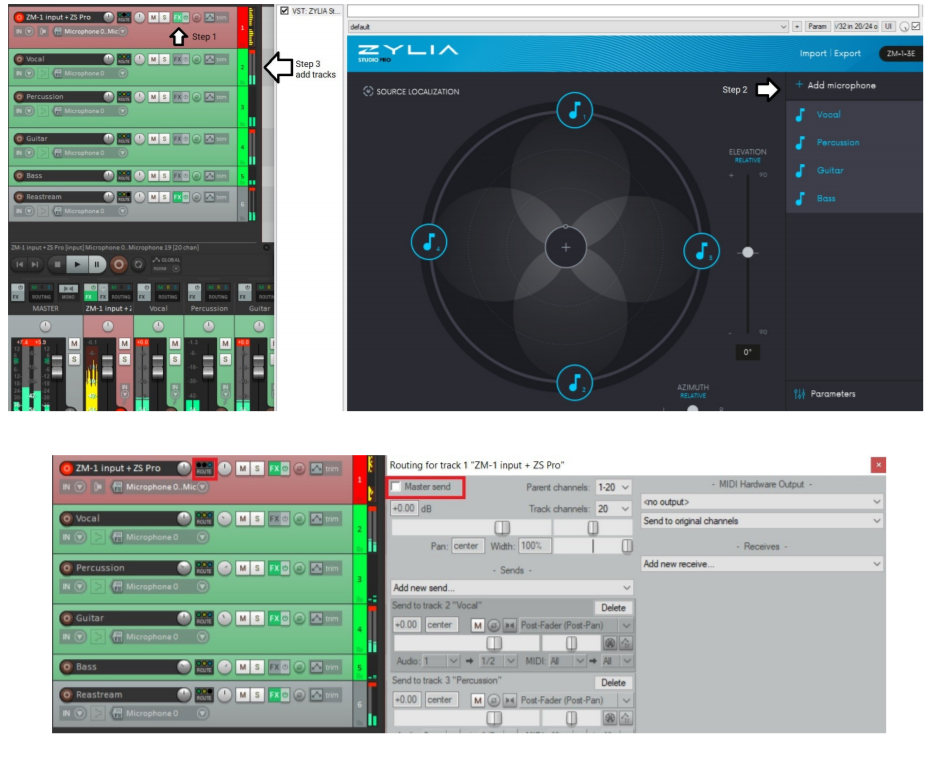 Step 2 In ZYLIA Studio Pro plugin, add virtual microphones. You are able to add as many necessary but the output will be 2 channels only. Remember to position the microphones and play with the plugin settings for better results. Step 3 Add equal amount of tracks to the number of virtual microphones created. Step 4 Route the signal from the ZM-1 multichannel track to the tracks created. 4.1 – Click the routing button 4.2 – Click add new receive and choose the track with the ZM-1 input. 4.3 – Choose the virtual microphone channel to receive 4.4 – Do this process for all the virtual microphone created. 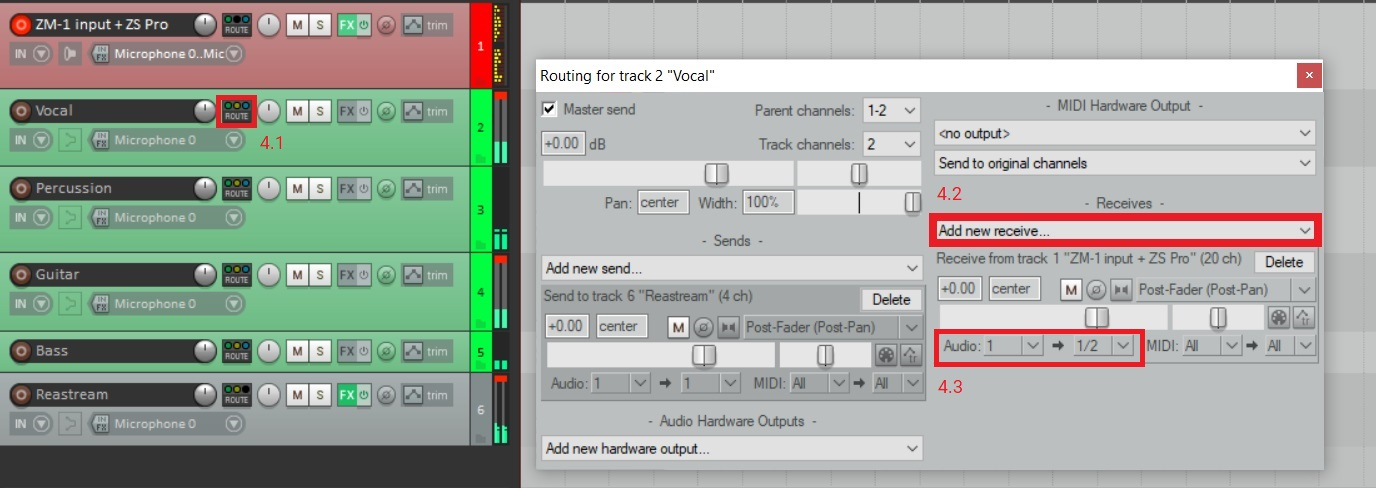 Step 5 Mix the separated tracks do your liking, change levels, add EQ/FX, etc Since we are using the live input for streaming, we recommend to do the mixing based on the streamed output. Step 6 Add a new track and route the signal from the separated tracks to this track. Once again, do this by clicking the routing button, add new receive, select the target track and choose Audio 1-2 to 1-2. 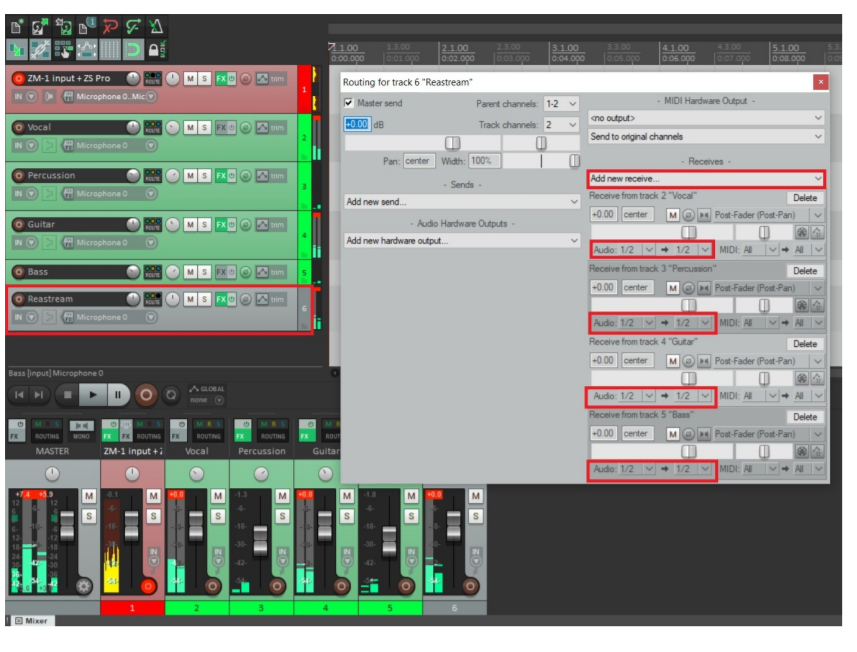 Step 7 To the same track add the ReaStream VST to the FX bus (if you don’t have it installed you are able to download this free plugin at: https://www.reaper.fm/reaplugs/ ). Step 8 In the ReaStream plugin, send the audio signal. In the identifier field you may leave it at default but it should be consistent in the OBS as well ( more information mentioned in OBS tutorial. ) In blue: here you can send more audio channels to OBS. Which can also be used for sending First Order Ambisonics (replace ZYLIA Studio PRO with ZYLIA Ambisonics Converter plugin). 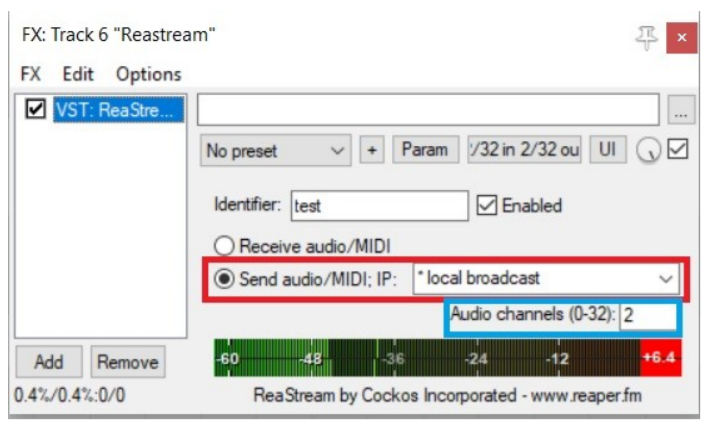 Step 9
Continue the setup in OBS (Receiving ReaStream signal in OBS) by Marek Kabacinski All concerts and gigs are canceled, and you are sitting at home and wondering what to do with your free time, how to show your creative work to the world, stream your concert from your apartment, or just play guitar for others? We have a solution for you! Take the ZYLIA microphone, connect it to your laptop and start streaming your home concert or solo session to the world. #stayhome #stayathome #homerecording #stream #music #concert #twitch #zylia #streaming #facebook #youtube #ambisonics #FOA #OBS #reastream #audio #microphone #video
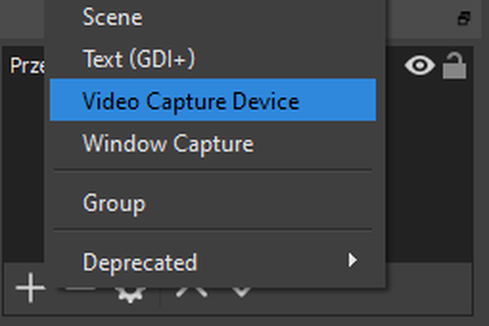
1. To add video source to your stream with OBS Studio, click on + button in Sources window: 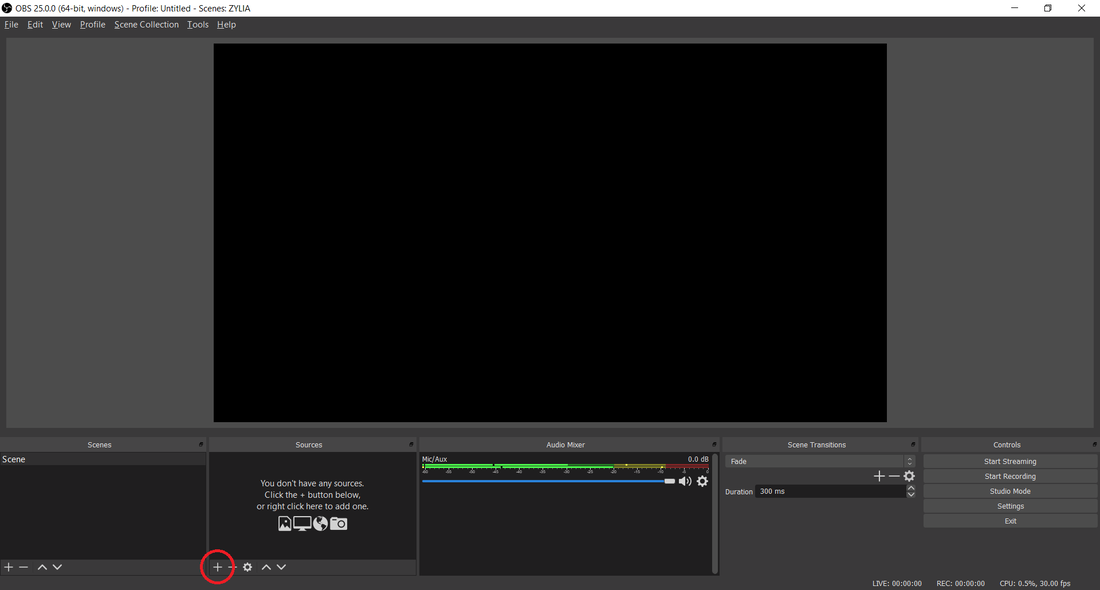 2. Choose Video Capture Device: 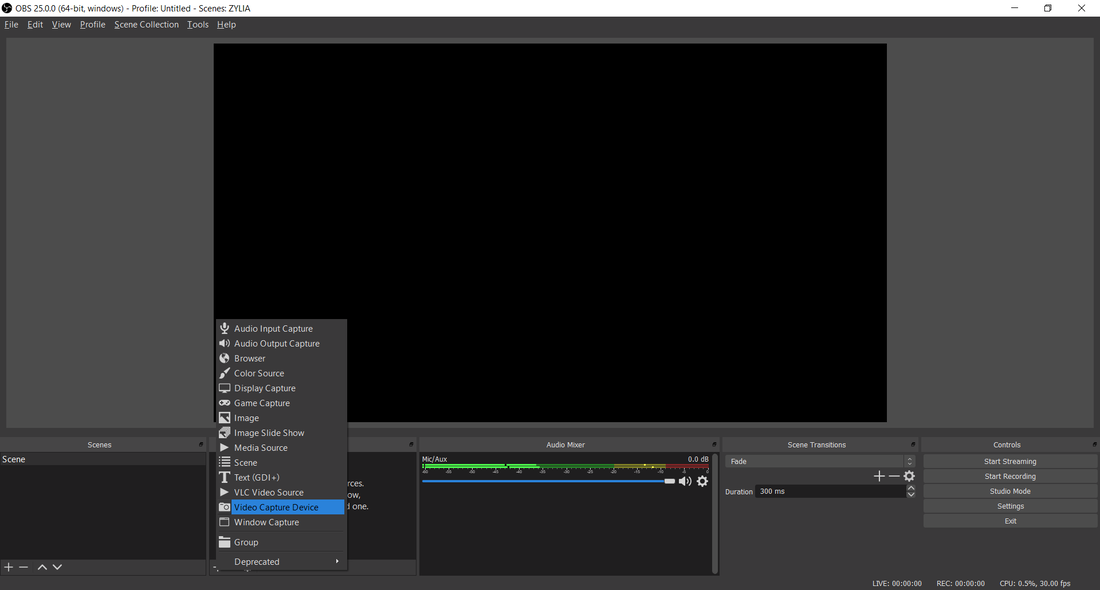 3. Choose the name of your source and click OK. 4. Window with source configuration will open, choose your video device: 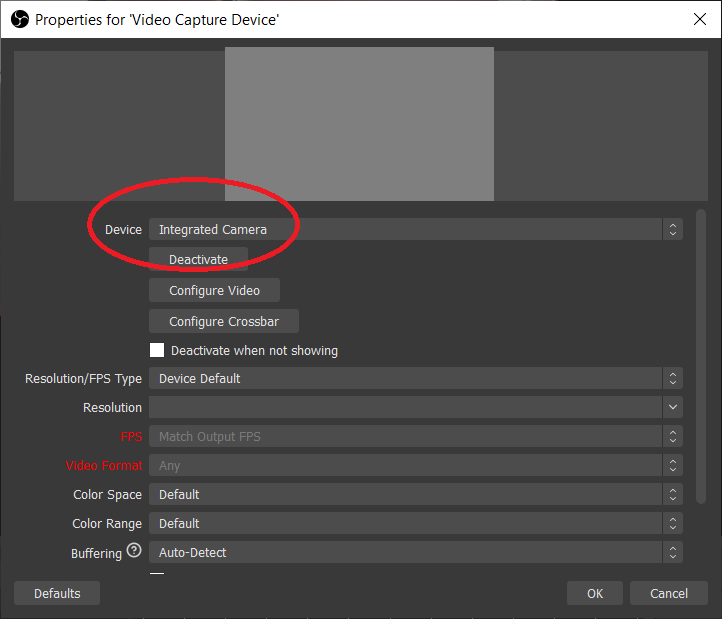 5. If you don’t want to use audio from your camera, mute audio from device: 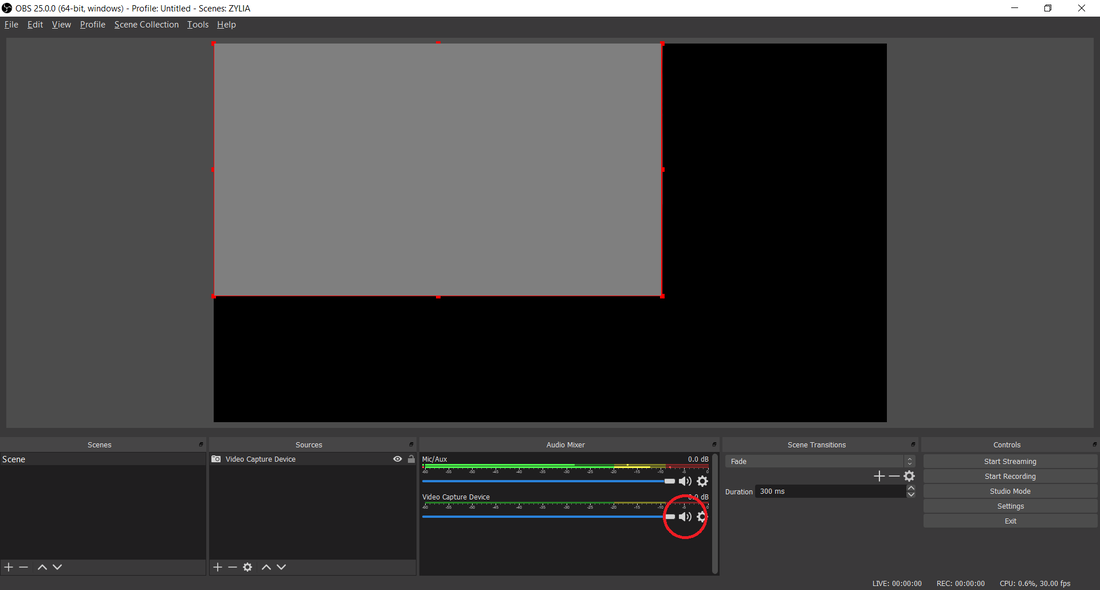 By Pedro Firmino All concerts and gigs are canceled, and you are sitting at home and wondering what to do with your free time, how to show your creative work to the world, stream your concert from your apartment, or just play guitar for others? We have a solution for you! Take the ZYLIA microphone, connect it to your laptop and start streaming your home concert or solo session to the world. #stayhome #stayathome #homerecording #stream #music #concert #twitch #Facebook #youtube #streaming #OBS #reastream #audio After using your DAW to send the signal using ReaStream plugin you will have to configure OBS to receive the signal from your ZM-1. Step 1 Open Audio settings in OBS. In the Desktop Audio choose your output device. In this case Speakers. Confirm with OK. Step 2 With Desktop Audio added, click on the cog Icon and select Filters. Step 3 In the + Icon add a new VST 2x Plug-in: Choose ReaJs (it is included in the ReaPlugs vst pack). 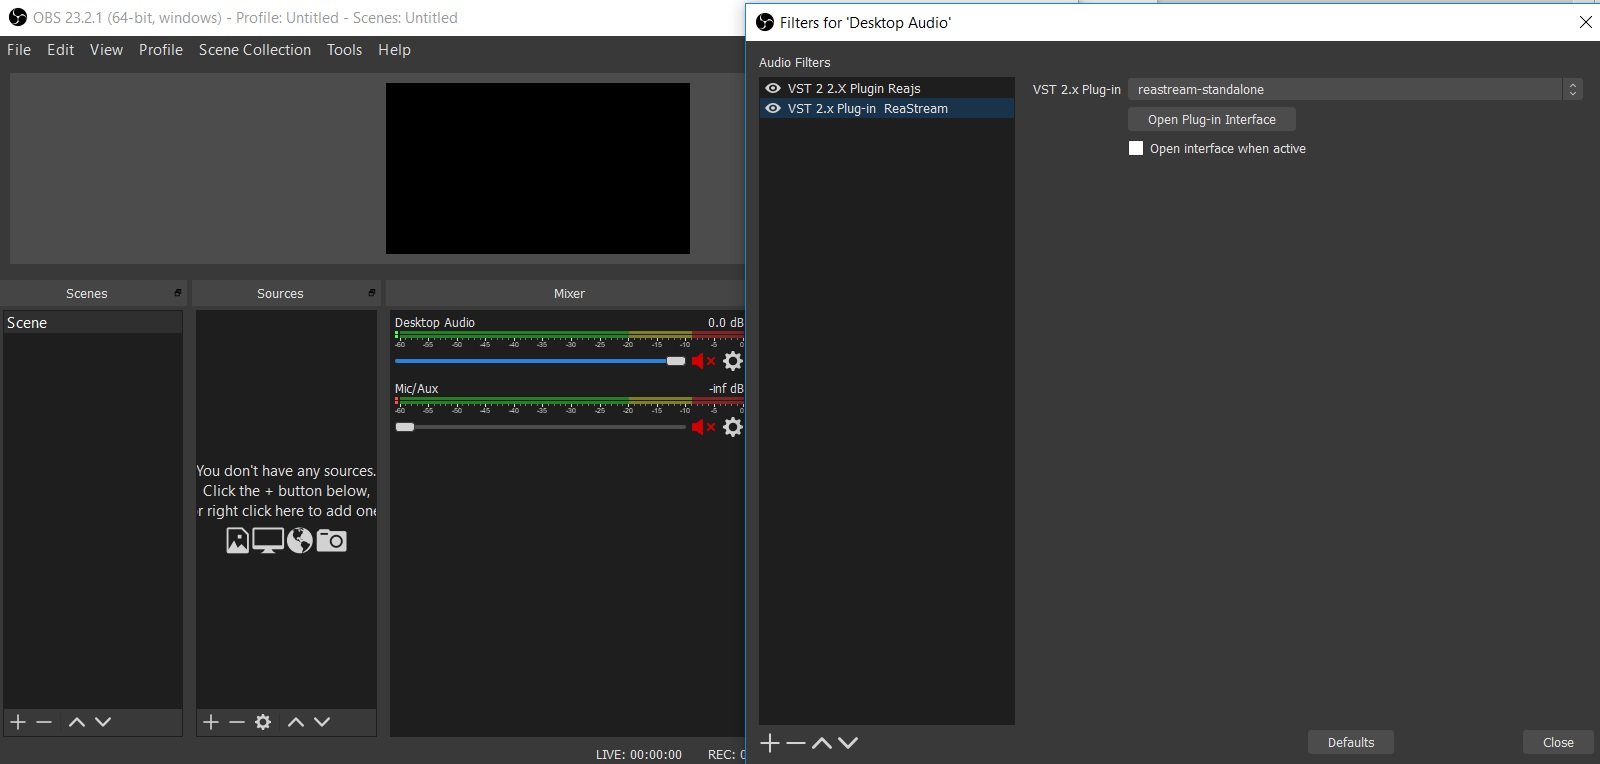 Step 4
Click the Open plugin interface, click Load – Utility – Volume. Set the volume to the lowest. Step 5 On the Filters window, also add ReaStream-standalone plugin. Open the Plug-in Interface and select to receive. Make sure the identifier is the same as in the Reaper session. You will now be using the ZM-1 as an input audio device and are ready to start streaming! by Tomek Ciotucha All concerts and gigs are canceled, and you are sitting at home and wondering what to do with your free time, how to show your creative work to the world, stream your concert from your apartment, or just play guitar for others? We have a solution for you! Take the ZYLIA microphone, connect it to your laptop and start streaming your home concert or solo session to the world. #stayhome #stayathome #homerecording #stream #music #concert #twitch #zylia #youtube #facebook #streaming #jackpilot #loopback Here is a step-by-step instruction on how to stream 2-channel audio on Mac:
The “Preferences” window should show up when you open the app for the first time. If not, open it by clicking on the JackPilot/Preferences in the upper right corner. In the Preferences window choose Zylia microphone array as an Input Device. Then set the Sample Rate to 48000 and leave everything else untouched. Click save.
“Connections Manager” window should appear. 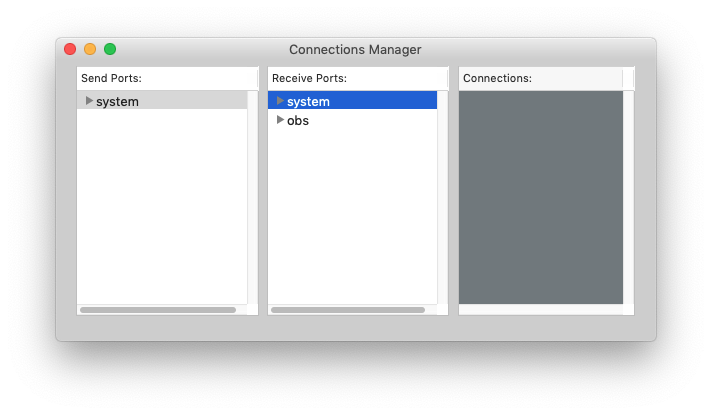 In the Connections Manager window click on the two triangles highlighted in the image below. The Send Ports/System list shows the input channels from Zylia, and the Receive Ports/obs is the receiving broadcasting software, in this case OBS. If you are using a different software, it should appear on the Receive Ports list. Remember, that first you have to choose JackRouter as an Input Device in your broadcasting software for it to show up in the Receive Ports list in JackPilot. 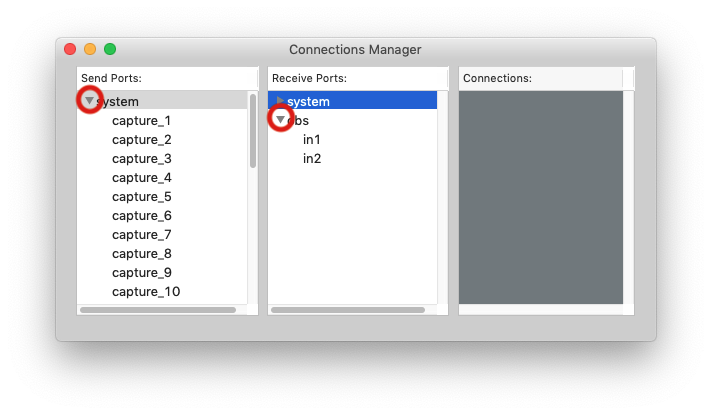 Then, click on the “capture_5” item on the “Send Ports” list. 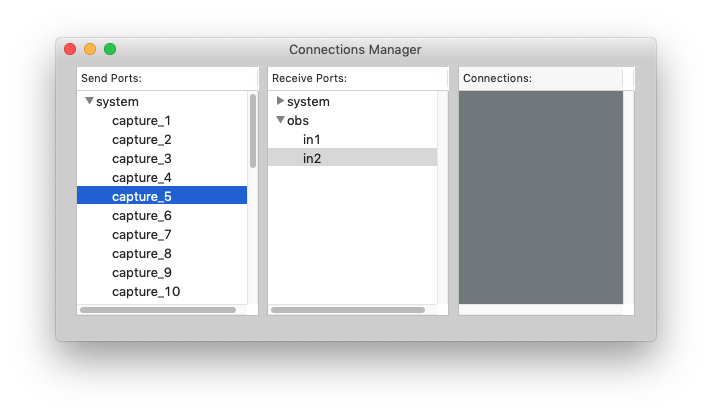 With the “capture_5” item selected, double click on the “in1” item on the “Receive Ports” list. It should change the colour to red. This means, that channel 5 from Zylia is routed to input 1 in OBS. 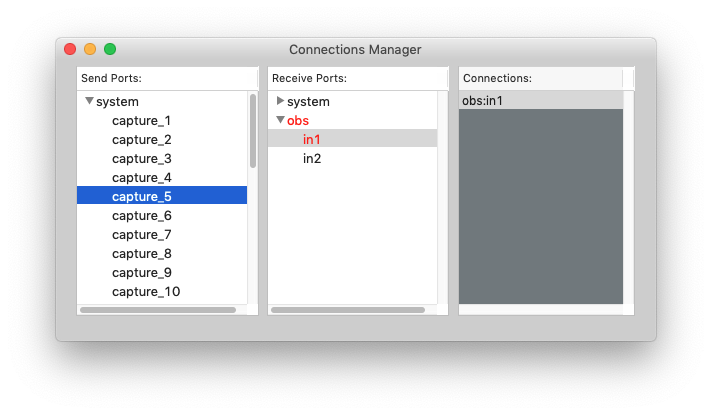 Now do the same with “capture_8” and “in2”, to connect channel 8 with the input 2. 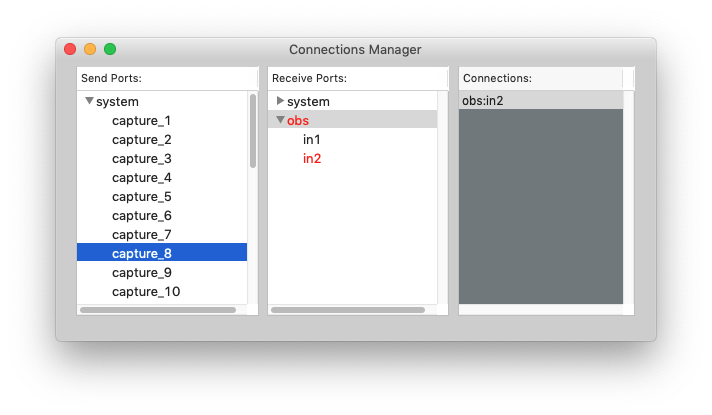
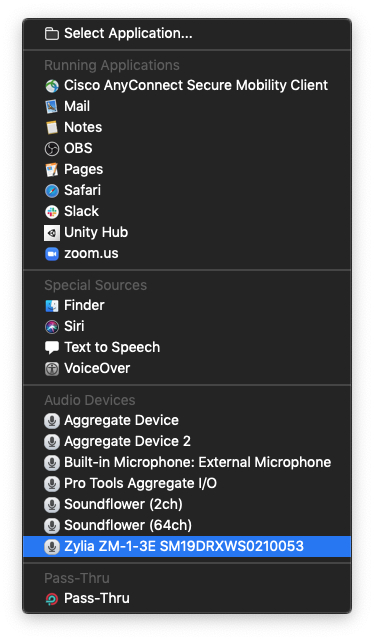
In the free trial, audio degrades after 20 minutes. To download the software use the link below: https://rogueamoeba.com/loopback/ After installation and opening Loopback on your computer, this screen should show up: 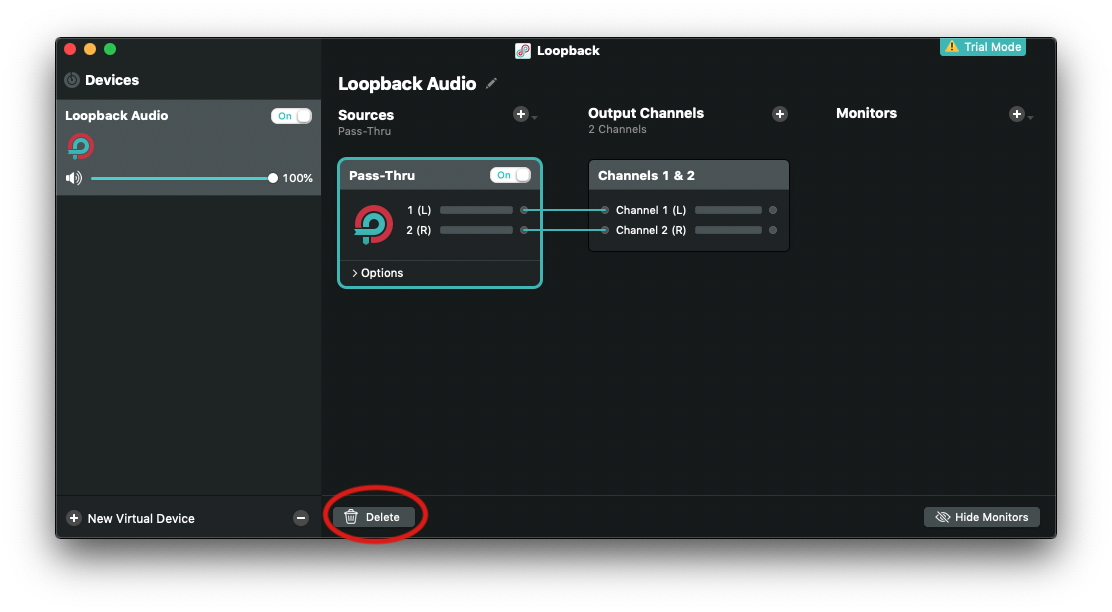 First, select the “Pass-Thru” in the “Sources” section and delete it by clicking on the button at the bottom of the window or by pressing cmd + backspace. Make sure that you have plugged in your ZYLIA microphone array before next step. 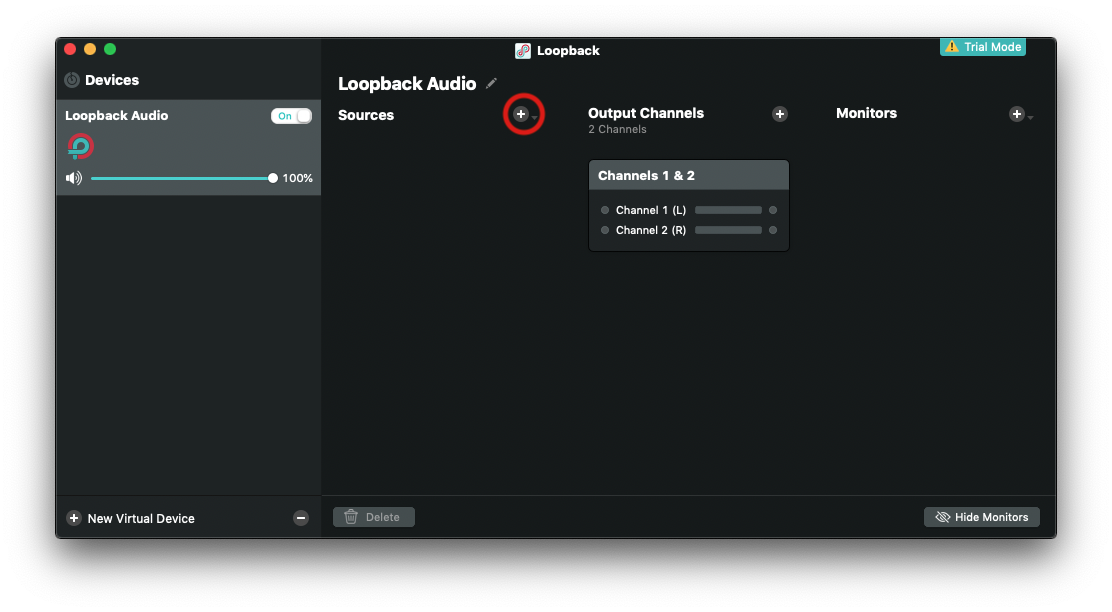
The inputs from the ZYLIA microphone array should appear in the “Sources” section. First, you have to delete the current connections, by clicking on the “cables” (highlighted by the red circle in the image below) and then pressing the delete button on the bottom of the screen or by pressing cmd + backspace. 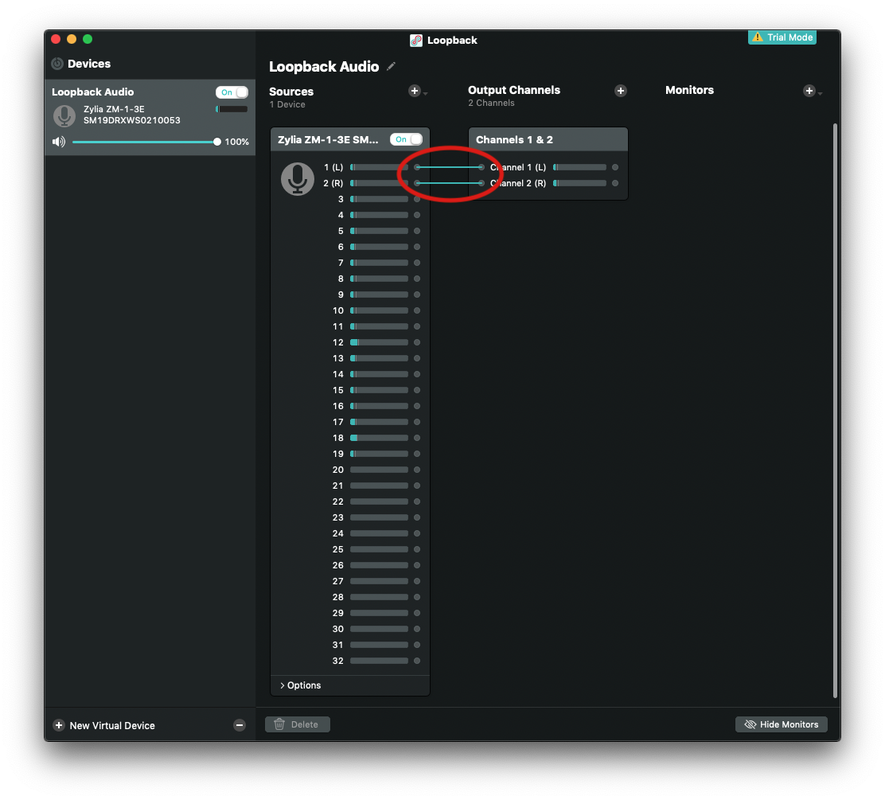 Then connect the 5th and 8th channel in the “Sources” section to the “Channel 1 (L)” and “Channel 2 (R)” respectively in the “Output Channels” section. 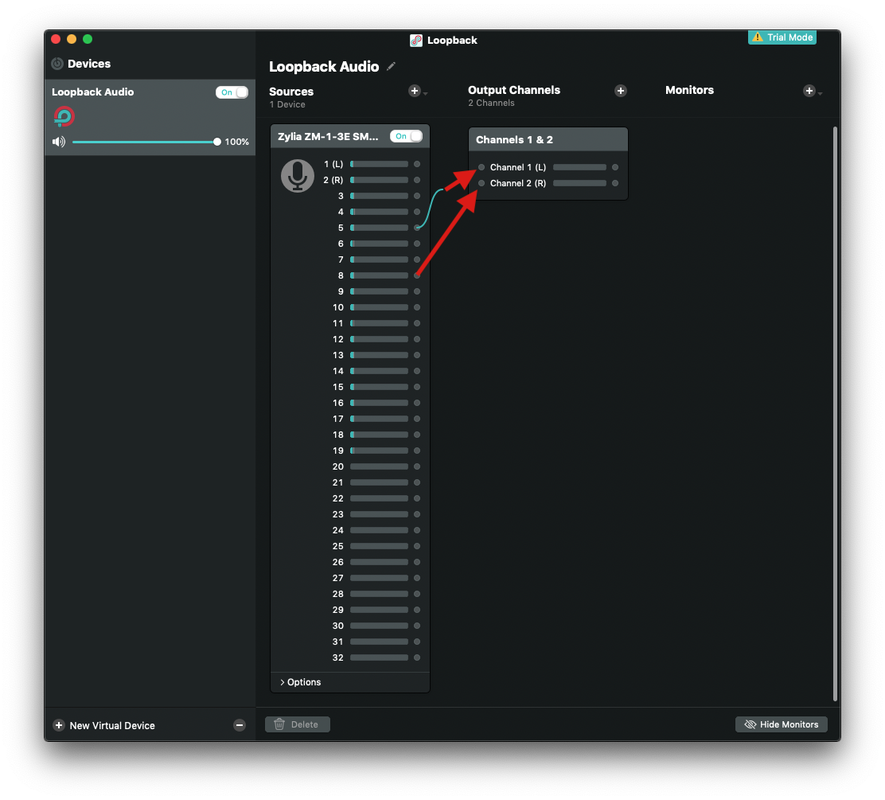 Now, that all the routing settings are prepared, you can change the name of the virtual device, so it will be easy to find in your broadcasting software. 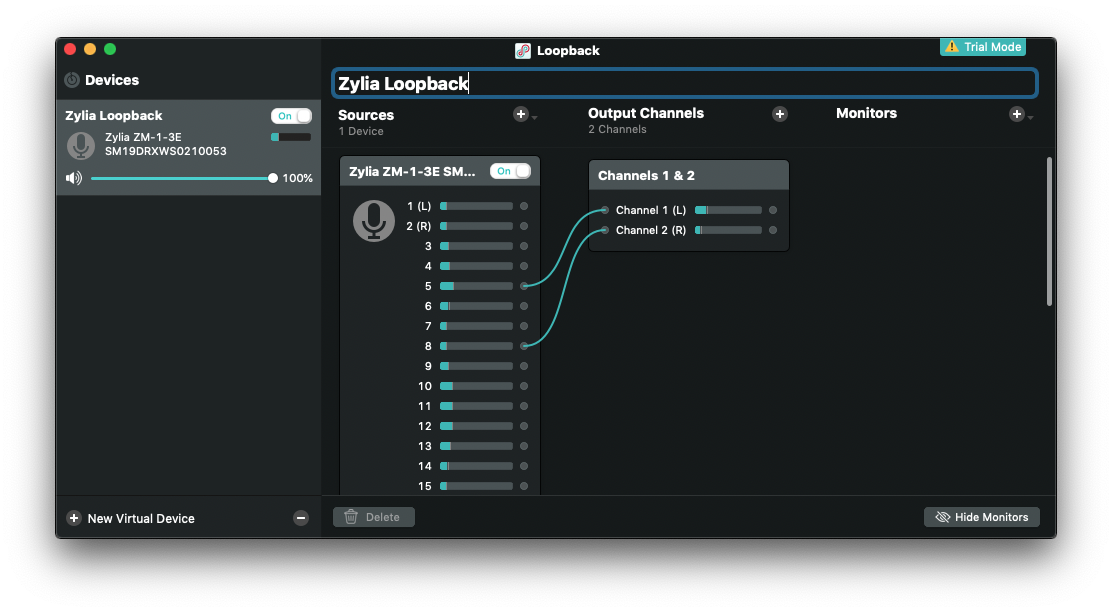 |
Categories
All
Archives
August 2023
|


 RSS Feed
|
|
Connect with us |
|
© Zylia Sp. z o.o., copyright 2018. ALL RIGHTS RESERVED.
|